Foodborne illnesses and allergies are common problems that affect many Americans. The CDC estimates that Americans acquire roughly 9.4 million food related illnesses each year, and more than 19 million people were diagnosed with allergies in 2017 alone. Between one and three percent of beef may contain toxic strains of E. coli, which sicken as many as 265,000 Americans each year. Fortunately, the high temperatures involved with smoking meats can help protect your family from E. coli infection. Since the kitchen is a haven for germs and irritants that can make you and your family sick, knowing how to maintain a safe kitchen with a sanitary environment can make the difference between a healthy family and one who becomes ill frequently.
Eliminating Mold for a Safe Kitchen
Although mold doesn’t grow quite as readily in the kitchen as it might in the bathroom, without proper attention, your kitchen can become an ideal home for types of mold that could be aggravating or even causing allergies in the younger members of your family. The heat and humidity that is the result of cooking in a kitchen provides an optimum environment for mold. Kitchen sink leaks may also lead to the development of mold if left undetected as well as garbage cans and disposals. Turning on kitchen fans and opening windows in the kitchen and in the whole house will lower the level of humidity in the kitchen while also allowing fresh air to enter. If you live in a humid climate, purchasing a dehumidifier will be the best bet for preventing humidity related mold growth. Checking for leaks regularly, as well as keeping your kitchen environment clean, including the regular sanitation of cupboards and drawers will also help to eliminate mold growth in the kitchen.
Safe Kitchen- Preventing Food borne Illnesses
Another common way that an unclean kitchen can lead to illness is through foodborne illnesses, due to incorrect preparation or spoiled food. Proper handling of foods, particularly raw meat, can prevent your family from making that list. Smoking meat and other delicious foods can have rewarding results, but if food is not handled properly, unfortunate consequences may result. Washing hands for 20 seconds with warm, soapy water both before and after preparing food is the first line of defense against foodborne illness. Washing hands immediately after coming into contact with raw meat, as well as any surfaces the meat might have touched with hot, soapy water will help you have peace of mind that your meal will not make you sick. Proper food handling, like cooking meat to the correct temperature, will allow you to fully enjoy a delicious steak, possibly smoked with hickory chips.
Making sure to create a clean and safe environment, free from mold, germs and various contaminants, will allow your family to maintain the high levels of health we all strive for. Be sure to always follow proper food safety guidelines, and check for mold regularly, as not doing so could negatively affect your family.
More related reading on smoking & Grilling tips and technique see our directory on previous blogs!
Your BBQ shoes for safety is as important as comfort!
“Wear heat resistant footwear!” how to protect your feet around hot embers!
I remember a particular year, I believe it was 2007, when my Culinary Events Crew traveled to 29 of the 50 states in the US and 4 provinces of Canada. I felt like I never slept in my own bed and constantly was repacking the suitcase with clothing suitable for the area we would be traveling to.
That was the year I lost my favorite lace up/zipper ankle boots to the fire.
Not literally burning in a fire but from repeated exposure to hot, stray coals that are common when you engage in wood fired cooking. I was constantly stepping on these stray embers and this consistency lead to me putting more than one hole in my favorite boots.
It was a lesson well learned and one I want to pass on to you to bring home the point for heat resistant footwear!
Don’t Be Surprised
Just as your educated that the standard oven mitt won’t cut it when your dealing with excessive heat levels in metal equipment commonly used for wood fired cooking, the same holds true for your footwear. When working around chimney starters that spit and shoot hot sparks of scalding coals and water pans that hold 212°F water, flip flops are not the ideal choice in footwear. Unlike the professional kitchen where Chef’s clogs are the ideal to prevent slips and falls on the constantly wet floors as well as to keep your tootsies comfortable when on your feet 15 hours a day, cooking with fire takes some thought for heat resistant footwear practicality.
That led me to look at options in footwear designed for safety, specifically fire safety.
indestructible shoes
Indestructible® Shoes- Heat Resistant Footwear
We run a factory operation at SmokinLicious®, which means we have strict policy when it comes to personal protective equipment or PPE. That includes policy on heat resistant footwear that also specifies the need for steel toed footwear.
Over the course of a decade, safety footwear has seen a metamorphosis in style, comfort level, and level of protection. Gone are the days of limited color options and welcome the new days of vibrant patterns and even height options on the boot cuff. I was particularly intrigued with a relatively new shoe on the market called the Indestructible® Shoes.
Not only are the shoes stylish, but they offer features many other work shoes can’t match. Like the steel toed cap that cannot be penetrated by nails, saw blades, and weight (see the very impressive videos on these tests). With a shockproof midsole, these are also a work shoe that can be worn for hours.
But given that we work around a lot of extremely hot fires that emit stray coals, we wanted to ensure that the anti-slip rubber soles would not only protect you from slips but also from the penetrating heat of hot coals and embers. That led us to conduct our own tolerance testing for the right heat resistant footwear.
The Test for Heat Resistant Footwear
After firing up the charwood production oven and running a full day of production, we removed hot embers from the oven that had a heat temperature of nearly 1000°F. Our controlled testing included establishing a coal bed within an aluminum foil pan since aluminum is a great medium for radiating heat. We also elected to test the shoe without weight bearing so note that we cannot speak on this parameter, merely the shoes’ outer sole tested on high heat without weighted pressure from a wearer.
There were three levels of testing: 30 seconds, 60 seconds, and 90 seconds which in our opinion, simulated the length of time a person would stand stationary at a high fire or cooker. Following each test, the shoe was placed in snow with an ambient temperature of 30°F. We also alternated shoes between tests to ensure no carryover temperature of significance factored in to the stability of each test level.
963 degrees F of heatShoe on the hot embersTime for resting on the hot embers- 30, 60, 90 secondsSole inspection post resting on hot embersShoe sole resting in the snow to provide the cool down for our experimentTemperature of sole post cool down
Results- Heat Resistant Footwear
At all three test levels, the Indestructible® Shoes performed brilliantly. Although there is an obvious odor of the heated rubber, it is not considered excessively dangerous. Keep in mind, the thermodynamics of heating rubber results in the rubber shrinking not expanding with heat like other materials. This is due to the molecules of the rubber becoming disordered unlike when they are at a normal temperature which results in the molecules becoming less disordered (i.e. entropy/isothermal).
There was minimal discoloration to the lightest coloring of the rubber sole which is a reaction of the rubber’s cells and the carbon in the combusted material.
Overall the Indestructible® Shoes proved to be a great option for those who work with live fire and hot coals for cooking. Between the steel-toe and the thick rubber outer sole, as well the shock-proof inner sole, these are an option in footwear for the barbecue and live-fire cooking enthusiast, whether amateur or professional, in protective heat resistant footwear that is comfortable, long-wearing and fashionable.
You can find the Indestructible® Shoes at: https://indestructibleshoes.com/
What is your favorite footwear when you barbecue? Leave us a comment to share your views. Bringing you informative recipes, techniques, and the science beyond the fire, smoke, and flavor. That’s SmokinLicious®!
More related reading on how Smokinlicious® is committed to reducing risks in all aspects of wood cooking including and beyond pitching for heat resistant footwear.
I had an opportunity to visit an original historic smokehouse in Hopewell, NJ that is beyond impressive. Knowing that this structure likely dates to the late 1700’s, I was most impressed with how the structure maintained itself over the years and how this piece of history has remained functionally intact.
Let me provide a brief history on these fascinating structures as well as share some images of the Hopewell, NJ structure.
A Necessity to Farm Life
If you were a farm in New Jersey like many New England states, a smokehouse was a necessity. Pigs were commonly raised during the 17th century and butchered in the month of December in order to be able to slaughter and preserve the meat through use of a smokehouse also called smoak house or meat house.
From earliest times, a smokehouse was a small enclosed shelter, where a fire could be kept smoldering for weeks, which slowly released its smoke to the hanging meat that was hung to keep it safe from vermin and thieves.
Smoke has long been known to contain compounds that act as preservatives. Phenol and other phenolic compounds in wood smoke are both antioxidants which slow rancidification of animal fats, and antimicrobials, which slow bacterial growth. Antimicrobials in wood smoke include formaldehyde, acetic acid, and other organic acids, which give wood smoke a low pH.
Although the process of smoking the meat could take days of preparation, generally the fresh cuts of meat were packed in tubs of coarse salt for about six weeks while the salt drew most of the water from the flesh. Then the salted meats were hung in the smokehouse that contained a small fire which smoldered for one to two weeks. The result was dried, long-lasting, smoke-flavored meat that would age in these historic smokehouses for up to two years before being consumed.
The Hopewell Historic Smokehouse
With its original mortar and stone, this Hopewell, NJ smokehouse is a real gem!
Estimated to date in the late 1700’s, this was used for both storing and smoking meats, as evidence by the original steel hanging system. You can clearly see the venting chamber which acts as the outtake while circular holes present air intake. These were so well made that despite minor ground shifting, they are still as strong as ever.
This structure contains stacks of original bricks which were found in the house and subsequently moved to this location. The house still contains the original, super large stone fireplace that served as the wood fire cooking area and heat generator for the home.
Without question, these early smokehouses are an opportunity to view just what living was like before refrigeration and other luxuries of our current society. I’m constantly keeping me eyes toward the fields and yards of historic areas in search of these hidden gems that started us on our hunger for smoked foods.
Is there a historic smokehouse near you? Leave us a comment to share your views. Bringing you informative recipes, techniques, and the science beyond the fire, smoke, and flavor. That’s SmokinLicious®!
With the Centers for Disease Control and Prevention reporting some 48,000 cases of food borne illness events each year, resulting in some 128,000 hospitalizations and 3,000 deaths, food borne illness outbreaks often generated from microbial bacteria is a serious concern. This is an added stress to manufacturing facilities that produce smoked food products as they must adhere to multiple regulations regarding the raw food product, smoke process and final smoked food product. The last thing a facility needs is to worry about the wood material used in the smoking process but that should be a priority for these facilities. Why?
Escherichia coli, Listeria monocytogenes, Salmonella enteritidis, Saccharomyces cerevisiae, Lactobacillus plantarum, Pseudomonas fluorescens, and Aspergillus flavus have all been shown to survive on plastic material meaning that if a supplier utilizes the standard GMA pallet commonly found in the grocery industry, these microbial bacteria or viruses survive and can flourish increasing the risk that they can be introduced to new food product placed on these recycled plastic pallets.
Microbial Bacteria- Hosts of Contamination
With the recent outbreaks affecting romaine lettuce (from E. coli) and beef (from salmonella), attention is being drawn to other potential hosts for the transfer of the bacteria. We know the common hosts: unsanitary conditions at a farm or packaging facility, food handlers failing to employ personal hygiene standards prior to working with food, food exposed to climate conditions that stimulate the bacteria development. One potential host that has not been fully publicized is the packaging materials used to transport. Unfortunately, it is the lack of enforcement in this area that puts the smokehouse industry at further risk.
Raw Material Transport
Many smokehouse operations purchase wood product for the smoke infusion from companies that supply the wood chip in paper bags that are then stacked on wooden or plastic GMA pallets. Although some of these suppliers may be able to attest that the wood chips have been kiln dried or heat treated to a certain temperature, none confirm to a heat level that would kill all the bacteria previously listed. Specifically, listeria, which requires a temperature of 74 °C/165.2 °F to be killed, is a key concern in smokehouse operations that include meat, poultry and fish products.
The risk is elevated by the potential for these bags to be penetrated by a stray nail from a wood pallet or sharp edge of a plastic pallet. If the pallet contains the bacteria, it is a host that can transmit to anything it has contact with.
Decreasing Your Risk of Microbial Bacteria
In previous testing of wood pallets, one or more of salmonella, E. coli, and listeria were found to be present in as much as 6.8 million spores/gram which is classified as an extremely high count. Given that domestically, there is no requirement for wood pallets to be heat treated for movement between states, the contamination can be passed to multiple locations with food when the pallet remains in the transportation system.
Although there have been efforts to change the transport of food by road and rail through the Food Safety Modernization Act (FSMA), to date nothing has been regulated on the packaging materials that the food is placed on.
One encouraging finding is that cardboard materials, if correctly stored, reduce the potential for cross-contamination of food due to a quicker viability loss by spoilage and pathogenic microorganisms compared to the plastic packaging. For this reason, SmokinLicious® only packages our smokehouse wood chip products in cardboard packaging that is then placed on a pallet that has been heat treated to an internal core temperature of 75°C/167°F and holds this minimum temperature for 75 minutes. We adhere to a higher heat treatment standard as the health and safety of everyone using our culinary products is of highest importance. We believe that hardwood used for cooking should be regulated independently and adhere to stricter standards than those currently in place for the general wood industry. Until that regulation is written and enforced, SmokinLicious® will self-regulate our product to this level.
At SmokinLicious®, we believe in Quality and Safety over profit! Isn’t it time your smokehouse joins us and takes a proactive stand against microbial bacteria like listeria, salmonella, and E. coli and help in the fight to rid our foods of life-threatening bacteria.
What is your biggest concern in your smokehouse food operation? Leave us a comment to share your views. Bringing you informative recipes, techniques, and the science beyond the fire, smoke, and flavor. That’s SmokinLicious®!
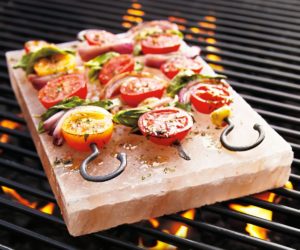
Himalayan Salt Blocks used for grilling! – #himalayansaltblock
Himalayan Salt Blocks: Benefits, Uses, and Tips
Jeffrey Lewis (Bio)
Hey there, friends! I’m Jeffrey. I’m a blogger at Ittefaq Salt. Thank you for joining me, as I share different aspects of my life. I’m so thrilled you stopped by! I love to create a beautiful, thriving life around me and helping others to do the same. I love writing about nature, health, food and nutrition-related topics.
You must be aware of the importance of salt for our body. It is required for the proper functioning of many body functions. But have you ever heard about using Himalayan salt blocks for cooking? Well, this is becoming a trend among those who want to add a wow factor to their cooking. The idea of cooking on these salt blocks is itself very fascinating. But there are more benefits that you can get from these incredible salt blocks as well.
Keep on reading to know more about these amazing salt blocks.
What Are Himalayan Salt Blocks?
As the name suggests, these are the big Himalayan salt slabs that are hand mined from Khewra salt mines in Pakistan. These are hand carved into different sizes and thickness. Click here to know more about these salt blocks.
These salt blocks are made of pink hued Himalayan salt crystals that are locked up in mountains for over 250 million years. This salt is unrefined, unprocessed and free from contaminations. This is to be the purest salt due to the extreme pressure that it has experienced over a long period of time.
Himalayan salt provides a number of health related benefits due to which it is being widely used as an alternative to regular table salt. It contains 84 minerals that fulfill our body’s mineral requirement. It is said to be helpful in maintaining the body’s pH level, regulating blood pressure and reducing water retention.
So, these Himalayan salt blocks have all the goodness of this salt.
Benefits:
These salt blocks are heat resistant and can hold temperature for a long time which makes them really useful. These are good for both high and low temperature and can be used for cooking and chilling the food.
Cooking on a salt block means you are adding flavor along with 84 minerals of Himalayan salt to your food.
Salt blocks have moisture retention and low absorbency properties which make them anti-bacterial. Because of this, these blocks are an amazing choice for serving and presenting food.
#saltblocks
Uses:
Himalayan salt blocks are so versatile in their usage due to their tendency of temperature. These blocks are hand carved into different sizes so that they can be used for various purposes.
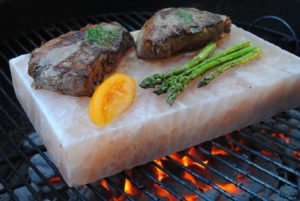
You can cook and grill different kinds of food on these blocks such as meat, vegetables etc. This will make your grilling more fun and exciting. It not only gives a very subtle saltiness to your food but also imparts minerals to the food.
Salt blocks can also be used for curing of some food items such as salmon fish. It will increase the shelf life of the fish.
Due to its ability to hold temperature for a long time it can also be used for chilling the food.
Another amazing use of this block is to use it for serving a variety of foods. It will make the food more presentable.
#Himalayansalt
Tips for Using Salt Blocks:
First of all, you need to choose the salt block that has right size and thickness according to your need.
Salt block needs to be tempered before using it for the first time. For this, you need to heat it slowly at a low temperature in an oven, then increase the temperature gradually until you reach 500°C. After that, cool it down to room temperature. This process will improve the cooking surface and strength.
If you want to use it for cooking, you always need to pre-heat it. It will make cooking and grilling easy.
It is also very easy to maintain and clean a salt block. After using it, cool it down and wipe with any damp cloth. Then let it air dry and store in a cool and dry place.
Himalayan salt blocks are not just pretty with their pink hues but also add flavor and nutritional value to the food along with so many other uses. These all natural blocks are a must have cooking tool in any kitchen to add uniqueness and creativity to the cooking. These will not only add to the beauty of your kitchen but also a unique and creative way to cook the food. So, next time if you want to impress your guests, grill and serve food on these blocks.
You are what you eat. We discuss the double standards of smokehouse processing emphasizing high quality ingredients but less than quality smoking methodology.
Food & Smokehouse Processing Double Standard?
Self-disclosure here. I work for a USA cooking and smoking wood company that has earned recognition for its commitment to manufacturing quality products specifically suited for many culinary professions, trades and interests. Even though not required to do so, the company treats its entire product line as food additives. This is an important point for my following observations.
I’ve always been especially impressed how reputable food processors and manufacturers accept, follow and even exceed many of the numerous public regulations in place to provide consumers with safe and healthy food products. For the most part our nation’s food industry operates from a philosophy that maximizes consumer protection by prioritizing food safety. Clearly, we’d be in a world of hurt if it didn’t! In relation what I’ve come to understand with food involved with some smokehouse processing operations, I’m really confused.
Smokehouse Processing? Here’s my dilemma- A Double Standard?
Recently, I tuned into a very popular realty television program which showcases “dirty” jobs- I think you know the name. Maybe you’ve even seen it. Like most other episodes, this show highlighted a series of tough job tasks, performed by hardworking employees. This episode dealt with all food processing elements of a very high quality, perishable specialty deli meat item- Lebanon bologna.
It’s impressing that the company, for over 100 years, goes to great heights in sourcing only the best ingredients. Its processing methods seemed to be top notch. Except a few of the techniques shown in the latter stages of the show highlighting smokehouse operations. At first it was disturbing to see that the main source of smoking wood is wood slabs with bark on considered to be “mill waste material.” If that wasn’t enough, I couldn’t believe when a worker demonstrated their process of generating smoke in the smokehouses. Step #1- douse a rag with kerosene, light it and kick it in to the burn pit of the smokehouse. To me, the very defining aspect of this company’s high-quality food product, smoked bologna, has been denigrated with a cheap, uncleaned and potentially harmful fuel source and an ignition process that is archaic and potentially harmful.
For the life of me, I can’t truly understand why a company that has been in business since 1902 and is apparently known in large markets for having the very best ingredients to make its consumable food products would revert to a smoking operation that involves waste wood being ignited with nearly the same petrochemicals that fuel the likes of a diesel locomotive? Given the residuals of burnt petrochemicals, I’m not sure I’d ever want to eat any of their smoked deli meats.
You Are What You Eat
So, I guess the adage of you are what you eat apparently doesn’t have the same meaning with this company. It appears their smoking method hasn’t evolved much beyond the same dirty way done 100 years ago, before health risks came to the forefront. When considering that smoking methods are a big part of their overall food products, I can’t help but think that a double standard is in place with the consumer to suffer.
I love the idea of making your own dry rubs for a variety of reasons, but primarily to allow the cook to control the amount of salt and sugar, two ingredients that are in high ratios for many jarred rubs.
This guide is intended to provide tips to achieve a balance of flavors in the ingredients selected. I’m also going to provide listings of ideal ingredients for specific proteins to help stimulate your creative juices.
Dry Rubs Made Easy- Percentage of Water
Before we begin with the actual ingredients for dry rubs , let’s discuss the composition of meat and poultry and why you need to be aware of water content.
Although you may not think of water this way, water is a chemical and it is the dominate one in meat, followed by protein and then fat. For a less active, mature, “fat” animal, water can be 45% of the composition but for a younger, leaner animal it can be as much as 72% moisture. Remember, fat cannot hold water. Texture, color and flavor are affected by the amount of water in the muscle tissue. Water that is retained during forces of pressure and temperature is referred to as “bound water” while water that is lost is called “free water”. You can change the capacity of the muscle to hold the water by disrupting the muscle structure. Examples would be grinding, freezing, chopping, thawing, and salting meat.
Dry Rubs- Salt and Sugar
Hopefully, you are aware of the ingredient rule that states the first few ingredients listed on a nutritional label are the highest percentages of that item. That means, when you see salt and sugar listed in the top three ingredients, note that those dominate the rub .
Research has shown that higher salt content works very well with cuts of beef, fish, and wild game. Pork tends to do well with rubs that contain higher sugar levels. However, I tend to avoid putting salt into my rubs, preferring to add by hand when the food is ready.
Let’s breakdown the types of salt and sugar so you know how to incorporate them.
Table or Refined Salt: a fine grade salt that is made by dissolving in water which removes everything but sodium chloride. These usually have an additive to prevent them from caking in dispensers and may also contain an iodine additive.
Kosher Salt: a coarse grain that may have an anticaking additive, it is slower to dissolve on food surfaces.
Sea Salt: most are refined producing just over 99% sodium chloride but the grain size can vary from brand to brand.
Pickling Salt: contains no iodine or anticaking additive and dissolves well in water making it ideal for brine recipes
Seasoned Salts: a refined salt that contains a flavor ingredient such as garlic, onion, celery
Curing Salts: these should never be used as an ingredient in a rub as they are designed to preserve meats, which means they include nitrite and possibly nitrate.
White Sugar: this is a highly refined cane or beet sugar that can scorch at higher temperatures
Brown Sugar: this is white sugar combined with molasses so it tends to add more flavor
Dry Rubs- Pepper
It’s important to have some level of heat in your rub to balance the sweet and savory ingredients but you need to have a tempered hand to ensure that you don’t add to much. Let’s look at the pepper options:
White Pepper: considered the gentle pepper, it’s light in color and flavor with just a warm heat undertone.
Black Pepper: this can be fine or coarse and has much higher heat level than white and some cayenne peppers.
Cayenne: although I’m listing this separately due to its popularity, cayenne is a chile powder known as ground red pepper, the heat level is front of the line which means you need to add small quantities and taste before adding more.
Chile Pepper: these are the peppers that have a wide variety of heat levels. Common names include: Ancho, Chipotle, Pasilla, New Mexican, Guajillo, Habanero, Jalapeno, Bhut Jolokia, Aji Amarillo.
Our not so smokey Smoked Turkey is from cooking this on the gas grill, not on a smoker. We selected this photo because of the great color- not dark like a traditional smoker can impart!
Turkey is one of those items that is generally made for a special event – Thanksgiving, Christmas, New Year – and not associated with everyday cooking. I’m here to tell you that it’s easy to enjoy turkey any time of year when you use a gas grill for the cooking and smoke infusion. All you need is a turkey (preferably one under 15 lbs.), 6 wood chunks, a water pan with hot water, and your favorite gas grill.
Smoked Turkey- Turkey 101 Prep
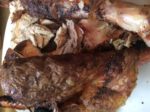
#freshturkey
I’m fortunate to have a local fresh turkey farm, Sprague’s Turkey Farm in Portville, NY, close by so I’ve ordered one that is under 14 lbs. Before preparing the turkey for marinating overnight, I first need to remove the parts that are commonly found inside the turkey. This includes the neck, heart, liver, and gizzard which is part of the turkey’s digestive tract. These parts do make for great stock so if you can, save them to add to a stockpot down the road.
Once the organs and neck are removed, it’s important to wash the entire turkey under running water. After a thorough wash, pat dry with some paper towels and place in a shallow pan for the rub application.
Herb and Spice Rub
#turkeyrub
After washing and patting dry the turkey, I trim the excess skin from the neck area and then begin applying the rub. I’ve combined an assortment of herbs and spices for my rub as I tend to like a potent mix of ingredients to balance the fresh meat and smoke. My rub includes: allspice, clove, basil, cumin, cardamom, coriander, cinnamon, celery salt, garlic and onion powder, oregano, orange and lemon peel, paprika, and ancho chili powder. I make sure to cover the entire surface of the bird. I add a few drops of avocado oil and then apply additional rub. This will be refrigerated overnight to allow the flavors to marry and penetrate to the meat.
Tasting Notes: Feel free to incorporate different herbs and spices in your rub as there are no rules when it comes to combinations.
Smoked Turkey- Smoking on the Gas Grill
#twozonecooking
As you can see in some of the photos, this was a cold day at the grill, with a temperature below 25°F. I prepare my LP/Gas grill by first removing one of the grill grates, exposing two of my burner shields. To one of the shields I place 3 double filet wood chunks from SmokinLicious®. Now I lite only two burners; the one with the wood chunks and the one directly next to that. I set these burners to medium heat to start. Just before I’m ready to grill, I check the temperature readout and adjust my heat setting until I hit my target temperature of 325°F.
Time to add the rubbed turkey to the unlit side of the grill and my water pan right next to the bird. I insert a thermometer and close the lid. Basically, for the next couple of hours, I just need to monitor that the water pan has enough hot water in it and the bird gets spritz with water to keep the skin moist.
Tasting Notes: Although I’ve placed my water pan to the side of my turkey, between the lit and unlit sides of the grill, you can use this as a drip pan and place this directly under the turkey. I elected not to do this today due to my low outdoor temperature.
Time to Serve Your Smoked Turkey!
#turkey
If you’ve maintained the steady temperature of 325°F and hot water in the drip pan, you won’t need to stay with the grill during most of the turkey’s cooking time. My skin has crisped up thanks to maintaining moisture both on the bird’s skin and in the cooker with my water pan. I remove the turkey and take it to the kitchen where I cover it for about 30 minutes prior to carving. It’s super tender, moist, with a crunch to the skin. The best part is that the smoke is subtle and does not over power the fresh meat.
That’s why the two-zone method of smoking is perfect when your feeding a variety of tastes. Those that tend to avoid smoked foods will find this full of flavor that is well balanced due to our rub and consistent cooking temperature. My turkey of 13-1/2 pounds took just about 4 hours to finish with very little effort on my part, even with a 22°F outdoor temperature and wind chill. The best part is my oven was free to cook a bunch of side dishes so everything was timed perfectly for the table.
What’s your favorite preparation for turkey? Bringing innovation to wood fired cooking with recipes, techniques and the science behind the fire, smoke, and flavor. That’s SmokinLicious®.
Dr. Smoke- Everyone forgets about the extra oven almost everyone has- the lp/gas grill! So this year we prepared smoked turkey using the gas grill with wood chunks providing the smoke!
Our drawing of the typical offset food smokers, which come in a variety of sizes! Study our “Match Your Cooker” list for wood use.
For those that have followed us for years, you know we are proud that almost from the start of our Company, we were committed to providing a guide for equipment to cooking wood product match. We refer to our guide affectionately as “Match Your Cooker”.
In this article, we are covering our recommendations for smoker equipment; these are cookers that are dedicated for use as a smoker, usually hot smoking at that. As there are always new equipment lines and models released, our plan is to provide regular updates. We also encourage you to send us a message when you don’t see a manufacturer or model listed so we can add this to our listing.
For now, we introduce you to our wood master’s guide to SmokinLicious®cooking woods for specific smokers.
American Barbecue Systems model: “All Star”, “The Pit-Boss”, “The Bar-Be-Cube”
Backwoods Smoker model: “Party”, “G2 Party”, “The Fatboy”, “G2 Fatboy”, “The Pro Junior”, “The Piglet”, “Piglet Plus”, “The Competition Hog”, “The Pro-Competition Hog”, “The Whole Hog”
Dr. Smoke- When it comes to the performance of your food smokers, we have a ton of helpful info that will make your unit work superbly to flavor food. Feel free to tap into our “Match Your Cooker” wood master’s guide on our website.
Smokinlicious® recommends “must have” gas grill tools
GAS GRILL TOOLS
There is no question that LP/Gas grills have changed tremendously over the past 10 years and now include some features standard that for many years, were options. Then there is the development of dual or multi-fuel options on a grill so you can have one unit that performs as a gas grill, charcoal grill, wood grill, and even electric or pellet grill, all in one unit.
Today, I’m focusing on the standard LP/Gas grill, independent of any other fuel source. This guide will focus on the basic tools that will provide for a better grilling experience and make you more efficient at the grill.
GAS GRILL TOOLS THAT YOU MUST HAVE:
Tool #1
I’m starting with a grill brush since most of us have the habit of thinking about cleaning off the grill grates when we start the grill for cooking, not when we finish. This tool is to ensure clean up the residual food bits and grease left from your previous grilled foods.
Now I’m aware of the controversy over the use of metal bristles but most of these brushes are made well. Simple inspection of the brush bristles each time you use it will allow you to identify if the bristles have come loose and have the potential to be transported to your foods. I prefer a brush with metal bristles, with a long handle to keep my arm away from the heat, as often you want to clean the grill when it’s hot. Remember, most of these brushes are under $10 so think about purchasing one a couple times per season to ensure the bristles stay put.
Tool #2
There are times when the grill grates and lid will become super coated in grease and pieces of food. You’ll need to break out the cleaning agents to ensure these surfaces are ready to go for the next grilling event. Two of my favorites are CLR BBQ Grill Cleaner and Mr. Clean MagicEraser. As a non-toxic, non-flammable, biodegradable product, CLR BBQ Grill Cleaner is not something you have to leave on for hours at a time. It quickly breaks through the issues and allows you to wipe clean to an almost new state. Keep in mind, the CLR brand also makes a stainless steel cleaner for the outside as well.
Tool #3
Long-handled tongs. Your standard tong length for the traditional kitchen just won’t work at the grill, as you need to keep some arm distance from the hot grill surfaces. I like the 20-inch length with silicone grips as well as silicone tips, as silicone can tolerate extremely high heat. If you grill multiple food items at the same time, think about purchasing tongs with different colored tips and/or handles as that will ensure use of one color for a specific food so there’s no transfer of flavors.
Tool #4
Like the tongs, a must have is long-handled spatula for those food items that need to be flipped. I prefer one that is made of solid steel and has a bit of a beveling to the edge. Again, the longer the handle the better for keeping away from high heat.
Tool #5
An easy to read, digital thermometer. It is a must when you grill or smoke. Look for one that has a longer probe for when your grilling larger roasts and thicker cuts of meats and poultry. Be sure the readout is easy to see and if you grill a lot at night, get one that has a back-lite to see more clearly. If you cook a lot of different animal proteins at the same time, try to have a thermometer dedicated to each food so you don’t cross-contaminate while bacteria may still be an issue. There are assorted colors available making it easy to dedicate one to red meat, pork, poultry, and fish. Most of the digital thermometers on the market today are under $18 with even more under $10.
Tool #6
If you’ve always been a person that cooks directly on the grill grates and only does the standard fare – hamburgers, sausage, chicken, perhaps ribs – you need to get out of that rut and learn to do more with your grill. Start by investing in one piece of quality cast iron. Able to withstand intense heat, cast iron can take you from the average griller to someone with skill. Now, you can enjoy recipes normally done on the indoor stove outside in the fresh air, with your cast iron skillet. Remember, there’s a whole line of cast iron cookware so as you expand your skills, you can add to your outdoor cookware.
Tool #7
Although I am a fan of the standard steam table disposable foil pan, any size, shape foil pan will do. These are perfect for use as a drip pan to prevent render juices from spiking flames and as water pans for a two-zone cooking set up. I won’t deny, that I also use these to cook in especially fragile items like fruit and specific vegetables. You certainly can invest in a grill pan but clean up becomes a snap with the disposable pan.
Tool #8
Although the smoker box was originally intended for use with wood chips on the grill, I always use small wood chunks in mine. I prefer a box made from high-grade stainless steel and one that has a hinged lid. My smoker box holds three Double Filet Wood Chunks from SmokinLicious® perfectly and provides for extended smoke vapor as compared with wood chips. Used directly on the grill grate or set under the grill grate on the heat shield, it produces smoke for hours. Although you can place wood chunks directly on the heat shields, as I’m known to do myself sometimes, they will become permanently marked from the wood ash and eventually need replacing. The smoker box allows you to avoid this.
There you have it! My TOP TOOLSNEEDED FOR GAS GRILLING for better results and help in extending the life of your investment!
We all love the time of year when we can abandon the indoor kitchen and head out to the grill for open air breathing, relaxing, and some great food. For those of you who are new to outdoor grilling or who may need a refresher, we are giving you our top TIPS FOR GRILLING SAFETY so there’s no chance your summer grilling season is remembered for another reason.
Tip #1
You probably wondered why about 15 years ago, outdoor kitchens became all the rage. The real purpose in having an area designated for outdoor cooking took hold when people realized these structures were highly durable and allowed for measures to be in place to ensure rogue hot coals from charcoal fires or excessive heat from gas grills didn’t ignite the surrounding structures like the house and garage. If you can’t afford a full outdoor kitchen layout, at least follow some of the basic ideas: set the cooking area a distance away from any building and preferably on a fire-proof surface like concrete, that is safely away from trees and grass.
Tip #2
Keep your grill clean. Whether it’s propane, natural gas, electric or charcoal, all grills need periodic cleaning to keep them performing optimally as well as to prevent those surprise grease fires. Any grill can have a grease fire! Clean the drip pan, grease pan, lid, walls and grilling grates. In addition to the safety need, this will give you the longest life out of the grills parts. If you grill a lot in a single season, then clean the equipment more than just at the start and end of the season.
Tip #3
Don’t use lighter fluid. This is a chemical designed to give quick life to briquets, charcoal, and wood. Don’t use it! It adds a prominent chemical taste to your foods and can result in a fire that goes wild. Learn what a chimney starter is, buy one, and use it. It is the safest and easiest method of lighting a fire for a charcoal/wood grill.
Tip #4
Take note of the clothing you choose to wear when you know you’re going to be in control of the grill. No dangling sleeves, strings, or flammable materials should be near the grill. Aprons are a great way to keep clean as well as to keep flowing clothing under control. Just be sure the ties to said apron don’t become a fire starter.
Tip #5
Outdoor cooking is an adult activity. Don’t assign a youngster to watch the grill. Grease fires account for most of the damaging fires resulting from grilling. Plus, it is so easy for youngsters to receive burns from brushing or directly touching the hot grill surfaces. Animals, too, should be kept away.
Tip #6
Always prepare for catastrophic events! That means keep a fire extinguisher handy, sand, or baking soda at the ready. Never attempt to put out a grease fire with water. Remember, when using a fire extinguisher, spray ahead of the fire and then move toward it.
Tip #7
Understand how your grill works. With multi-fuel options in one piece of equipment, you need to know how to close vents, valves to gas, and output drafts. Firing up the grill and having something uncontrollable occur is not the time to learn what those knobs, slides, and dials are for.
Tip #8
If nuts, bolts, or screws loosen up, take the time to secure them back in place, especially if they are on lids, wheels, or fuel areas. Grills need to be sturdy to withstand the constant opening and closing of the lid. Protect the surface the grill is on by investing in a grill mat that is fire retardant. Not only can it prevent the start of a fire, but it will protect your deck or patio material from needing replacement.
Tip #9
When lighting a gas grill, be sure to keep the lid open. Lighting when the lid is down can result in the gas pooling and exploding. This will result in the lid becoming a weapon of its own when it is blown off the grill!
Tip #10
Never move a grill indoors including to a garage! I know. Space is always an issue when you entertain and a grill can take a lot of that valuable space. But there is no way around the fact that these pieces of equipment require outdoor air to prevent accumulation of volatile gases that can make you and everyone around ill or worse. Plus, these units radiate a lot of heat and that heat can spread quickly to other surfaces like the garage door, walls, siding, canopies, lawn chairs – you name it. Always maintain a 3- foot barrier around the grill including above it to ensure no issues.
Have you experienced a disaster while grilling? Tell us what safety tip you wish you had known about before disaster struck. Get tips, techniques, recipes, and the science behind the flame and fire to improve your skills with wood-fired cooking! Follow our TIPS FOR GRILLING SAFETY for a wonderful safe grilling season!
When you are going through the steps of installing an outdoor kitchen, you’ll quickly find that deciding where to set it up is one of the most difficult and impactful decisions of the process. Since you have multiple options, it can be hard to figure out exactly where to put it. We’ve come up with a list of things to consider to help you decide!
Be Conscious of Sun and Shade
Summer is prime time for outdoor kitchen use. So, when planning your outdoor kitchen, bank on warm temperatures and lots of sun, and take reactive measures. Placing your outdoor kitchen under existing shade, or planning to add new sources of shade will provide you and your guest’s comfort year-round.
Natural shade from trees and vines is best because they ventilate easily. As an added bonus vines and trees “transpire,” evaporate moisture to cool themselves, creating their own natural misting system.
There are plenty of man-made shade options as well, such as pergolas, or trellises. The growing popularity of transition rooms provides an even more permanent and durable option for your outdoor kitchen.
Leverage Your Natural Space
Do you have a pool or hot tub in your yard? A beautiful garden? When choosing where to add your outdoor kitchen, take note of any existing structures or features that you want to complement. Also be wary of design overlap. The last thing you want is for your outdoor kitchen covering to inadvertently shade your vegetable garden.
In addition, when planning the placement of your outdoor kitchen, it’s important to consider the relationship between the indoor and outdoor versions, and how they will be used together when cooking or entertaining. If you have a large outdoor space to work with, it may prove prudent to place your outdoor kitchen in closer proximity to your indoor kitchen to create a seamless transition between indoors and outdoors.
Consider the View
Another crucial element to consider when you’re placing your outdoor kitchen is your views and sight lines. You can have the most beautiful outdoor kitchen in the world, but when your guests sit down to eat at the table, if they’re facing a brick wall or the old shed in your backyard, that’s what they’re going to remember. So, be sure to consider the view when you’re trying to find the perfect location for your stainless steel outdoor kitchen.
Another key consideration is the location that will provide the most privacy from neighbors. Screening views with trees and shrubbery will provide privacy while also providing a noise buffer for your close neighbors.
Don’t Forget Utilities
When planning your outdoor kitchen layouts, keep in mind the best practical placement or installation of the necessary gas, water, and electrical supply. Note where your water, gas and electric lines are, and design your kitchen accordingly.
Furthermore, when placing your grill or smoker, think about the natural flow of wind – make sure that smoke from the grill will be carried away from dining and living areas. You should also think about making sure the kitchen area is located a safe distance from doors and entryways to keep foot traffic away from potential hazards.
Additionally, make sure to place all outdoor cooking appliances away from areas where children play or where people play sports. You’ll want to avoid basketballs or soccer balls bouncing over onto a hot grill.
Don’t Shy Away From the Roof
When one thinks “outdoor kitchen,” the tendency is to think of backyards – but that doesn’t have to always be the case. Especially if you have a small or nonexistent lawn space, building your stainless outdoor kitchen on the roof can prove a very viable design option.
If you are choosing this option though, pay special attention to restrictions and codes. They vary by municipality, so check with your town’s building department to find out rules about setbacks, fire safety, and what kind of permits you’ll need to file. We recommend working with a general contractor so you are up to code and all safety requirements are included.
Fit Your Needs
The right spot to place an outdoor kitchen will vary from homeowner to homeowner. You may like the idea of an outdoor cooking area just outside the back door of your house or a freestanding pavilion near your pool area.
At the end of the day, there’s no one “right” spot for your outdoor kitchen. But by using these outdoor kitchen location tips, you’ll ensure you make an excellent choice.
“You are what you eat” is a saying that is truer today than it was years ago!
‘YOU ARE WHAT YOU EAT’ APPLIES TO WOOD COOKING
Summary of You Are What you Eat
Healthy eating recipes, eat smart with Bark free cooking wood, cooking wood as a food ingredient is a clean eating basic. Responsibly sourced wood and only using heartwood Hardwoods avoids what woods are toxic to humans. Please remember you are what you eat when it comes to smoke flavor in food and your sourced wood.
We’ve all heard it, likely from our mothers. You are what you eat. If you truly understand the meaning of the statement, you know that we extract necessary nutrients from the foods we ingest to energize and stabilize our bodies. The nutritional content of what we eat determines the composition of our cell membranes, bone marrow, blood, and hormones. Every day we lose cells which is why the foods we consume are so vital to our body’s health.
Like Any Other Food Choice
If you’ve been a follower of my writings then you are aware of the stress I put on recognizing the wood used to cook foods is just as important an ingredient as the cut of meat, choice of spices, quality of oil, etc. There has been a lot of focus on the origin of food and how important it is to source locally both as a means of supporting local business and to control what you’re putting in your body. From our perspective, you want to know that the wood used for cooking is sourced close to the growing area. This ensures that there is knowledge about how the wood is processed before it gets to you and it assures the freshest product.
Minimal Processing
Just as with the clean food concept which focuses on minimally processed foods and as direct from nature as possible, SmokinLicious® holds to the same approach. Sourcing wood from forest regions (direct from nature) that are in close proximity to our manufacturing facility, provides us with the unique advantage to process into the various cooking products the hardwoods harvested that meet our strict criteria: 100% bark-free (we don’t allow any bark-on product to cross our threshold), 100% heartwood (no outer cores of the tree cross our threshold), harvested hardwood that is less than 6 months of age (ensures this is still a “green” product), chemical-free (no pesticide or growth enhancement techniques employed), and in raw state to allow us to process it into a suitable cooking wood size.
The Risks
If you love foods that are cooked with wood, then you should know a few specifics to keep you on the path to health and long life.
Hardwoods only!
Softwoods or coniferous woods should never be used for cooking as they have elevated sap levels and more air in their cell structure. This causes them to burn fast, produce lots of sparks, and unpleasant flavors that are not ideal for flavoring foods. These include pine, redwood, cedar, fir, spruce, hemlock, larch, cypress.
Toxicity Risks:
There are many known toxicities in certain species of wood with softwoods containing the highest risk. Other woods have the potential to cause sickness and in some cases death if a person’s system is already compromised. Most of the risks are associated with the cooking process rather than the ingestion of the actual wood-fired food. But know that if a balance of the wood-tar creosote is not found, then the ingestible risks of the food heighten. One of the best means of obtaining a balance is by starting with hardwoods that are considered safe for cooking, are clean, are bark-free, and derive from the inner cores rather than outer of the wood, where more impurities lurk.
Cooking Technique Influence Risk:
At some point, I’m sure you’ve read about heterocyclic amines (HCAs) and polycyclic aromatic hydrocarbons (PAHs). These are the chemicals that form when meats, poultry, and fish are cooked using higher temperature methods like grilling. Why does this pose a health risk? Because these chemicals cause changes in DNA and when you change DNA and they are metabolized by specific enzymes in the body, you can increase the risk of cancer associated with these compounds. There is no definitive link between HCA and PAH exposure from cooked meats and cancer in humans. There is no way to differentiate between other exposures to the chemicals from the food exposure.
HCAs are found to only be associated with meat cooked at high temperatures. While PAHs can be found in other smoked foods. Remember, PAHs are also in cigarette smoke and fumes from car exhaust. A recommendation is to remove any charred portions of meat, continuously turning meat over the high heat source, and avoiding direct exposure of meat to the open flame to reduce exposure. Here’s a tip that can also reduce the risk of forming HCAs – marinate your foods for at least 10 minutes.
Tips from the Electric-Smoker Guy about electric smokers, reviews and how to choose the best unit. Read this and his blog to guide you in looking for a good quality smoker, purchasing electric smokers, analog smokers or digital smokers!
You don’t have to be an expert to prepare a perfectly smoked meat if you have the best electric-smoker by your side. Now, you have to be aware that you can’t just come into the store and ask for the best electric-smoker because that doesn’t exist.
The best unit for me and for you doesn’t have to be the same model and that is why it is important to know what to look for. You don’t have to be modest, there are many electric units on the market which means that you can adjust almost every part of the smoker to your needs.
If you don’t know where to start, let me guide you through the process of picking one for you.
#1 Choose the Capacity of an “Electric-Smoker”
The size of the smoker is the most important feature you can adjust because there is no need for buying a big electric smoker if you are smoking only for your family. If you want to smoke for your family and friends, go with the medium smoker and if you want to smoke for a large group of people, then I would suggest you take a look at the commercial-grade electric models.
#2 Choose the Place for Your “Electric-Smoker”
An electric smoker has to be outside and you can’t smoke in the kitchen if you don’t have a special ventilation, which most homes don’t. Choose a place for it and see if it can stay there all the time. That place should be protected from the wind, the rain and under a roof. If you don’t have that place, buy a smoker with wheels so you can take it out of the garage to smoke it and store it again when you are done.
#3 Choose the Features for Your “Electric-Smoker”
If this is your first smoker, choose the one that has a window on the doors so you can see the smoking process. That is very important, especially for rookies who aren’t sure what smoking does to the meat and how long it takes for the meat to be done. If you are constantly opening the door of the smoker you will lose smoke and the heat. That will prolongate the smoking process a lot. The window on the door should be from tempered glass to withstand the heat and it mustn’t be easy to break.
#4 Choose the Controller
The electric smoker can be analog and digital. The analog smoker shows you the temperature on a temperature gauge and it is not so easy to control it. The electric units, on the other side, are easier to control. You have to set the time and the temperature you want and the smoker will maintain the same temperature through the entire smoking process.
As you can see, smoking is not just picking the first smoker you see in the store and buying it. If you buy a good quality smoker you will be able to control the heat and the smoke better when using smoking wood chips, chunks, logs or dust and that will result in a good smoked meat. If you choose the best electric smoker you won’t have to do anything, the smoker will do most of the hard work. But, if you want to learn more about these electric units you can visit the site about them called the Electric-Smoker Guy:
Does stainless steel rust? This is a common question asked by many.
by Linda Colon
Our Guest blogger discusses Stainless Steel, does stainless steel rust in outdoor appliances. Tips on how to care for stainless steel outdoor kitchen units. She explains active metals and passive metals in stainless steel grill and to avoid hard water, wire brushes, steel pads and only use non-abrasive cleaning tools.
Myth: Stainless steel does not rust.
Myth Busted: Unfortunately, stainless steel is susceptible to rusting.
Here is a little background to help you understand why this myth has created confusion for the metals world.
First, let’s take a look at the difference between active and passive metals. Metals such as iron and steel easily corrode – showing yellow or orange rust – within the natural environment and are called active metals.
The two grades of stainless steel most referenced in relation to outdoor environments are 304 and 316L, also known as marine-grade stainless steel. Their numbers are determined by their alloy composition. Unlike the active metals mentioned above, stainless steel is referred to as passive because it contains other metals including chromium. For a material to be considered stainless steel, at least 10.5% of the make-up must be chromium. Additional alloys typically include nickel, titanium, aluminum, copper, nitrogen, phosphorous, selenium and molybdenum. The key difference between the 304 and the 316L is the addition of molybdenum in the 316L. It is the molybdenum that enhances corrosion resistance in environments rich in salt air and chloride – giving 316L the moniker of “marine grade” stainless steel.
It is also important to note that stainless steel is not stain proof; it’s stainless. As such, regardless of whether you use 304 or 316L exposed stainless-steel cabinetry and appliances requires maintenance. The addition of molybdenum (in marine grade stainless steel) only delays corrosion, it does not stop it.
The chromium contained within stainless steel creates an invisible passive film covering the steel surface and shielding against corrosion. As long as the invisible film – or passive layer – remains intact, the metal remains stainless and corrosion resistant.
However, three things can break down this film:
Mechanical abrasion – steel pads, wire brushes and scrapers will scratch the steel surface.
Water – depending on where you live, your water can be hard or soft. Hard water may leave spots and, when heated, leave deposits behind. These can break down the passive layer leaving the stainless steel to rust. Be sure to remove deposits from food preparation and service.
Chlorides – are found everywhere including in water, food and table salt. Household and industrial cleaners contain some of the worst chlorides!
There are many types of corrosion that affect stainless steel metals. Corrosion mechanisms fall into five different categories; pitting corrosion, crevice corrosion, galvanic corrosion, stress-corrosion Cracking, and general corrosion.
Pitting corrosion happens to stainless steel when it is exposed to environments that contain chlorides.
Crevice corrosion is triggered when oxygen levels are low in a crevice.
Galvanic corrosion happens when dissimilar metals come into contact with another.
Stress corrosion cracking is when tensile stresses combine with environmental conditions.
General corrosion happens when the stainless steels pH is less than 1.
So, does stainless steel rust?
The answer: Yes, how quickly is determined by the type of stainless steel the outdoor appliances and cabinets are made of.
By keeping the stainless steel surfaces free from food and other debris, following these cleaning tips for outdoor kitchen cabinets will help maintain your cabinets integrity and reduce the risk of rusting and corrosion:
Use only alkaline, alkaline-chlorinated or non-chloride cleaners
Avoid hydrochloric acid (muriatic acid) on your stainless steel
Always use a non-abrasive cleaning tool such as a soft cloth or plastic scouring pad
Avoid steel pads, wire brushes, and scrapers
Always clean in the direction of the polishing marks by locating the lines or grain and scrub in a motion parallel to them
If you do end up using a chlorinated cleaner, be sure to rinse thoroughly and dry it, immediately
Air dry your equipment
Remember, our stainless steel equipment is not stain-proof, it is stainless.