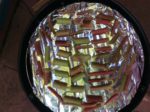
Our team developing traditional family recipes for the “Passing it on” series
If you have been a follower of our blog, you’re likely aware that we often feature a Guest Blogger. It’s great to get other ideas on outdoor cooking, recipes, and tips on anything to do with cooking and the outdoors. Many of our blogs offer a sharing of cooking styles and cherished traditional family recipes.
Recently, I had the opportunity to become another platform’s guest blogger. Or rather, guest cook!
Hello South Africa!
In 2019, we had the good fortune to begin offering our wood chip products in South Africa. This would not have been possible if it wasn’t for the help of some great South Africans. Who could have known that a pandemic would strike in 2020 and force a change in our business plan.
But here’s something great that came out of this! SmokinLicious® had the honor of meeting Clinton Phillay. Clinton has a passion for ensuring that traditional family recipes get passed on to others in order to keep the spirit of family cooking alive.
What a great goal and a needed purpose. SmokinLicious® was happy and honored to participate. Plus, the timing was perfect. SmokinLicious® is about to release our new YouTube channels featuring our step-by-step recipes as well as a channel just for business customers.
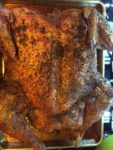
While you wait to see the first episode featuring our Smoked Dry Rubbed Chicken Drumsticks, check out the Passing It On channel: https://www.youtube.com/c/PassingItOn
This is a recipe source you’ll want to subscribe to and hit the notify button so you can begin a great collection of traditional family recipes.
Coming soon their TikTok account will feature these same recipes. Watch for it soon and subscribe!
Prevent Shrinkage to Grilled Hot Dogs–There is nothing more frustrating than getting your family and friends all excited for a good hot dog barbecue only to have great disappointment when the dogs come off the grill. There they are. All shrunk and shriveled that it would take a least two hot dogs to fill a standard hot dog bun.
That’s why I’m going to share with you my top tips to prevent shrinkage and shriveling of your grilled hot dogs. All these tips are done before adding the hot dogs to the grill of your choice, making them very simple.
Let’s get started!
Three Techniques to Keep Size of Grilled Hot Dogs
Before I start with the first preparation tip, let me just clarify some information about the standard hot dog or frankfurter or wiener, additional terms you may be familiar with.
Hot dogs now come in a variety of options including all beef, beef and pork, chicken, turkey and even a vegetarian or vegan style. One thing that is common with hot dogs is that they contain a lot of water, fat and generally, sodium. Know that the water can be in the form of ice mixed with the meat trimmings and flavor ingredients. To adjust for all the wetness, dry starches or powdered milk are used to absorb the extra moisture, as starches do not allow moisture to enter the hot dog until heated. Once heated, the starch granules breakdown and allow the moisture to enter which makes the starch swell. This is the plumping commonly seen when grilled hot dogs are cooked on charcoal or gas fired equipment.
Know that all hot dogs are fully cooked before being packaged and some brands may also include smoking the hot dogs which gives them extra flavor and color.
Now, for our first tip on preventing grilled hot dogs from shrinking while being reheated or “cooked” on the grill.
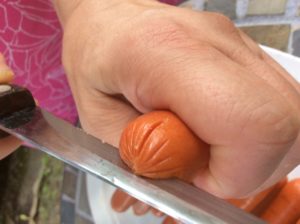
Tip #1: The “X” End Slice to prevent Shrinkage of Grilled Hot Dogs
#xendslice
This is the easiest method of preparing the hot dog without an obvious change to its overall shape. Simply take the blade of a knife and cut an “X” shape on each end. This cut should go only about ½-inch deep into the meat. The ends will curl slightly and get additional crispness that make them extra tasty. Essentially, these dogs maintain most of their original shape.
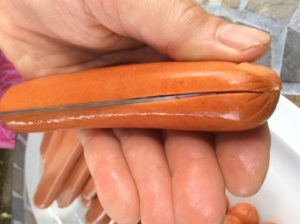
Tip #2: The Length Cut to prevent Shrinkage to Grilled Hot Dogs
#cuttolength
One of the reasons I prefer the length cut preparation to hot dogs is that if you are planning a large variety of toppings, this is an ideal preparation. Additionally, it allows the toppings to nestle comfortably in the middle of the grilled hot dogs and gives every bite full flavor. Simply take the blade of a knife and run it down the center of the hot dog from end to end about halfway down the meat’s thickness. You can know cook these in the flat form.
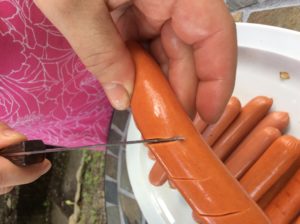
Tip #3: The Spiral Cut to prevent Shrinkage to Grilled Hot Dogs
#spiralcut
The spiral cut is another easy method of keeping your grilled hot dogs true to size. For this technique, simply pass the blade of a knife thru the skin of the hot dog about 1/2 -inch deep every inch or so down the length of the hot dog. Be sure to do both sides of the hot dog.
Load Up Those Grilled Hot Dogs!
#onthegrill
I’ve done all three preparation tips so you can see that the size of the grilled hot dogs remains essentially intact no matter which technique you elect to do. I also used both a charcoal and gas grill equipped with wood chunks for added smoky flavor to the grilled hot dogs.
I did set up an indirect cooking method on the gas grill to allow for a holding spot if I had some hot dogs cook faster than others, which tends to happen more on a gas grill than a charcoal unit.
I’ve got four topping options each that contains three ingredients. Now, let’s look at each option in more detail.
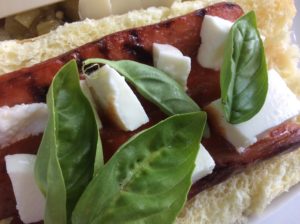
The Italiano Dog
Featuring: fresh mozzarella, fresh basil leaves, and marina sauce
#italianodog
I am a lover of fresh ingredients and summer harvest season makes it easy to get those fresh flavors. I start by spooning on a flavorful marina sauce followed by cubes of fresh mozzarella and finally topped with fresh whole basil leaves.
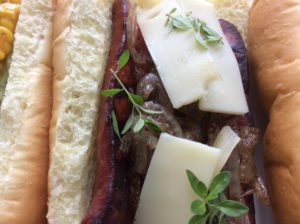
I call this one the Allie Dog in honor of the onions used as a bold flavor, which onion is part of the allium family, thus, the “allie” name. Load on the buttery, caramelized onions, then top with Gruyére cheese and fresh thyme sprigs.
The Jalo-Bean Dog
Featuring re-fried beans, white cheddar, jalapeño
#jalobeandog
If you have a taste for tacos, then this is the dog for you. Start by loading on a good quality refried beans. Then top with chopped jalapeño and cheddar cheese – I prefer the white version.
The Dog From Mexico
Featuring fresh guacamole, corn, fresh cilantro
#mexicodog
I love this hot dog combination! For me, spice is great so I tend to use a spicy corn but you can use just plain corn or buttered corn kernels if desired. Start with fresh guacamole on the grilled hot dogs. After that add the corn, and top with fresh cilantro.
There are no rules when it comes to toppings for your grilled hot dogs so experiment and find what combinations you enjoy. That includes experimenting with the bread as well so know that though I did not change the rolls on my combinations, that is another flavor level that can vary right along with the toppings.
What is your favorite method for grilled hot dogs and what makes your topping list? Let us know in the comments and don’t forget to follow us on all platforms. Providing tips, techniques, recipes, and the science behind the flame and fire to improve your skills with wood-fired cooking! That’s SmokinLicious®!
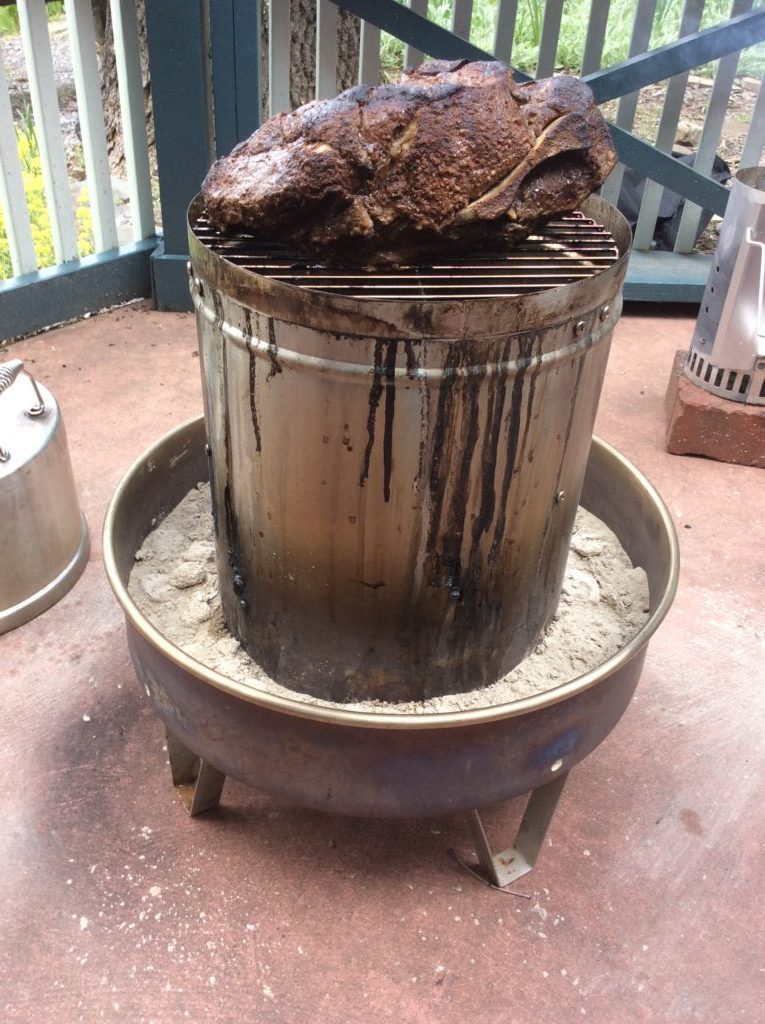
This certainly is a clear example of how anyone can produce authentic barbecue on the equipment they have even if it’s not a traditional smoker.
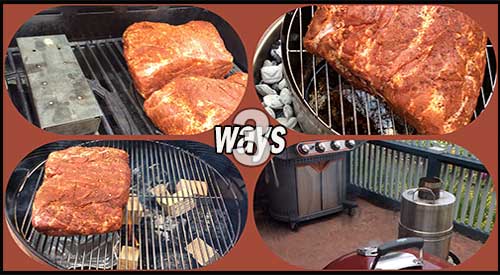
3 Methods of Smoking Boston Butt-
It should come as no surprise that majority of grill owners invest in a gas grill for their outdoor cooking with over 80% of these owners investing in multiple accessories for that grill. Often, many of these grill owners will venture to make an additional purchase of a second type of grill like a charcoal or pellet grill/smoker, in order to be able to cook more barbecue or smoked food options.
My intent is to demonstrate to you that you can produce authentic flavors, colors, textures, and aromas of favorite barbecue proteins with a variety of equipment, all outfitted with hardwood for the authentic wood flavoring.
I’ll be taking Boston butt to a traditional gas grill, a kettle charcoal grill, and a convection-style grill to demonstrate just how easy it is to cook this popular animal protein while giving you a bit of education on how these units are different when hardwood is incorporated.
Set Up Similarities and Differences for Smoking Boston Butt
When it comes to setting up the grills for smoking, there are some obvious differences. First, let me name the equipment brands I’ve included and the intended set up of each for cooking and smoking the Boston Butt cuts, all of which approximate 8 lbs.
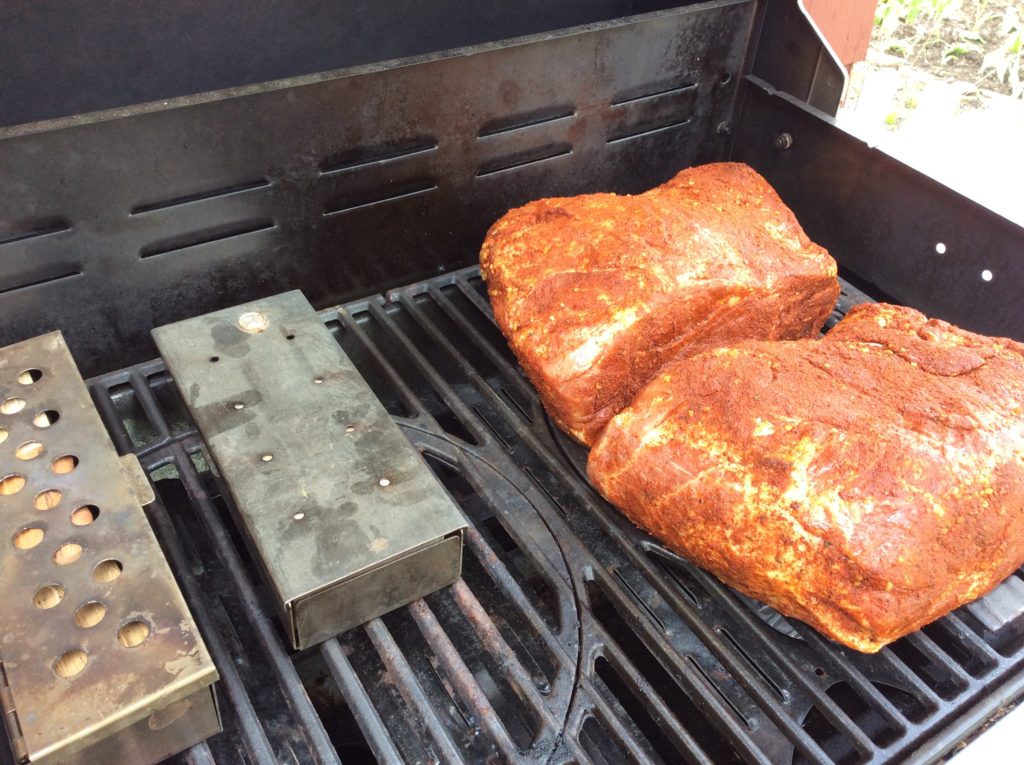
Our Boston Butt (s) on the Stok Gas Grill with accompanying Smoker boxes
The Stôk Quattro 4-Burner Grill:
If you are not familiar with this grill, it is equipped with an insert system to allow you to use a standard grilling grate, a griddle, grill basket, vegetable tray, pizza stone, Dutch oven, Wok, and other inserts that easily pop in and out of the cast iron grates. Despite this feature, you can do traditional smoking using wood chunks without the need for the smoker/infuser insert.
Whenever I smoke on a traditional gas grill, I always set up a two-zone cooking method. This means, on my 4-burner Stôk, I will ignite just two of the burners on one side. You can either place wood chunks directly on the heat shields of the unit or use a metal smoker box. My Boston butt will cook on the unlit side of the grill with a metal smoker box containing 3 wood chunks on the hot side. I’ve also included a second smoker box to make it easier to swap out the first when the wood becomes completed charred. My temperature is 225°F for the actual cooking.
Our Boston Butt on the Orion Cooker with Minuto® wood chips in the inner ring
This is an outdoor convection unit that uses briquets for the heat and Minuto® Wood Chips placed around the drip/water pan for the wood flavoring. This unit will be the fastest to cook the Boston Butt, with an anticipated timing of 4-1/2 hours total. This is a direct cooking method that uses the radiated heat of the stainless-steel body to trap and circulate the heat for faster cooking time.
There is no ability to replenish the wood chips with this unit due to the high heat level. About 15 lbs. of briquet and 4 ounces of OrionCustom Wood Chips is all that is needed to smoke, plus some water in the water/drip pan for a moist outcome.
Our Boston Butt on the Weber® kettle Grill with double filet wood chunks
Weber® Kettle 22” Charcoal Grill:
Likely one of the most popular charcoal grills, the Weber® kettle provides for the opportunity to cook with charcoal and hardwood. I’ll be setting up my grill using a two-zone method; charcoal/wood on half the fire area and the meat placed on the indirect side.
Due to the length of time Boston butt takes to cook, you likely will need to replenish the charcoal for maintenance of heat level. I prefer to maintain a temperature around 250° F.
For similarities: both the Weber® and the Stôk grill were set up with a two-zone cooking method. Both included use of the SmokinLicious® double filet wood chunk. The length of cooking time between the charcoal unit and the gas unit are very similar, taking close to 10 hours.
For differences: temperature maintenance is easier with the gas and convection units. The charcoal unit requires much more supervision to ensure that the fuel (charcoal) is replenished prior to the temperature of the grill decreasing significantly. You are also able to check on the meat’s coloring and evenness of cooking with the charcoal and gas units while the convection unit is generally left alone until closer to the recommended cooking times. Though you can check on the doneness of the meat at any point with the convection unit, generally there is no need to do anything but wait.
Regarding cooking variations, let’s discuss color, bark formation, moisture of the meat.
Barbecue By All Methods
With all four of the Boston Butt (s) prepared in the same manner – excess fat trimmed to ¼-inch or less, a dry rub applied on all sides, and marinated for 24 hours – this is a fair comparison of how each grilling and smoking method produces the barbecue results commonly looked for.
Bark:
Without question, bark or the outer crust that develops from exposure to a lower temperature, long cook time, and smoke vapor infusion was greatest on the Boston butt cooked on the Weber® Kettle 22” Charcoal Grill. The gas grill produces the least amount of bark which is dominate on the outer edges and top surface.
Color:
The darkest coloring to the bark and the most obvious smoke ring was on the meat cooked on the charcoal grill. The Orion Cooker produced a brown hue to the meat’s exterior while the meat cooked on the gas grill retained a red hue that was indicative of the dry rub color. Charcoal grills will produce a black hued coloring due to two combustible materials: charcoal or charred wood and hardwood.
Moisture:
The meat that produced the greatest amount of rendered juice was from the charcoal cooking method. Second, the convection grill method followed by the gas grill. However, the greatest internal moisture level was obtained from the indirect cooking method on the gas grill, followed by the charcoal method and lastly the convection method.
Final Notes:
What we’ve set out to accomplish with this multi cook segment is to prove that no matter what equipment you have, you can produce authentic flavor, aroma and texture to Boston butt. This can be invaluable for those times when you may not have a lot of time to supervise the smoker or grill but still want authentic barbecue. Or, when you must make a lot of meat meaning you must use all the equipment options you have available.
All four Boston Butt (s) one done on charcoal with the Weber, another in the Orion with wood chips and two on the gas grill with wood chunks- the coloring is not much different!
From a taste perspective, our sampling group indicated that the strongest smoked flavor was from the charcoal unit, followed by the convection grill and lastly, the gas grill. Keep this information in mind when you’re cooking for others, as boldness of the smoke flavor can be controlled not only by the amount of time exposed to the smoke vapor, but also with the equipment used for the cooking and the amount and type of hardwood used in the process.
This certainly is a clear example of how anyone can produce authentic barbecue on the equipment they have even if it’s not a traditional smoker.
Making you an informed consumer through valuable articles like this one. Leave us a comment and follow us or subscribe for more great recipes, techniques, tips, and the science behind the flavor. That’s SmokinLicious®.
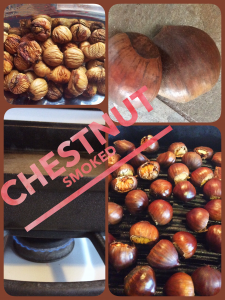
Collage of Smoked Chestnuts go on a Stovetop Smoker
SMOKED CHESTNUTS ON A STOVETOP SMOKER!
Depending on where your located, chestnuts may only be available for a short period each year, usually around the holidays. Mostly pan roasted in the oven, why not do something unique with this prized fruit and smoke them! In addition to the chestnuts, you’ll need a stovetop smoker, purchased or you can make your own with tools likely in your kitchen. You can see our writing on the “The Kitchen Find” which will guide you on what is needed.
about 2 hours of time. Be sure you also have a hood vent where you will be using the stovetop smoker in order to maintain a smoke-free kitchen.
You will find chestnuts available prepackaged or in bulk when in season. Although the packaged product will include a directive to cut an X in the flat surface of each nut, I grew up in a household where we always cut off the stem side. This is the small, dark cap side to the chestnut. The chestnut has a cap and a pointed end giving it a bloated teardrop look. I have found that when smoking, I get better control of the smoke infusion with a fresh cut to one end. Keep in mind, not all the chestnuts purchased will likely be viable as often mold will take hold of some of the chestnuts which you won’t see until you cut into them. As the chestnuts age, they can develop a fuzzy mold on the outside which will tell you not to waste your time cutting that one open! Simply discard!
Generally, chestnuts have a flat side and a rounded side.
To prepare them:
lay the chestnut on the cutting board with the flat side down. Place your knife blade over the small dark cap, and slice off in one motion. This will reveal the chestnut meat inside which will have a yellow-white hue. Once the cap is off, you’ll be able to tell if any mold has set in as it will have a marked gray/black appearance. If any mold is noted, discard the chestnut as it won’t cook tender. If the majority is free of mold, go ahead and keep it for the smoking/cooking process.
To do stovetop smoking, there are 4 parts needed:
a pan to hold the heat and wood chips
a drip pan to prevent rendered fat and juices from entering the wood. Generally, you only need the drip pan when you actually have a food item that will produce juices or fat drippings.
a grill pan
a lid.
Note: Smoked chestnuts will not produce any drippings though they do have a percentage of water that will be released as steam into the lid of the pan. Just be sure when you open the lid that you keep any collected water from dripping back into the cooking grate.
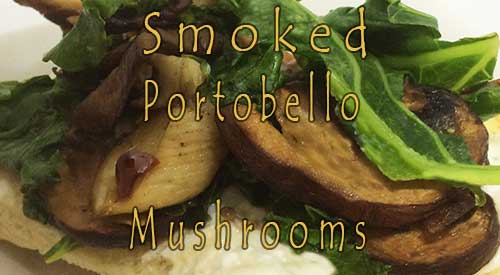
Smoked Portobello Mushrooms enhances the natural flavor of this fungi
What’s Fungi?
This is a group of organisms that include yeasts, molds, mildews and MUSHROOMS! That’s right! Mushrooms are a fungus but a good one.
As a water-rich fungus containing 85-95% water content, mushrooms develop from a nodule which forms the common stem and gill top. There are lots of mushroom types and not all of them are edible. Be sure to stick to mushrooms you purchase in the store and leave the wild ones to the forest animals.
A Healthy Fungus for More Nutrition
One benefit of mushrooms used for grilling and smoking is due to all that water content, they infuse smoke vapor quickly. This gives the mushrooms a deeper flavor that is even more earthy then when they are raw.
Here’s a super easy appetizer or main entrée that features large Portobello caps. Portobello mushrooms are very “meaty” and the larger ones tolerate grilling and wood smoking well. Their large size mean you can easily place them directly on the grill grate but given all the water they will expel, save messing up your grill and use a sheet pan or aluminum foil.
Give this one a try and I’ll bet you’ll start keeping this fungus around in your refrigerator for a quick and easy snack, appetizer or meal.
Smoked Portobello Mushrooms (Serves 8-10)
Ingredients:
12 large Portobello mushrooms
16 ounces Bruschetta or salsa (homemade or store bought)
12-16 ounces of fresh mozzarella
Bunch of fresh basil leaves roughly chopped for garnish
Start by preparing a charcoal or gas grill or smoker to reach a cooking temperature of 250°F. I prefer to use a two-zone or indirect cooking set up which is heat on only one side of my grill. My tray will be placed on the no heat side. Cooking wood preferences are either wood chips or chunks– both will do the trick for you!.
While the equipment is heating, clean the mushrooms well and remove the stems (save the stems for another recipe). Pat the mushrooms dry. Line a sheet pan or cookie sheet with foil, or use a disposable foil pan. Make sure the pan you select will fit on your grill or smoker. Place the mushroom caps on the sheet pan, cap side up. Spoon the Bruschetta or salsa into the mushroom cap, ensuring an even coating on the entire cap. Place thin slices of fresh mozzarella on top of the Bruschetta or salsa filled caps. Place the tray on the grate and cook/smoke for about 25 minutes or until the mushrooms are heated thru and the cheese is golden on top. Remove the tray carefully from the grill once the mushrooms are cooked thru being careful not to spill the rendered water that has accumulated on the tray surface. Chop some fresh basil leaves and sprinkle over the finished mushroom caps. Serve hot.
EMBER FIRED ASPARAGUS ON THE HIBACHI IS A PERFECT WAY TO ADD A GRILLING FLAVOR!
EMBER FIRED ASPARAGUS ON THE HIBACHI
Its Asparagus season and that means you should get the most out of this sensational vegetable while it’s fresh! Learn how easy it is to ember roast this thick skinned vegetable to bring out the fantastic flavor of this vegetable as a side dish, or used as an ingredient in other recipes like a refreshing dip, soup, or stuffing for meat or fish.
Fresh asparagus with thick stalks (or store bought is fine)
PREPARING TO EMBER COOK:
Clean the Hibachi or small charcoal grill unit of all previous ash, as well as any leftover wood and charcoal. Add the SmokinLicious®Grande Sapore® Wood Chips in the base of the Hibachi on the charcoal grates. If not using a Hibachi unit, then place the wood chips in the charcoal area of your small charcoal grill. I like to use Wild Cherry Grande Sapore® Chips to bring a balance to the asparagus’ flavor. Since I plan to use my roasted asparagus as an ingredient in other recipes, I’m using the chips in their natural state rather than soaking in a flavored liquid but feel free to soak in wine, alcohol, juice or other liquid of your choice.
LIGHTING THE FIRE
After loading the Hibachi or other unit with my Grande Sapore® Cherry Chips, I light the chips using a small kitchen size torch. I let the chips burn down until I have about 2-3 inches of hot embers to cook with. I need the layer long enough to accommodate the spears of asparagus and deep enough to ensure the embers encircle most of the spear. I keep plenty of extra Grande Sapore® Cherry chips on hand to ensure I get the depth and size of the ember bed throughout the cooking process. This includes maintaining a perimeter of unlit chips around the hot embers.
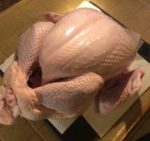
Often when faced with cooking a whole turkey, you find the challenge of ensuring every part of the bird is cooked to temperature. This can result in some extra work in ensuring that certain parts that cook faster don’t dry out or burn on the exterior. Think the wings and drumsticks. It’s a lot of work!
I’m going to introduce you to a method of cooking a turkey that will ensure every part cooks at the same rate and to the same doneness level without having to cover specific parts with foil. Spatchcocking a whole turkey meets that goal and by doing the cooking process on the gas grill with hardwood, you get the added benefit of a smoke flavor and oven room for preparing other dishes.
Order up a whole turkey, preferably under 24 lbs., and let’s meet in the kitchen to prepare the bird for smoking.
Does Fresh Make a Difference?
#freshturkey
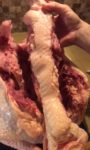
There is no question that I prefer a fresh turkey over frozen as the flavor is simply cleaner and the bird produces super moist meat compared to a frozen turkey. We are fortunate to have within 10 miles of our location, a fresh turkey farm that harvests turkeys once a year, just a couple of days ahead of Thanksgiving. My bird weighed in just under 22lbs. The organs and neck are removed from the cavity and the bird flipped breast side down to expose the backbone. This is where we start our spatchcock process. Get sharp cutting shears ready as we prepare to remove the backbone of our turkey.
Tasting Notes: If fresh whole turkey is not available, you may substitute frozen whole turkey. Just be sure it is completely defrosted and pat dried before starting this recipe.
Flatten and Rub for a Perfect Spatchcock Smoked Turkey
I won’t lie to you. Removing the backbone of a fresh turkey can be a bit of work, but it is so worth it. Start on one side of the backbone, insert sharp kitchen shears, and start to snip away. You’ll draw the shears along the edge of the backbone, releasing the bone from the meat. Done correctly, the spine will come out in one piece.
#spatchock
With the backbone removed it’s time for the final preparation to the turkey. Flip the turkey back so the breast is facing up. Time to break the breastbone so the turkey will lay flat on the cooking sheet pan. This will take both hands and a lot of force. Position your hands across the breast and push down with all your force until you hear the breast plate break. Now the turkey should be able to lay flat on a sheet pan equipped with a rack for rendering all the juice and allowing even heat distribution around the entire bird. The rack is key to use so heat distributes evenly. The turkey is now ready for a rub with your favorite seasonings, herbs, and spices.
#spatchocking
I’m using a simple herb rub that includes fresh sage, oregano, thyme, crushed red pepper, black pepper, marjoram, basil and cumin. I place my ground rub all over the skin of the bird and on the exposed meat side, reaching under the breast skin as well. Now cover with plastic wrap and refrigerate overnight. All this work can be done the night prior to grilling ensuring all that is left to do, is the simple two-zone cooking. Remember, two-zone cooking involves turning only half the burners on and placing a metal smoker box of wood chunks on the hot grate or directly on the heat shield of the hot burners. Be sure you have the box and hardwood at the ready for this step.
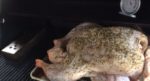
With our prepared spatchcock turkey readied, the sheet pan is added to the grill on the no heat side and the lid is closed. I leave this to cook on its own for about two hours before returning to rotate the pan, checking the smoker box of wood chunks I’m using on the lit side of the grill for the great smoke flavor. Remember, the heat from the burners that are lit will radiate throughout the entire grill, grill-roasting the turkey while the heat stimulates the release of the smoke vapor from the wood.
#twozonecooking #woodchunks#smokerbox
Tasting Notes: If you prefer, you can cook the turkey directly on the grill grate. Just be sure to place a water pan under the grate to collect all the juices.
Ready in No Time
My nearly 22 lb. fresh turkey takes about 3-3/4 hours to reach a 165°F internal temperature. In total, I use about 8 double filet wood chunks for the entire process. The best part, I can do other things while the turkey cooks, then rest it for about 20 minutes before carving. Don’t forget about all the beautiful juice it produces in the pan as well. Make gravy, use it as au jus, or save it for producing stock. Spatchcock fresh turkey – the easiest method of no-fuss grilling and smoking of a turkey!
What’s your favorite spatchcock turkey recipe? Leave us a comment to opine and subscribe to get all our postings on tips, techniques and recipes. Bringing innovation to wood fired cooking with recipes, techniques and the science behind the fire, smoke, and flavor. That’s SmokinLicious®.
More related reading on Spatchcock Smoked Turkey and other Sptachcocking itmes see our smoking & Grilling tips and technique see our directory on previous blogs!
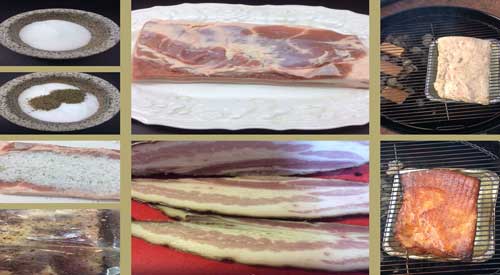
Just about everyone I know loves bacon, even if it’s the store-bought type. There are so many foods that have been designed around bacon including a chocolate chip cookie recipe featuring caramelized bacon pieces and a bacon ice cream! (which we’ll offer a recipe for soon).
One thing most bacon lovers don’t know is just how easy it is to make your own bacon at home, even the smoked type. You’ll be amazed at how different the taste and texture are with bacon you make at home. Just know, my technique will require you to cure the pork belly for a minimum of 7 days so be sure you have refrigerator room and time to wait. I know – when it comes to bacon it’s sooooo hard! But it will be worth the wait!
Quality Meat a Must for Homemade Smoked Bacon
#porkbelly
When making homemade bacon, you’ll need a slab of pork belly, which is a relatively inexpensive cut of pork. Since this process is a time investment, consider purchasing a quality cut of belly which would be labeled “organic”. This cut normally comes from heritage breeds like Kurobuta and Berkshire. This investment will result in richer, meatier, and cleaner flavors to the finished product.
Although a full pork belly will weigh around 12 lbs., you only need about 3 lbs. to give you a sizeable quantity of bacon. Also, some belly will come with the skin still intact while others will already have the skin removed. Note, you will need to remove the skin before curing so you likely will want to ask the butcher to do this for you. If you’re doing skin removal yourself, simply separate the skin from the fat layer at one corner by inserting a knife point. Grab hold of the skin and begin making horizontal cuts with the knife in short sections, pulling the skin back as you go. Leave as much fat layer as you can. Once removed, it’s time to rub and cure.
Homemade Smoked Bacon- Rub and Cure to Flavor
Curing is preserving the meat. This is done not only by the ingredients in our rub but also by the process of hot smoking which contains antimicrobial benefits. Remember, when we are done with the smoking process, your bacon will be ready to eat as is, though you will be able to crisp it up if you want in a pan.
For my rub, I’ll be combining the following:
1 cup of maple sugar, coconut sugar or regular sugar
½ cup kosher salt
1 tablespoon cracked black peppercorn
2 teaspoons minced fresh thyme
¾ teaspoon pink salt also known as Prague Powder #1
1 crumbled bay leaf
1 teaspoon ground coriander
#briningporkbelly
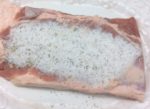
Now cover every area of the pork belly with your rub. Place the rubbed pork belly in either a 13×9 baking dish covered with plastic wrap or in a storage bag. I prefer the jumbo size bags. Just be sure to remove all the air from the bag before sealing.
Place the belly in the refrigerator. Now starts the curing process. As it cures, the meat releases liquid. You’ll need to flip the meat every other day to ensure the cure is evenly distributed. Begin checking after 7 days if the belly is fully cured. You’ll know the pork belly is ready to be smoked when the meat feels firm to the touch but is still pliable. Rinse the pork belly under cold water to remove any excess cure or the outcome will be too salty. We are ready to smoke!
For Your Homemade Smoked Bacon- Make the Pork Belly Smoke!
Even if you don’t own a traditional smoker, you can still smoke the pork belly. Here’s the technique:
Charcoal Grill:
You will set up the charcoal grill using a two-zone cooking method. Start by loading about 3 lbs. of briquets or hardwood charcoal on one side of the charcoal fuel area. Place a water pan filled with water about 2-inches deep on the non-charcoal side. Then fill a chimney starter ½ full of briquets or hardwood charcoal. Lite and allow to burn to hot coals, then pour the hot coals over the top of the unlit charcoal in your charcoal grill. Add a couple of hardwood chunk pieces to the hot coals and allow to start smoking before you add the pork belly. Once the chunks are smoking, place the cured pork belly on the unlit side of the grate fat side up. Put the lid on and allow to smoke for about an hour without disturbing. Keep in mind, your intake vent should be open ½ way as well as the outtake vent at ½. A 3lb. pork belly will take about 1-1/2 to 2 hours to reach 150°F internal temperature. By using both hot and cold charcoal, you should not need to replenish the coal bed, just may need to add another chunk or two of hardwood.
#charcoalgrilling
Gas Grill:
Place a smoker box of small wood chunks directly on your heat shield or on the grill grate. Turn on only ½ the burners on your gas/LP grill and set to medium temperature setting. Place a small pan of water on the warming grate to keep a moisture rich environment during the cooking process. Allow the grill to reach 225°F and to have the wood chunks begin smoking. Place the cured pork belly fat side up on the unlit side of the grill. Allow the pork belly to cook until it reaches an internal temperature of 150°F. Replenish the wood chunks in the smoker box as needed.
Traditional Smoker:
Set up your smoker as normal targeting a 225°F cooking temperature. Be sure to include a water pan if your smoker doesn’t include one (a disposable foil pan works great). Again, use 2-3 hardwood wood chunks for the flavor. Place the pork belly fat side up and cook until the internal temperature reaches 150°F.
Homemade Smoked Bacon- Ready to Eat!
Once the pork belly has reached 150°F internal temperature, it is ready to eat as it is fully cooked! Remember, smoke has an antimicrobial quality which helps to make this consumable at this temperature level. I recommend you allow the bacon to cool to room temperature on a wire rack set over a sheet pan. Then wrap in plastic wrap and refrigerate for at least 4 hours. This will set all those great flavors.
By slicing it paper thin, you can consume this cold and enjoy a more prominent smoke flavor. However, you may pan fry this like traditional store-bought bacon or oven cook this on a rack over a foiled lined sheet pan for those who prefer a healthier, more rendered fat version. This method also allows you to do a lot more bacon at one time then pan frying allows.
Refrigerated homemade bacon will last 5-7 days while frozen will keep for several months. Once you sample your own homemade smoked bacon, you’ll never purchase prepackaged again!
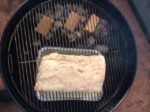
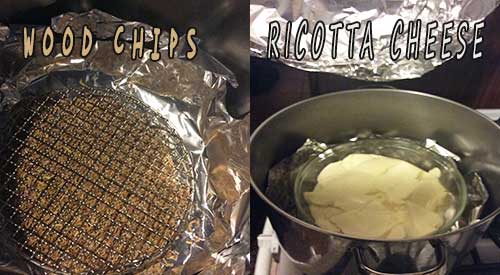
Smoked Ricotta Cheese – I know not everyone has a dedicated stove top smoker but I do know that we all have a large stock pot handy. I’m going to show you an easy way to convert that pot to a stove top smoker by using micro wood chips, aluminum foil, and a roasting rack. I’ll explain to you a combination hot/cold smoking method to bring a smoke flavor to whole milk ricotta, that will allow you to use this product in any recipe calling for traditional ricotta. Find your stock pot and roasting rack, and let’s get smoking!
Once you’ve selected a stock pot to use for the smoking, the preparation of the pot is quite simple. Start by placing 2 sheets of heavy-duty aluminum foil in the bottom of the pot, allowing it to go up the sides slightly. Then select the micro wood chips of your choice – I’m using a Sugar Maple Minuto® wood chip in size #6 – and spread into a thin layer on the foiled bottom. Add a roasting rack. Mine is round to fit easily in my pot. I also like to line the lid of the pot in foil as all hardwood contains creosote which can cause some discoloration to the pot. The foil will protect this from happening and makes clean up a breeze.
Then place the prepared pot with the lid in place over a medium-high heat and allow the chips to heat until they are consistently producing smoke. This will take less than 15 minutes.
Once the chips have started to combust and produce smoke vapor, it will be time to add the ricotta. I am doing 3 pounds of whole milk ricotta as I plan to make a dessert pastry horn and then keep some spare smoked ricotta cheese for pasta recipes.
After 12-15 minutes of heating, lift the lid and place a heat safe container of the ricotta on the rack inside your smoking pot. Secure the lid in place and allow this to stay on the heat for about 5 minutes. Then shut the heat off and leave the pot with the ricotta inside untouched for about an hour. Let the smoke infusion occur with this cold smoke technique.
Tasting Notes: Any hardwood can be used for the smoke infusion but note that by retaining the pot lid in place, you are limiting the oxygen that can enter the pot. This produces a much bolder smoke infusion than is common with the same wood used on a traditional smoker or grill.
Smoked Ricotta Cheese- Smoky, Creamy Goodness
Here’s something to keep in mind with this stove top DIY smoking technique. I have a very tight seal on my pot which means it doesn’t take a lot of wood chip product to infuse a smoky flavor in the ricotta. Plus, the fat level of this dairy product attracts smoke vapor well as this is high in water content which smoke vapor is naturally attracted to.
If after about an hour, and after you’ve sampled the smoked ricotta, you still desire more smoke, simply turn the heat back on for about 10 minutes to stimulate the chips for additional combustion. Then repeat turning off the heat and allowing the ricotta to sit absorbing the smoke for the set amount of additional time you want. Once done, refrigerate the smoked ricotta until you are ready to use it, keeping this covered well. If any liquid accumulates while refrigerated, simply pour off before using the smoked ricotta in a recipe.
To get your recipe ideas stimulated, I’ll offer up my Smoked Ricotta Pastry Horn recipe which is super easy, fabulous looking, and can be made with an assortment of filling options. Keep watching our website for the announcement on this recipe release.
What’s your favorite food to stove top smoke? Leave us a comment to opine and subscribe to get all our postings on tips, techniques and recipes. Bringing innovation to wood fired cooking with recipes, techniques and the science behind the fire, smoke, and flavor. That’s SmokinLicious®.
The Culinary Crew wants you to know…
… that experimenting with “Do It Yourself” techniques can certainly apply to using your outside charcoal or LP gas grill as a quasi-smoker too! We’ve heard from many of our followers about deep dished aluminum food serving trays and even pie tins being used to offer a quick and easy try to food smoking.
Many of us love to grow vegetable gardens but soon find we have an overabundance of certain items like tomatoes (though these are technically a fruit). I’m here to give you a super easy method of bringing tenderness, juiciness, and great wood flavor to this summer favorite.
Collect your favorite tomato varieties from the garden and meet me at the grill for this great, easy technique.
Below is a recipe for Smoke Cheesy Potatoes (serves 6) that have been made at our events.
Smoked Cheesy Potatoes- Ingredients:
1 package frozen diced potatoes or 16 oz. Fresh potato
1 red pepper, diced
1 onion, diced
3 cups of shredded white cheddar cheese
6 tablespoons of butter
1 ½ cups of heavy cream
½ cup of grated parmesan cheese
½ teaspoon salt
½ teaspoon pepper
In a foil pan, place the diced potatoes, diced red pepper, diced onion, salt, and pepper. Mix thoroughly. Sprinkle 2 cups of the shredded white cheddar cheese over the potato mixture. Mix gently and set aside. Mix the parmesan cheese and heavy cream together. Pour over the potato mixture. Top with the remaining 1 cup of shredded cheddar cheese. Place the foil pan on the smoker grate and smoke at 275° to 300° for 45 minutes or until potatoes are tender. Stir mixture a couple of times through the cooking process.
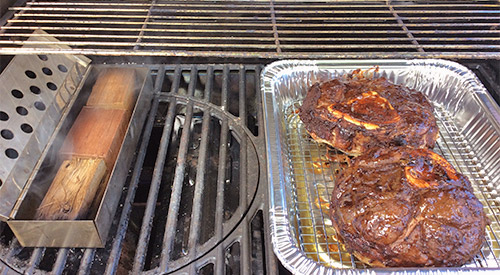
Grilling our Smoked Beef Shanks on the Gas grill with Double filet wood chunks in our smoker box!
OVER THE TOP GRILLED & SMOKED BEEF SHANKS
I’m going to make a confession. I rarely select steak to grill anymore. The reason – there are just too many other options that I simply prefer. Like beef riblets, short ribs, and shank. Oh, the bone-in shank! That is my favorite.
I’m going to give you a wet rub recipe and a grilling technique you can do on the grill of your choice, though I’ll be picking the easy gas grill. Get to the butcher and select some premium bone-in beef shanks then visit SmokinLicious® online for some wood chunks. Then get ready for the best grilled & smoked beef shanks you’ve ever had!
Smoked Beef Shanks- A Great Wet Rub
I tend to lean toward some Asian-inspired ingredients for my rubs, especially those that are a wet rub. While working on the rub, be sure you’ve started your grill so it will be ready to go when the meat is rubbed. Remember, we are using a two-zone set up for the grill so burners lit only on one side of the gas grill with the wood chunks placed on the heat shield or in a smoker box placed over the lit burners like I’ve done. Or, for the charcoal/wood grill, hot coals banked to one side of the grill.
For this wet rub, you’ll need equal parts of the following ingredients:
Ground ginger
Whole allspice – about 30
Garlic powder
Cinnamon
Cocoa powder
Sesame oil
Worcestershire sauce
Hoisin sauce
Honey
Start by combining the dry ingredients, followed by the wet and combine with mortar and pestle until a paste is made. Then coat the beef shanks on both sides and the edges with the wet rub. I line a disposable foil pan with a roasting rack, then place the shanks on the rack.
Tasting Notes: don’t be afraid to use a store-bought rub and simply add oil and/or garlic/spice pastes. There is nothing off limits when it comes to producing a rub.
Smoking
Time to open the pre-heated grill and start the cooking of the shanks. The wood chunks should be smoking well at this point so add the shank pan to the unlit side of the grill. Leave untouched for at least 40 minutes. Return to check the internal temperature. Flip the shanks and rotate the foil pan. Leave until the meat registers 140-145° F.
Tasting Notes: select the hardwood you like or use a combination of hardwoods like I did with my shanks – maple, hickory and white oak.
Smoked Beef Shanks- Serve ’em Up
When done, I simply slice against the grain for beautiful, flavorful beef that has a controlled infusion of smoke. Here’s a tip: be sure you enjoy the marrow in the bones! It is very rich so if you elect not to eat it when the meat is done, use it with onions and shallots to make a confit, or use it with a rich pasta dish to make the flavor of the richness even more stunning. Or, combine the marrow with an acidic dish like an arugula salad with lemon and capers. And don’t forget to save the bones to make our smoked beef broth. Two zone cooking makes it so easy to control the smoke infusion and produce perfection in any item grilled.
What’s your favorite beef cut to grill and smoke? Bringing innovation to wood-fired cooking with recipes, techniques and the science behind the fire, smoke, and flavor. That’s SmokinLicious®.
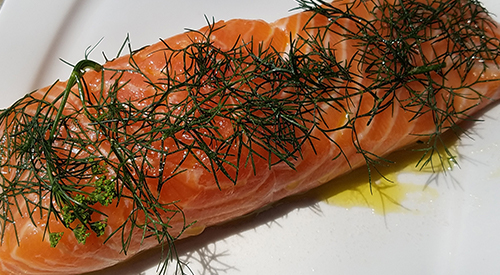
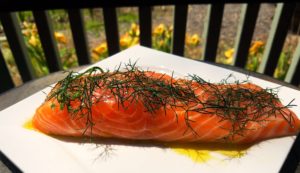
Our gorgeous filet of salmon is awaiting Chef Calle to turn it into Charwood Grilled Salmon on a kettle grill using a two-zone method along with Smokinlicious® wood chips!
Charwood Grilled Salmon Fillets for a Hint of Smoky Flavor
By: Chef Calle, Resident Executive Chef
Chef Calle here and thanks to SmokinLicious®, I’m going to offer an easy and palate-pleasing method to cook and lightly smoke fresh salmon fillets over a Charwood fire that features a small number of smoking chips. With this approach, the smoking chips infuse a delicate smoky flavor to the salmon without overpowering its delicious fresh taste.
Today, I’m using a Stok® Tourist™ grill, clearly one of the best Charwood grilling and smoking units on the market. If you don’t have a Stok®, just about any Charwood grill will work, if its heat chamber has room enough for both the Charwood and wood chips.
Charwood Grilled Salmon- Preparation
Preparation is key with salmon and setting up the cooking equipment. So, first prepare the fresh salmon fillets by lightly seasoning with EVOO, salt, pepper and if you have it- fresh dill or fennel. Let them sit and soak up all those great flavorful ingredients for about half an hour or until the salmon reaches room temperature. Chef’s Tip: Do not use salmon that is past its prime, thinking that the smoke will disguise the slightly off flavor of the fish. Only use the best salmon available.
While the fish is marinating, begin preparations for the actual grilling by first firing up SmokinLicious® all natural Charwood using a hollowed chimney starter. Never use charcoal lighter fluid! Or Charwood, charcoal briquettes, pretreated with petroleum-based starting fluid. In addition to ruining your salmon with a foul aftertaste, it’s safer not to consume the residue or remnants from petrochemical fire starter liquids.
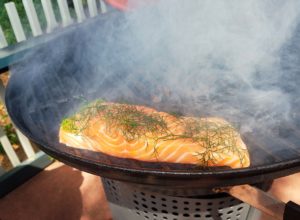
After your embers have taken on a medium to high heat condition (grayish color), place them directly in the center of the grill’s heating chamber. Put the grill grate on over the fired embers and clean it by using either a halved onion or lemon like you would use a sponge but, do it quickly and in short strokes to avoid getting fingers or hands burned.
Smoking the Charwood Grilled Salmon
Next, position small amounts of the smoking chips (a few large handfuls, I’m using SmokinLicious® Grande Sapore) around the outer fringes of the main concentration of burning Charwood. This allows the wood chips to take on two roles- 1) indirectly contributing to the cooking process, and; 2) producing a burst of smoky vapor that flavors the fillets.
A minute or two after you’ve positioned the smoking wood chips and reattached the grate, place the salmon fillets, skin side down on the grate, directly over the medium embers and cover. Grill and smoke the salmon for about 4 to 6 minutes, uncover and gently turn the fillets over, cover and grill and smoke the skinless side for no longer than 2 to 4 minutes depending on the thickness of the fillets.
Chef’s Tip: Be careful not to overcook. You can gauge the finish of the fillets be being able to flake them with a fork.
When done, remove the skin by gently peeling away with a fork or just serve skin side down. For a nice finishing touch, brush with a bit more, high-quality EVOO, season with freshly ground salt and pepper to taste. Feel free to garnish with fresh dill, fennel edible flowers or lemon. Hope you enjoyed Chef Calle’s recipe Charwood Grilled Salmon Fillets for a Hint of Smoky Flavor!
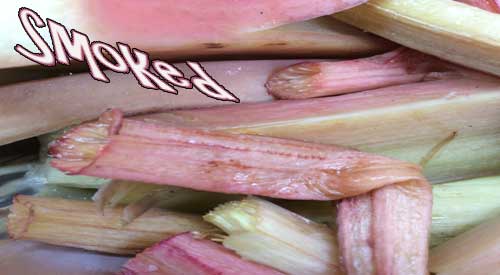
Rhubarb Smoked – I will make a confession: I don’t like rhubarb, a spring to early summer perennial vegetable, on its own, likely due to the very tart flavor. I do, however, enjoy this vegetable smoked and then blended with a sweet fruit.
This is likely why you may not have realized that rhubarb is a perennial vegetable since this is so widely used for dessert items. The rhubarb stalks are suitable to eat but the leaves are poisonous meaning they should never be eaten or added to a smoothie. Since this is a tart vegetable, I am going to first smoke it to change the balance of that tartness. Later, I plan to use these smoked stalks in combination with some smoked strawberry to make a strawberry-rhubarb fool, a delicious treat or dessert.
For now, let’s get about a pound of fresh rhubarb, hopefully from a garden or a fresh market, and meet at the smoker for an easy method of infusing wood flavoring to this tart stalk vegetable.
Smoked Rhubarb- Selecting and Preparing
#rhubarb
Rhubarb is a perennial vegetable that prefers cold conditions to thrive. When first planted, you won’t be able to harvest any of the stalks until the second year, similar to growing asparagus. When ready to harvest, you’re looking for stalks 12 to 18-inches in length with good girth to them. If the stalks are too thin, that means the plant does not have enough nutrients.
Here is a great guide on growing your own rhubarb for those that want to add to your garden production or simply like this vegetable: https://happydiyhome.com/growing-rhubarb/
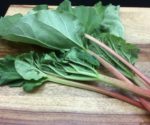
Once harvested, clean well under water and pat dry. Trim all the leave ends from the stalks as these are poisonous, and discard. Note you can compost the leaves as the poisonous oxalic acid breaks down quickly when decomposition begins.
I prefer to cut my stalks into 3-4-inch lengths. That’s it! Likely one of the easiest vegetables to prepare for the smoker. Speaking of the smoker, time to prepare ours. I’ll be using an electric smoker today since smoking rhubarb takes very little time.
Tasting Notes: Whether to cut the stalks is dependent on what you plan to do with the rhubarb so adjust this step according to your planned recipe.
Smoked Rhubarb- Fire Up the Smoker!
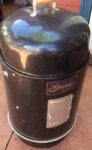
The Electric Smoker for our Rhubarb (smoked) technique
I’ll be using a standard vertical electric smoker that uses lava rocks as the radiator of the heat as well as an electric element as the fuel/heat source. My electric smoker allows me to use wood chunks so I have an assortment of small sizes that total about 6 ounces of hardwood. The double filet wood chunk size is ideal and as a tip, if you note to SmokinLicious® the need for thin chunks, these can be provided.
My set up is simple: I wrap one of my grill grates in aluminum foil, place my element on the lava rocks and insert wood chunks between the element’s spaces. I’m using a combination of maple and cherry hardwood. I add my water pan with about 2-inches of hot water so energy from the unit isn’t wasted heating up the water. On goes my tray of pre-cut rhubarb that are spaced to allow the smoke to penetrate all around. Leave these untouched on the smoker for about 20-25 minutes or until the thickest stalks are fork tender.
The best part about rhubarb on the smoker is it takes very little effort. Trim, clean, and cut to size then place on the grate and smoke. In about 15 minutes time, you’ll see a golden hue come out of the rhubarb pieces. That means the smoke has penetrated its great flavor. Using a fork or the tip of a paring knife, I check the thickest stalk to be sure I can easily pass the metal tip thru. If so, then the rhubarb is tender and ready to come off the smoker.
Cut up Rhubarb pieces in the smoker
If your plans are to prepare this for rhubarb pie, then just continue with your favorite recipe. This step is simply to provide another flavor level and begin the cooking process. Check in with us soon as we release our version of the strawberry-rhubarb fool featuring this smoked rhubarb and smoked strawberry.
What’s your favorite method of cooking rhubarb? Leave us a comment to opine and subscribe to get all our postings on tips, techniques and recipes. Bringing innovation to wood fired cooking with recipes, techniques and the science behind the fire, smoke, and flavor. That’s SmokinLicious®.
The precious forest, source of forest grown hardwoods, covers 513,175 acres (801.8 square miles) and includes the Allegheny Reservoir Natural Habitat.
FOREST GROWN HARDWOODS
It is likely when you have your heart set on some wood-fired cooked foods that you give little attention to the wood that will be required for that cooking event. You may have seen wood smoker chips or chunks available in your local box store and decided that you can always pick those up last minute, to be assured your plans aren’t foiled. Or, you simply plan to go with charcoal chips without considering that this product is made from wood as well. Is the product made from something less than forest grown hardwoods? Smokinlicious® uses only forest grown hardwoods in the production of our entire line of cooking and smoking woods!
Unless you are in a direct county of involvement, you likely have not realized the invasions that are occurring readily to our forests, woodlots, and home landscapes.
To date, here are some of the diseases and infestations we are battling in the USA’s Precious Forest regions:
So why if you are a lover of BBQ smoking chips or BBQ wood chunks (smoking using wood chunks or woodchips) or other wood-fired foods, should issues with bugs be of concern? Because cooking by fire is the oldest known cooking method for humankind. Right now, you may simply enjoy 3 benefits of trees: for shade, for beauty (viewing), and for a flavor to foods cooked on your grill/smoker.
But there are many other benefits to forest grown hardwoods:
Decrease atmospheric carbon by capturing and storing CO2
Improve air quality by filtering pollutants and releasing oxygen
Reduce stormwater runoff and pollutants entering local water bodies
Increase property values by 3-7%
The pollutant removal alone that trees are responsible for provides a human health benefit worth $6.8 billion per year! Trees keep us alive!
As of December 2016, NYS DEC has detected an increased prevalence of Oak Wilt in the state which has no known treatment to contain and kill this fungus. Oak is one of the most popular hardwoods for wood-fired cooking methods.
Please, take the time to source wood for cooking from reputable sources and follow the laws in place in your specific state to ensure we can limit the spread of these pests and diseases, and continue to enjoy the oldest method of cooking: by fire!


 I line a disposable foil pan with a roasting rack, then place the shanks on the rack.