Our team developing traditional family recipes for the “Passing it on” series
If you have been a follower of our blog, you’re likely aware that we often feature a Guest Blogger. It’s great to get other ideas on outdoor cooking, recipes, and tips on anything to do with cooking and the outdoors. Many of our blogs offer a sharing of cooking styles and cherished traditional family recipes.
Recently, I had the opportunity to become another platform’s guest blogger. Or rather, guest cook!
Hello South Africa!
In 2019, we had the good fortune to begin offering our wood chip products in South Africa. This would not have been possible if it wasn’t for the help of some great South Africans. Who could have known that a pandemic would strike in 2020 and force a change in our business plan.
But here’s something great that came out of this! SmokinLicious® had the honor of meeting Clinton Phillay. Clinton has a passion for ensuring that traditional family recipes get passed on to others in order to keep the spirit of family cooking alive.
What a great goal and a needed purpose. SmokinLicious® was happy and honored to participate. Plus, the timing was perfect. SmokinLicious® is about to release our new YouTube channels featuring our step-by-step recipes as well as a channel just for business customers.
While you wait to see the first episode featuring our Smoked Dry Rubbed Chicken Drumsticks, check out the Passing It On channel: https://www.youtube.com/c/PassingItOn
This is a recipe source you’ll want to subscribe to and hit the notify button so you can begin a great collection of traditional family recipes.
Coming soon their TikTok account will feature these same recipes. Watch for it soon and subscribe!
Our outdoor kitchen guest blog is authored by Mike Cahil
Mike is part of the Content Marketing team and enjoys applying market insights to provide valuable content on all things real estate. Mike’s dream home would be mid-century modern style near the water.
As days get warmer and summer approaches we’re all looking for more ways to spend time outside. Whether it be biking, running, hiking, or walking we can all agree that being outside is one of the best ways to spend time during the summer. So why not cook outside too? Having an inviting outdoor space that can double as a beautiful kitchen is a great way to be outside and create memories to be cherished for years to come. For that, we reached out to the experts from Yolo to Palm City to provide our readers with a few tips for creating the Ultimate Outdoor Kitchen.
Make it your own Outdoor Kitchen
The trend of outdoor design is experiencing a dramatic shift today. Landscape designers are moving away from traditional masonry-built structures to waterproof cabinets equipped with storage, trash receptacles and even vegetable and herb potting areas providing a whole new experience. Moya Living and Urban Bonfire offer two creative and functional products that bring color and extreme functionality into the design and provide the structure with every ability to create the perfect outdoor kitchen. Whether the homeowner desires a smoker from Kalamazoo, a pizza oven from Lynx, or Versa Powder Cooker from Alfresco, the options are endless in the design creation. Outdoor kitchen design now takes front and center focus when planning a remodeled home and now is simply an extension from the indoor to the outdoor so that every space of the home is utilized. – Annette Reeves
Find a proper grill
The focus of any outdoor kitchen is the grill. At Chicago Outdoor Living we believe a grill’s value shouldn’t be based solely on price. Features such as design, quality of materials, and functionality, combined with price, play an important role in choosing the grill that is right for you. It is also important to be aware of the manufacturer’s warranty. Chicago Outdoor Living carries a variety of high-quality grills to fit everyone’s grilling needs and budget – Chicago Outdoor Living
Our Authors image of cooking burgers
Choose complimentary finishes
Leather finish granite countertops are my go-to countertop surface for outdoor kitchens. It looks matte enough to feel like it belongs outdoors but is cleanable and ages well. – Attainable Form
Utilize misting systems
During sweltering summer days that are hot enough to have you fantasizing about moving to Antarctica, it can be difficult to enjoy your outdoor kitchen while you are feeling sweaty and scorched. With our misting systems that cool the air by up to 30 degrees without getting anyone drenched, you’ll be able to elevate your lifestyle and enjoy your outdoor kitchen in comfort all you want. – Advanced Misting Systems
Incorporate patio heaters
Enjoying your outdoor kitchen can be extremely difficult during winter days that are so cold it feels like you could chip a tooth from shivering. With our outdoor patio heaters that emit radiant heat to keep an area warm, you’ll have your own patio encased in a bubble of warmth, allowing you to enjoy your patio and outdoor kitchen while the neighbors are stuck indoors. – Gas Outdoor Patio Heaters
Storage is key in your Outdoor Kitchen
You can never have enough storage outside. The key is drawers: paper plates, utensils, corn on the cob holders, grill grates…. Keep them at your fingertips and you will be much happier. Drawer cabinets have to be fully enclosed to avoid creatures from crawling in for a vacation. – Cowgirl Q
If you love wood-fired flavors to foods cooked outdoors then be sure to consider wood storage when designing your outdoor kitchen. Pizza ovens, ceramic or clay ovens/smokers, traditional smokers and gas/hybrid grills all allow for the addition of charcoal, charwood, and/or hardwood to bring flavor essence to favorite cuts of protein, vegetables and fruit. Include in your design wood storage that allows for good air circulation to the wood as well as storage placed close to the equipment. Mesh bins or small wood crates work well for smaller pieces of wood that can fit on shelving under the counter or design open shelving in metal, stucco or concrete material that allow larger pieces of wood to remain dry, nonreactive and at the ready. – Smokinlicious
Don’t forget about the island
The best way to start creating your own Ultimate outdoor Kitchen is by getting ideas of different types of islands and kitchens. Researching will help you brainstorm an idea of your own (shape, size, color, components, etc). The next step is to find out where your Island will be placed. After finding a perfect fit, take a few measurements to see how the unit will be laid out. Over the years, KoKoMo has created various Outdoor Kitchen models with all kinds of different designs. A good example is our custom sports bar. This unit is fully stocked with all of our most popular components and accessories. This kitchen has a beautiful white-looking stone that covers the base, with a nice steel-looking tile to go with it. We used a large 15×15 aluminum shade cover with two giant TVs to entertain both sides of the island. – KoKoMo Grills
Keep it comfortable
Outdoor kitchens draw people in, whether it’s your guests gathering to offer help or little ones looking for a snack before the big meal. Make everyone comfortable with our thick, high-density cushions. Bonus tip: all our cushions are covered in water-resistant fabric, making rain and spills the least of your worries. And at the end of the party, if you need a special type of cover for your furniture or grill, we’ve got you covered with custom-made covers! – Classic Accessories
Consult with a pro for the Ultimate Outdoor Kitchen
For homeowners who want to build a fully functional outdoor kitchen area in their homes, I always recommend consulting with a designer, in addition to the outdoor kitchen company themselves. One thing I have learned with my experience in the business, is one layout for a kitchen does not necessarily work for every future buyer of the home — so the key is: versatility and simplicity. Most buyers these days are not so focused on decking, they want to see more grass. So artificial grass is a great alternative to decking, plus easy to maintain. Keep your dining area separate, and not built-in, should someone in the future want to change it, or if you entertain and need a different layout for a specific event. – Jenny Okhovat Homes
This certainly is a clear example of how anyone can produce authentic barbecue on the equipment they have even if it’s not a traditional smoker.
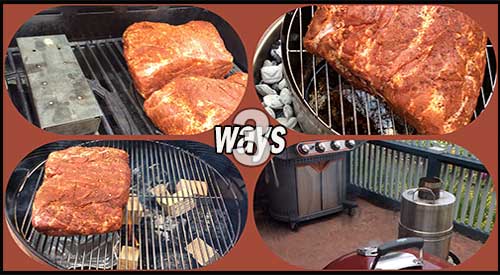
3 Methods of Smoking Boston Butt-
It should come as no surprise that majority of grill owners invest in a gas grill for their outdoor cooking with over 80% of these owners investing in multiple accessories for that grill. Often, many of these grill owners will venture to make an additional purchase of a second type of grill like a charcoal or pellet grill/smoker, in order to be able to cook more barbecue or smoked food options.
My intent is to demonstrate to you that you can produce authentic flavors, colors, textures, and aromas of favorite barbecue proteins with a variety of equipment, all outfitted with hardwood for the authentic wood flavoring.
I’ll be taking Boston butt to a traditional gas grill, a kettle charcoal grill, and a convection-style grill to demonstrate just how easy it is to cook this popular animal protein while giving you a bit of education on how these units are different when hardwood is incorporated.
Set Up Similarities and Differences for Smoking Boston Butt
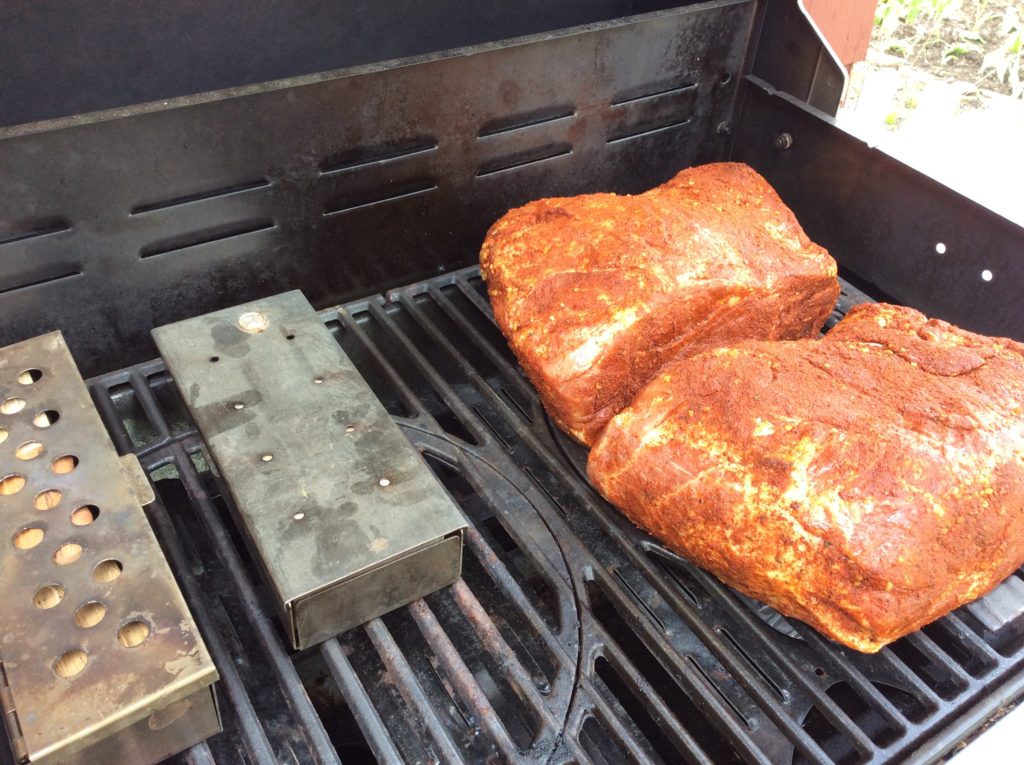
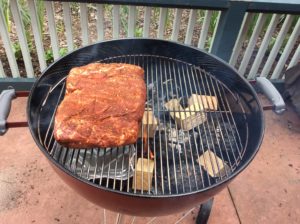
When it comes to setting up the grills for smoking, there are some obvious differences. First, let me name the equipment brands I’ve included and the intended set up of each for cooking and smoking the Boston Butt cuts, all of which approximate 8 lbs.
Our Boston Butt (s) on the Stok Gas Grill with accompanying Smoker boxes
The Stôk Quattro 4-Burner Grill:
If you are not familiar with this grill, it is equipped with an insert system to allow you to use a standard grilling grate, a griddle, grill basket, vegetable tray, pizza stone, Dutch oven, Wok, and other inserts that easily pop in and out of the cast iron grates. Despite this feature, you can do traditional smoking using wood chunks without the need for the smoker/infuser insert.
Whenever I smoke on a traditional gas grill, I always set up a two-zone cooking method. This means, on my 4-burner Stôk, I will ignite just two of the burners on one side. You can either place wood chunks directly on the heat shields of the unit or use a metal smoker box. My Boston butt will cook on the unlit side of the grill with a metal smoker box containing 3 wood chunks on the hot side. I’ve also included a second smoker box to make it easier to swap out the first when the wood becomes completed charred. My temperature is 225°F for the actual cooking.
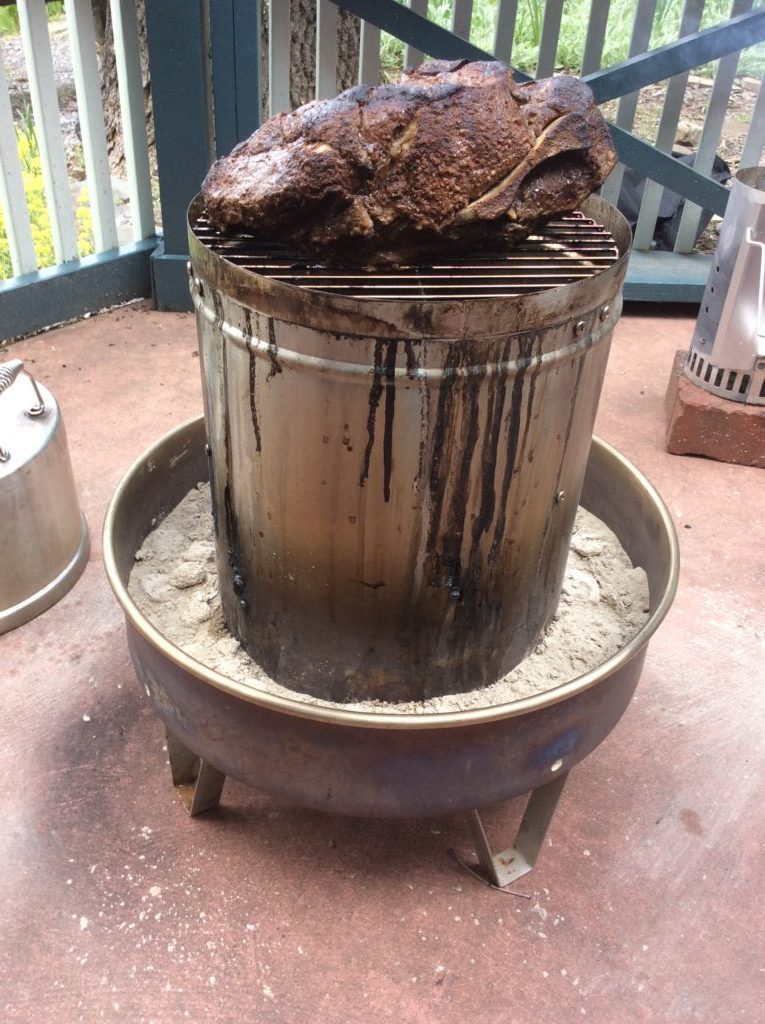
Our Boston Butt on the Orion Cooker with Minuto® wood chips in the inner ring
This is an outdoor convection unit that uses briquets for the heat and Minuto® Wood Chips placed around the drip/water pan for the wood flavoring. This unit will be the fastest to cook the Boston Butt, with an anticipated timing of 4-1/2 hours total. This is a direct cooking method that uses the radiated heat of the stainless-steel body to trap and circulate the heat for faster cooking time.
There is no ability to replenish the wood chips with this unit due to the high heat level. About 15 lbs. of briquet and 4 ounces of OrionCustom Wood Chips is all that is needed to smoke, plus some water in the water/drip pan for a moist outcome.
Our Boston Butt on the Weber® kettle Grill with double filet wood chunks
Weber® Kettle 22” Charcoal Grill:
Likely one of the most popular charcoal grills, the Weber® kettle provides for the opportunity to cook with charcoal and hardwood. I’ll be setting up my grill using a two-zone method; charcoal/wood on half the fire area and the meat placed on the indirect side.
Due to the length of time Boston butt takes to cook, you likely will need to replenish the charcoal for maintenance of heat level. I prefer to maintain a temperature around 250° F.
For similarities: both the Weber® and the Stôk grill were set up with a two-zone cooking method. Both included use of the SmokinLicious® double filet wood chunk. The length of cooking time between the charcoal unit and the gas unit are very similar, taking close to 10 hours.
For differences: temperature maintenance is easier with the gas and convection units. The charcoal unit requires much more supervision to ensure that the fuel (charcoal) is replenished prior to the temperature of the grill decreasing significantly. You are also able to check on the meat’s coloring and evenness of cooking with the charcoal and gas units while the convection unit is generally left alone until closer to the recommended cooking times. Though you can check on the doneness of the meat at any point with the convection unit, generally there is no need to do anything but wait.
Regarding cooking variations, let’s discuss color, bark formation, moisture of the meat.
Barbecue By All Methods
With all four of the Boston Butt (s) prepared in the same manner – excess fat trimmed to ¼-inch or less, a dry rub applied on all sides, and marinated for 24 hours – this is a fair comparison of how each grilling and smoking method produces the barbecue results commonly looked for.
Bark:
Without question, bark or the outer crust that develops from exposure to a lower temperature, long cook time, and smoke vapor infusion was greatest on the Boston butt cooked on the Weber® Kettle 22” Charcoal Grill. The gas grill produces the least amount of bark which is dominate on the outer edges and top surface.
Color:
The darkest coloring to the bark and the most obvious smoke ring was on the meat cooked on the charcoal grill. The Orion Cooker produced a brown hue to the meat’s exterior while the meat cooked on the gas grill retained a red hue that was indicative of the dry rub color. Charcoal grills will produce a black hued coloring due to two combustible materials: charcoal or charred wood and hardwood.
Moisture:
The meat that produced the greatest amount of rendered juice was from the charcoal cooking method. Second, the convection grill method followed by the gas grill. However, the greatest internal moisture level was obtained from the indirect cooking method on the gas grill, followed by the charcoal method and lastly the convection method.
Final Notes:
What we’ve set out to accomplish with this multi cook segment is to prove that no matter what equipment you have, you can produce authentic flavor, aroma and texture to Boston butt. This can be invaluable for those times when you may not have a lot of time to supervise the smoker or grill but still want authentic barbecue. Or, when you must make a lot of meat meaning you must use all the equipment options you have available.
All four Boston Butt (s) one done on charcoal with the Weber, another in the Orion with wood chips and two on the gas grill with wood chunks- the coloring is not much different!
From a taste perspective, our sampling group indicated that the strongest smoked flavor was from the charcoal unit, followed by the convection grill and lastly, the gas grill. Keep this information in mind when you’re cooking for others, as boldness of the smoke flavor can be controlled not only by the amount of time exposed to the smoke vapor, but also with the equipment used for the cooking and the amount and type of hardwood used in the process.
This certainly is a clear example of how anyone can produce authentic barbecue on the equipment they have even if it’s not a traditional smoker.
Making you an informed consumer through valuable articles like this one. Leave us a comment and follow us or subscribe for more great recipes, techniques, tips, and the science behind the flavor. That’s SmokinLicious®.
Pears, pears, everywhere! Why not try your hand with this easy method for smoked pears Depending on where you’re located, you’ll have at least a few varieties of pears to select from. Rather than just enjoy these as a raw fruit, try something truly unique that will give them a kiss of wood flavoring?
Stovetop smoking is so easy and a great way to still enjoy wood-fired flavorings during the winter months, when you may not want to venture out to the grill or smoker. I’ll be highlighting Bosc pears in today’s technique. To do this technique you will need:
Fresh pears – 4 will likely fill the smoker pan one time
A Chef’s knife, paring knife, and cutting board
A cooling rack
Pears cut in half
PREPARING THE SMOKED PEARS
When I purchased my Bosc pears, I made sure that they were firm to the touch so that I would have some longevity to their use in recipes for a while. Carefully, wash each pear and then pat dry with a paper towel. I then slice each pear in half, removing the stem tip. This will give me a flat surface to smoke and cook my pears since I am using a stovetop grill pan with my process. That will allow me to form some great grill marks on the pears while they cook. The benefit to using halves of pear is I can feature larger pear cuts in a salad or dessert, highlighting the golden smoked color.
Once the pears are halved and the stems removed, I will core out the seeds and hard seed membrane with a small paring knife. Once that step is complete, I start the heat under my stovetop smoking pan.
We have all been in Tom’s position. We love grilling and smoking but prefer the warmer weather. For those of us in 4 season climates with below zero temperatures in winter and lots of snow, it seems too hard to continuing grilling! But just as Bert remarks, you do not have to give up cooking outdoors just because of the weather.
Collage of Smoked Chestnuts go on a Stovetop Smoker
SMOKED CHESTNUTS ON A STOVETOP SMOKER!
Depending on where your located, chestnuts may only be available for a short period each year, usually around the holidays. Mostly pan roasted in the oven, why not do something unique with this prized fruit and smoke them! In addition to the chestnuts, you’ll need a stovetop smoker, purchased or you can make your own with tools likely in your kitchen. You can see our writing on the “The Kitchen Find” which will guide you on what is needed.
about 2 hours of time. Be sure you also have a hood vent where you will be using the stovetop smoker in order to maintain a smoke-free kitchen.
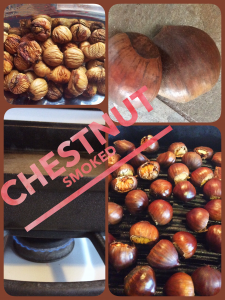
You will find chestnuts available prepackaged or in bulk when in season. Although the packaged product will include a directive to cut an X in the flat surface of each nut, I grew up in a household where we always cut off the stem side. This is the small, dark cap side to the chestnut. The chestnut has a cap and a pointed end giving it a bloated teardrop look. I have found that when smoking, I get better control of the smoke infusion with a fresh cut to one end. Keep in mind, not all the chestnuts purchased will likely be viable as often mold will take hold of some of the chestnuts which you won’t see until you cut into them. As the chestnuts age, they can develop a fuzzy mold on the outside which will tell you not to waste your time cutting that one open! Simply discard!
Generally, chestnuts have a flat side and a rounded side.
To prepare them:
lay the chestnut on the cutting board with the flat side down. Place your knife blade over the small dark cap, and slice off in one motion. This will reveal the chestnut meat inside which will have a yellow-white hue. Once the cap is off, you’ll be able to tell if any mold has set in as it will have a marked gray/black appearance. If any mold is noted, discard the chestnut as it won’t cook tender. If the majority is free of mold, go ahead and keep it for the smoking/cooking process.
To do stovetop smoking, there are 4 parts needed:
a pan to hold the heat and wood chips
a drip pan to prevent rendered fat and juices from entering the wood. Generally, you only need the drip pan when you actually have a food item that will produce juices or fat drippings.
a grill pan
a lid.
Note: Smoked chestnuts will not produce any drippings though they do have a percentage of water that will be released as steam into the lid of the pan. Just be sure when you open the lid that you keep any collected water from dripping back into the cooking grate.
We’ve all had those moments when the food comes off the smoker or grill and we wonder, What went wrong??
Sometimes the event is so bad you want to swear off outdoor cooking for good because of committing common smoking & grilling mistakes. I’m here to ask you to step away from the ledge and think about whether you do any of the following things. The more items on the list you engage in, the more likely you can benefit from my suggestions.
SMOKING & GRILLING MISTAKES:
#1 Resting Meat
This tends to be the common practice for roasts and steaks/chops. You’ve managed to get a nice crisp skin to the roast or steak and then you let it sit or rest, thinking it will make the outcome juicier. You end up with a soft skin, a wet outside, and waxy fat. These are meat cuts that don’t require resting. In fact, they will rest enough on your dinner plate so they are best served hot of the grill or smoker, without a rest period.
#2 Using Too Much Wood
You know that charcoal and gas are the fuels used to reach and maintain temperature while you’re cooking, and that hardwood is what flavors your food. You want to ensure there is adequate smoke flavor so you add 10 pieces of wood chunks to the hot coals when you start cooking. Then after the first hour, you add another 6 pieces of wood. STOP! That is way too much and simply put, a waste of a tree. On average it takes just 6 ounces of wood to start flavoring meat. My rule of thumb is to add 3-4 wood pieces for a full chimney of charcoal plus a couple of pounds of unlit. Only when those pieces are fully combusted (black and ashy) do I add a couple more pieces. Depending on what and how long I’m cooking, I may only use 6 pieces total.
#3 You Soaked Your Smoking/Grilling Wood
I know this is one of the biggest controversies out there when it comes to smoking with wood. To soak or not. I take the stand that you should never soak the wood as adding water will only fluctuate your cooking temperature and take more energy away from the fire to steam the water from the wood. Remember, the wood cannot start to combust until the excess water has been vaporized. Work with a wood that has at least 20% moisture for the best flavor.
#4 Room Temperature Meat
It is well documented that when you want to attract smoke vapor from burning wood, colder temperatures are like a magnet. Don’t take the meat out of the refrigerator until right before you’re ready to place it on the grill. In addition to attracting smoke vapor, colder temperature meats will warm up faster in your equipment than if you left them out on the kitchen counter.
#5 Searing to Lock in Juices
This is the one item even well-known restaurants can get wrong. Searing meats before finish cooking does not lock in the juices. What it does do is brown the outside of the meat and firm up the outer surface, giving a distinct pleasant flavor. The meat fibers do not get sealed by this method or produce any additional juiciness to the meat.
#6 Marinating Overnight or Longer
As marinades tend to contain oil and meat is made up mostly of water, the two tend to compete against each other. Here’s the thing with marinades. Marinating for long periods of time do not allow the marinade to penetrate any deeper than if you marinate for just one hour. In fact, you have an increased risk of breaking down the meat fibers too far with a marinade, producing a soggy outer layer. Stick to short marinade times and understand most of that flavor will penetrate only to the outside layer.
#7 Don’t Trim the Fat Cap
Just like meat being made up of mostly water, fat is made up of oil. Again, water and oil don’t mix. Leaving a fat cap on meat only allows it to melt and drip into the equipment you’re using. This can produce some additional flavors to the meat but allow too many drippings into the fire area, and you’ll cause flare ups that will deposit soot onto your meat. Don’t forget, most of us have a habit of trimming fat off meat before we consume it.
listen to our blog regarding wood chips for smoking
One vegetable that is available throughout the year is the onion. Although you’re likely accustomed to using this in recipes as an added natural flavor when you wood-fire the onion, something magical happens to its cell structure that turns these into the buttery, melt-in-your-mouth gems that you’ll want to use in even more recipes.
Onions are high in vitamin C, can aid in weight loss, and have reduced certain cancer risks, especially those associated with the digestive tract.
Whether you elect to do the standard yellow onion, the sweet red onion, or shallots, you will love how smoke vapor works to bring out the best in any variety.
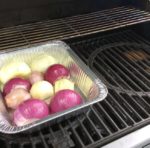
Wood Roasted Onions- Preparing for the Grill
Before preparing the onions for the grill, let’s get the grill started by lighting the burners on only half the grill. This is referred to as two zone cooking. On the lit burner side, I place 2 wood chunks – I’m using the Single Filet size from SmokinLicious® – directly on the heat shields of my hot burners. This will provide the wood flavoring to the onions. My burners are set to medium-low which usually produces a cooking temperature of about 300°F. Simply adjust your burner setting to reach this temperature.
For the onions, I simply cut the tops of, slice in half and remove the skins. I place the halves cut side down in a roasting pan and add about ¼ cup of oil to the pan. With my pan ready, I place it on the unlit side of the grill and close the lid. In about 75 minutes, these will slightly charred, tender, and juicy.
Tasting Notes: Although I used avocado oil since you are not grilling over direct heat, you can use other oils such as olive, almond, walnut, grapeseed, coconut, sesame, canola, etc. Remember, some varieties of onion are considered herbs so doing an assortment of types will give you an abundance of flavors.
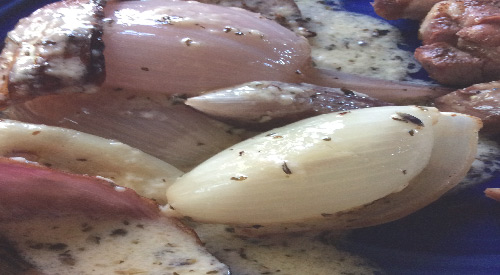
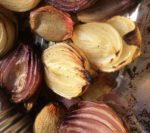
Wood Roasted Onions- The Longer the Wood Roast the More Flavor
You’ll find as these onions cook and absorb both the smoke vapor and oil, the scales of the onions will separate and caramelize. The results are tender, juicy and flavorful with a hint of woodsy from the charred edges.
I decided to make a simple sauce of butter, cheese, parsley, and pepper for my onion mix and served these alongside a pork steak, also cooked on the grill with a two-zone method.
The best part is onions are available year-round so I can do this method even in the dead of winter, as remember, the gas grill still functions even in the cold! For those who like to freeze produce, this freezes very well so grill a lot keep them so they’re ready for the winter days you don’t feel like lighting the grill. Just think what an onion soup will taste like when you wood-fire the onions first!
Tasting Notes: If using a charcoal grill, still use a two-zone cooking set up meaning charcoal on only one side of the grill. Be sure you only cook with hot coals, no flames. This type of grilling can have more challenges to steady temperature so make sure you check the onion pan more frequently.
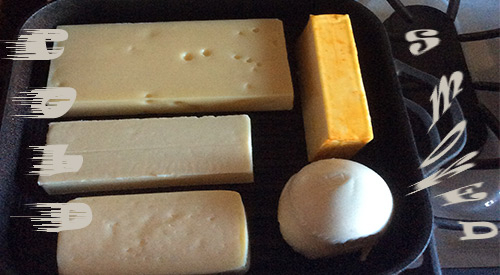
Cold Smoked Cheese is a very simple technique with very rewarding results. Follow our instruction and enjoy some all natural smoked cheese.
THE EASY METHOD TO COLD SMOKED CHEESE
listen to our blog regarding wood chips for smoking
The cooler season is here and that’s the perfect time to think about cold smoking techniques that bring special flavoring to heat sensitive items. First up for us, cheese! We’re lighting up the Technique Cast Iron Stove Top Smoking Pan and loading it up with our favorite varieties of cheese in preparation for a couple of recipes. If you don’t own a stove top smoker pan, see our blog titled “The Kitchen Find” which will guide you on using items likely found in your own kitchen.
Plant-based burger taste better when cooked with wood chips or wood chunks for added flavor!
What is a plant-based burger? There is no question that this has become the new rage. Plant-based burgers have been introduced not only to the grocery meat case in over 8000 locations but to thousands of restaurant locations world-wide.
It is a genetically modified version of heme, the iron containing molecule in soy plants, which is what accounts for a “meat” flavor. It also incorporates coconut oil and potato starch to give a more burger-like texture, something that has been a complaint with vegetarian or vegan patties. Brands like Impossible Burger® use a braiding of minerals, fats, and proteins to keep the burger from falling apart.
To compare an animal protein burger with a plant-based burger from a nutritional view, you’ll find that the plant-based burger may not always be the better choice. It really depends on the brand but know you should look at the saturated fat level and calories as the plant-based burger is not always lower than the traditional beef patty or even a poultry patty. Sodium levels should also be monitored.
Plant-based Burger- Make It More Like A Burger Experience
You may know that many people accept that there are two camps for cooking burgers: grill grates whether on a gas grill or charcoal, and a griddle whether on a stove top or on a griddle insert of a grill.
I would argue, however, that there is another camp. Those of us who believe in live fire with wood for cooking common items like burgers and dogs. This is how you take an average burger and maximize the experience of eating while creating a newness to a very popular American item.
The influence of plant material combustion and release of the flavonoid composition of this material is what can take your average burger to the next level. I don’t know how many times I’ve had dinner guests inquire how I made something like a burger taste so high quality. It’s only then that I reveal my use of hardwood, whether chunks in a smoker box, chunks directly on hot charcoal, or a sprinkle of wood chips on a griddle or plancha. Wood takes even the most basic food item and brings out umami.
Plant-based Burger- Grill Set Up
For the easiest cooking of your plant-based burger, start by setting up an outdoor grill with a two-zone cooking set up. That means one half of the grill has no burners lit for the gas grill, or no hot coals on one half of the charcoal unit.
Start the burger cooking by placing the plant-based burgers on the indirect side (no direct heat) and adding wood to the direct side. This is where a smoker box comes in handy on the gas grill, which I fill with small wood chunks. Close the lid and cook for about 7 minutes, unless the burger is particularly thick which would call for 10 minutes cooking. Open the lid and turn the burgers over still using the indirect side for cooking and allow to cook for another 7 minutes (or 10 for thicker cuts).
If you’re going to medium finish which is 145°F, then at about 125°F internal temperature, move the burgers to the direct heat side of the grill and cook leaving the lid up. This will sear the outside. Be sure to keep flipping the burgers every minute to ensure a perfect sear and not an overdone burger.
To me, this makes a plant-based burger even more of an authentic burger flavor with the simple addition of hardwood on the grill of your choice.
Have you tried and loved a specific brand of plant-based burger? Leave us a comment to state your preference and follow us or subscribe for more great recipes, techniques, tips, and the science behind the flavor. That’s SmokinLicious®.
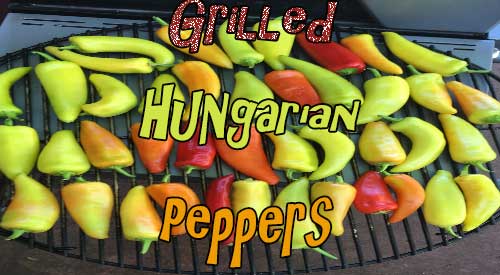
I love growing Hungarian wax peppers in my garden and then harvesting for recipes and freezing for future recipes. Hungarian wax pepper come in different levels of heat depending on the variety chosen. Mine are a hot variety but work perfectly for mixing with other creamy flavors to produce some great condiments and sauces. I will introduce you to two versions of my Smoked Hungarian Pepper Spread in our recipe blog which will post soon.
There seems to be some legend out there that wood-fired cooking methods are all about the endless hours of tending food and fire that produce taste results that are only granted to a small percentage of committed cooks; nothing could be further from the truth. Ready for simple methods of wood flavor infusion that do not take stockpiles of wood and equipment so large, you start thinking about adding on to your house?
Wood-fired cooking includes the simplest methods of wood infusion like the current rage with hand-held food smokers or even the stovetop smoker. Kitchen gadgets that have opened the door to anyone who wants to explore the fragrant and flavorful bounty that awaits all foods and beverages. One thing that still is evolving is the concept of spices not for your food but for your equipment!
If you’ve read some of our previous articles on wood flavoring you’ll come to understand and appreciate that there is no set rule on wood-fired cooking. Oh, yes, there is plenty of science when it comes to cooking with fire or as I like to say when you combust to flavor, which is what you are accomplishing with wood for cooking. I feel more attention should be given to the actual wood products; rather than focusing on the ingredients to the foods being cooked.
Wood is an ingredient
First, wood to us IS an ingredient, one that still needs to be balanced with the other components to bring forth a food memory. As an ingredient, the easiest by far to manage for wood flavor infusion is sawdust or in our Company’s listing,Smokin’ Dust®. Compatible with all types of equipment, Smokin’ Dust®literally becomes a ‘spice’ for your equipment.
Thinking of island flavors of pineapple, coconut, and mango for a recipe? Why not add one or more of those flavorings through the wood product? Yes, using all-natural flavoring infused into ourSmokin’ Dust® is one of the quickest methods of getting the great flavor to a specific regional dish. With 15 flavor-infused options that are 100% all natural, designed for cooking, and infused in hardwood, as well as 8 natural hardwood flavors, we’ve given new meaning to the word ‘spice’ as ours can now apply to the wood product! Remember, applewood doesn’t smell or taste anything like an apple. Use our apple infused product, and you’ll experience hints of cinnamon, nutmeg, and the bite of an apple!
Why settle for a run-of-the-mill smoking sawdust product that you don’t know where it comes from? A softwood, swept from the floor, shoveled from the ground, or worse, taken from under an animal? Instead, get excited about the flavor opportunities awaiting you and your equipment when you use a smoking sawdust product from a real cooking wood company. Get excited about the opportunities out there to experiment with, whether for hot smoking, cold smoking,handheld food smoking,stovetop smoking, or even traditional LP and charcoal grilling. And get ready to experience the world through flavor aroma!
Dr. Smoke- “Smokin’ Dust is one of our most customized and versatile cooking wood product.” which is a spice for your equipment
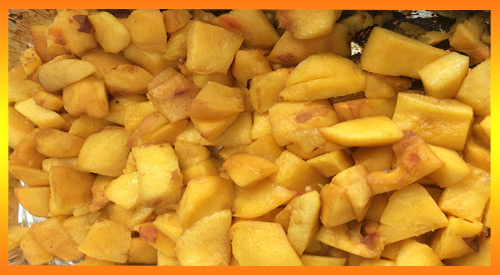
Our Grilled Peaches for the perfect salad addition with sweet onion, Tomatoes, and fresh herbs!
GRILLED PEACH SALAD- THE PERFECT SALAD!
Listen to our blog
If you’ve been a follower of our recipes and techniques for a while, then you’re aware of our preference to grill, smoke, coal cook, and ember fire in-season produce. Peaches are no exception and with our Grilled Peach Salad, get your taste buds ready for a real treat!
I’ve got my two quarts of fresh peaches and a plan to grill these on the charcoal grill using charwood coals. Then I’ll use my luscious smoked peaches in a salad that features two additional seasonal ingredients – tomato and shallots.
Get your chimney starter of charwood or charcoal and meet me at the grill for this quick technique and grilled peach salad recipe.
Whenever you use the charcoal grill, it’s always best to get it lit about 30 minutes ahead of cooking. I’m using a kettle-style grill made by Stôk that has a removable center grate for an assortment of inserts. I won’t be using any inserts for this cook as my peaches for the grilled peach salad recipe will stay in a disposable foil pan for easy cooking and removal.
Start by placing charcoal or charwood in a chimney starter. Place a Firestarter in the charcoal area of the grill and place the filled chimney starter over the starter. Lite the Firestarter and allow to remain in place until all the charwood has ignited and started to reduce to hot coals. While that’s burning, let’s prepare the peaches. Be sure you have a couple of wood chunks available to add to the coals when we are ready to grill. I like to use the single filet wood chunk size from SmokinLicious®.
Tasting Notes: there are differences in charcoal so be sure to use a natural charcoal or charwood product rather than briquets as briquets will produce more heat than you need.
Perfect Peach Bites
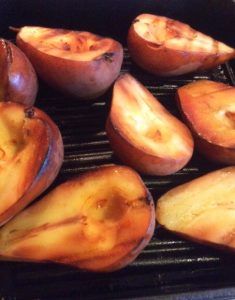
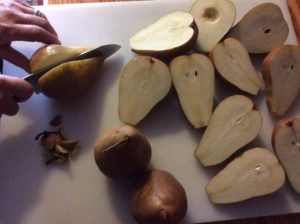
With our charcoal grill going, it’s time to start on the peaches. There are a few ways to remove the skin from peaches including placing them in hot water for a few minutes then removing and placing in a bowl of ice water. The skins will just peel off. I’m an old school so I use a sharp paring knife and just remove the skin.
Once the skin is removed, it’s time to cut the peach into bite-size pieces. You can easily cut around the pit and cut those slices into pieces. Place all the pieces in a foil pan in an even layer.
Tasting Notes: Try to purchase peaches that have some firmness to them if you don’t plan to grill them right away. The peaches should have no bruising and have a slight give when touched. Too soft and those peaches won’t hold their shape when exposed to the grill’s heat.
Smoking Process for the Perfect Grilled Peach Salad
With the peaches prepared, time to take them to the grill. Pour the chimney of hot coals into the grill’s charcoal area and add the wood chunks. Add the pan of prepared peaches and placed the lid on the grill. Be sure the outtake vent on the lid is ½ way open. The intake vent at the charcoal area should be ¼ way open. Now allow smoking for 15 minutes prior to checking. Remember, we want to add smoke without reducing the peaches to a puree.
Tasting Notes: Since peaches contain 89% water, they take in the smoke vapor extremely well. Keep that in mind when you select both the charcoal and wood. Remember, oak based charcoal tends to burn hot and has a stronger undertone to fruit.
Final Salad Prep- Grilled Peaches for the perfect salad addition!
While the peaches are absorbing all that great smoke flavor, return to the kitchen and prepare the remaining ingredients for our salad. You’ll need:
1 lb. tomatoes cut into 1/2’” pieces; or if using cherry or grape tomato, halved
3 tablespoons extra virgin olive oil, plus additional for final drizzle
2 tablespoons rice vinegar
½ teaspoon lemon zest
1 tablespoon lemon juice
1 shallot, sliced thin
fresh mint leaves torn
salt and pepper
I start by slicing my tomatoes in half, then add a teaspoon of salt to them while sitting in a colander so I can render some of the water. While the tomatoes sit, I start slicing the shallot into thin strips. At this point, you’ll want to check the peaches. They should be close to or ready to remove from the grill. I like to place them in the refrigerator for about 10 minutes to cool them down for the salad. While that’s happening, let’s prepare the vinaigrette.
I prefer to mix all the vinaigrette ingredients in a measuring cup so I can easily pour it to the salad right before serving, to keep the tomato and peach from getting too soggy. Start with the extra virgin olive oil and add the rice vinegar. Next, the lemon zest, lemon juice, salt, and fresh pepper. Whisk it all together and set aside while you combine the salad ingredients.
Tasting Notes: you can substitute cider vinegar for the rice vinegar and any color of tomato will do though I lean toward the reds and purples to give a color contrast from the orange peach.
Smoked peaches go into the serving bowl first, following by the tomatoes, and shallots. Pour the vinaigrette over the salad within an hour of serving and top with the torn mint leaves. A perfect balance of sweet, tart, smoky, and refreshing. An easy method and recipe you can have in 60 minutes. I love peaches so try our grilled peaches for the perfect salad addition for your next dish to pass! You will tantalize the guest taste buds!
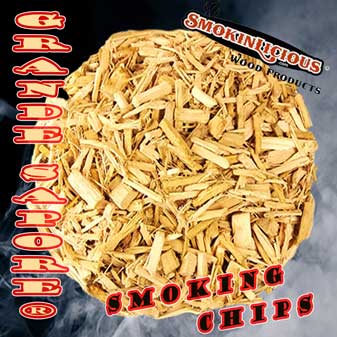
Smokinlicious® Grande Sapore-larger smoker wood chips or woood nuggets are crushed to preserve the great moisture level to be released during the cooking process.
A MESSAGE FROM DR. SMOKE on WOOD NUGGETS:
I want to thank everyone for their feedback and comments regarding “One Size Does Not Fit Everything!” There are so many smokers/grills on the market today, and we’ve always felt that one wood chip size does not fit every piece of equipment! Is the description “wafer”, nuggets, or chip size?? Users of the various equipment always seem to be trying to fit either an oversized piece or an undersized into unit to make it work! Just like when a recipe calls for a Tablespoon, you don’t add a cup. It’s the same concept with wood smoke flavoring of food!
So, after much research and work in the test kitchen, we, at SmokinLicious® will be welcoming new equipment at our facility to manufacture a variety of wood chip sizes. Our packages will begin to distinguish the following new concepts:
Wood Species
Sizing of the product
Fines Fraction
Bark Particles
Wetness (moisture) level
Ash level
Although we have been providing this customization to our wholesale customers for some time, we feel the time is right to make this information available to our internet/home user customers!
The first scheduled product will be the “SmokinLicious® “Wood Nuggets.” This product will consist of wood pieces approximately 30-35 mm by 15 mm, a perfect size when you want to add something other than a “double filet” chunk to the process but need something more than a small chip in order to avoid flare ups over hot coals. The Wood Nugget will have plenty of substance to produce excellent smoke vapor, the most vital element for infusing wood smoke flavor in foods.
This will allow the backyard barbecuer the means to set up the fire with a base hardwood for smoking and add something at the end to match- just like what commercial smokehouses do! Use your base hickory and add cherry nuggets to provide some great red hue to the end product!
At SmokinLicious®, we are constantly refining products and techniques for food smoking, grilling, ember fire and oven cooking. We will have a classification of products anticipated to be completed by the end of this year. We will introduce this array of wood cooking and smoking products over the internet by Spring 2015! As always, we welcome your comments and feedback!
Bon Bar B Que,
Dr. Smoke- Our wood Nuggets offer the same superb Smokinlicious® flavor quality when your smoker or grill needs something bigger than chips but less that chunks.
For more reading on cooking and smoking wood, check out these article:
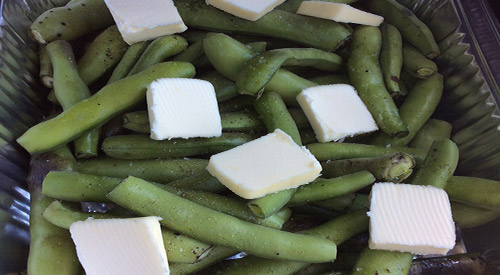
Fresh Fava Beans with Butter ready to become Grilled Fava Bean with a smoky flare!
ODE TO GRILLED FAVA BEANS
I love when the ideal weather comes around when at the same time there are so many options for fresh produce either at the Farmer’s Market or local grocery store. I tend to lean toward my grill and smoker for most of my cooking when the weather turns hot and steamy.
Beans are one of those vegetables that are spectacular on the grill but they get even better when you add a few wood chunks. I’ll show you how to prepare Fava Beans for the grill and give you my easy, fool-proof technique for incorporating wood chunks for flavor.
Before preparing the Fava beans, get the gas grill heated by turning on only half the grills’ burners which will be the side that radiates out the heat and holds the smoker box. For the smoker box, I’m using a stainless-steel model that has a hinged lid. I place 3 double filet wood chunks from SmokinLicious® in the box in a combination of woods. I’m using hickory, white oak and sugar maple to give me a great smoke balance to the beans. This will ensure I don’t overpower with the smoke vapor. By placing the smoker box with chunks on the grill grate as it preheats, it will be smoking by the time you have the beans ready.
Simple Bean Prep for Grilled Fava Beans
There is little to do with the Fava beans before they go on the grill. Wash them to start to make sure all the dirt and debris is removed. Pat dry with a paper towel and then move them to the cutting board. Remove any leaves and cut just the stem end to remove the stem. Place in a disposable foil pan, spread out evenly, and add roughly 6 tablespoons of butter to the beans, as well as salt and fresh ground pepper. That’s it. Leave the bean pods intact as they are going to act like a miniature steamer to cook the beans and ensure they don’t become over smoked.
With the grill heated and the wood chunks smoking in the smoker box, place the pan of beans on the unlit side of the grill and close the cover. Check that your grill temperature steadies out at about 375°F. If lower, simply increase the heat setting on the active burners. Too high, decrease the heat setting. Leave the beans untouched for about 30 minutes. Return to the grill, stir the beans and check the wood chunks. If the chunks are still emitting smoke, close the grill lid and leave for an additional 10 minutes or so, or until fork tender. Remove the pan from the grill and allow to cool for about 10 minutes.
Grilled Fava Beans- Buttery, Smoky Finish
After the beans have cooled enough to be handled, take each pod and push the beans out one end into a bowl. You may keep the empty pods to use for making broth or for puree in a sauce or smoothie. These Fava beans are now ready for you to enjoy as is or use in your favorite recipe. Now, I’m taking my Fava beans and making a dip with goat cheese, lemon and tarragon.


 recipes. If you don’t own a stove top smoker pan, see our blog titled