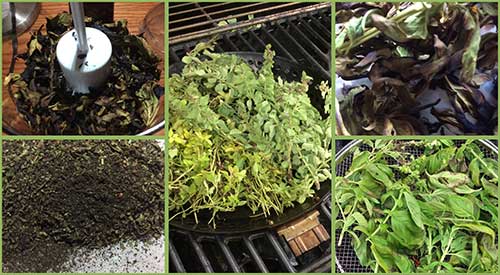
Our preparation of smoked herbs, from picking, smoking and grinding to make smoked herb dust. Adding great flavor to dishes.
SMOKED HERBS FLAVORS WITH SMOKED HERB DUST
Don’t make the mistake of thinking fresh herbs are to be used in dishes as, well, fresh only. Although you may have dried your fresh herb harvest before, we are bringing another alternative to you, smoked herbs.
We hot smoke the fresh herbs on the grill then turn them into a dust for use in all types of dishes. The smoking process will bring a depth of flavor that you’ve likely never experienced before. Go to the herb garden and pick your favorite varieties and let’s get making smoked herb dust!
Smoke Vapor Infusion
One thing about this smoked herb technique is you can do the smoke infusion by a variety of equipment methods.
For those with a gas grill, add wood chunks either directly to the heat shields on one side of the grill or add wood chunks to a metal smoker box that can be placed on the heat shields or the grill grate. For charcoal grill owners, light your charcoal and allow to reduce to hot coals only. Add a piece or two of hardwood chunks or a handful of hardwood chips to the hot coals. If possible, push the hot coals to one side of the grill. For both grill types, you want to use a two-zone cooking method so the herbs don’t catch fire.
For those that don’t own grilling equipment or who simply don’t want to bother lighting up the grill, you can use a handheld food smoker. Simply place micro wood chips in the bowl of the unit, place the herbs in a storage bag with the tubing of the smoker unit, cinch the end of the bag around the tubing, and light the chips. I like to leave the smoke in the bag for maximum smoke vapor infusion.
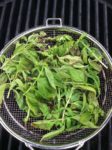
I used both my gas grill and charcoal grill for the smoke process by placing my herbs in a vegetable basket and grilling with the herbs on the unlit side of the grill. Within the first 5 minutes, you’ll see how the herbs lose moisture and begin the drying stage.
Tasting Notes: I find the handheld food smoker will produce the boldest smoke flavor to the herbs. The intensity of flavor rated from lightest to boldest based on equipment would be a gas grill, electric smoker, pellet smoker, charcoal grill, handheld food smoker.
Grinding Process
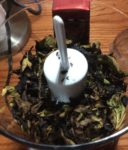
Once the herbs have charred and dried, it’s time to remove them from the grill and bring them to the food processor. I have a mini processor that only has two settings: chop and grind. I prefer to use this appliance to bring the smoked herbs to dust level but a spice grinder works just as well.
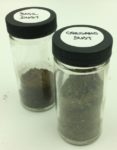
First, remove all the herb leaves from the stems and place a small quantity in the food processor bowl. You can remove the leaves by placing the entire herb sprig in a colander and pressing the leaves through to parchment paper. Secure the lid and grind until you get as fine a dust as the appliance will allow. Both the appliance and the herb will determine how fine the herb dust will get. As you will see, basil dust becomes finer than oregano. This technique will work for just about any herb you can grow or locate at the market. Store the herb dust in glass or metal jars for up to a year.
Tasting Notes:Smoked herbs are much stronger in flavor than the standard dried herb. Adjust the amount used in recipes as needed. It is often best to start with less, taste, and then add more as needed.
So Many Uses
Experimentation is key when it comes to #herbdust. Most often, herbs will be applied to meats and poultry, perhaps rice and pasta dishes, but there are so many more foods that are good pairings for herb dust. Let’s take parsley as an example. Commonly used with fish and beef, parsley is a great pairing for sweet items as well. This includes banana and cream. It’s important that you look beyond the traditional side dishes and entrees and explore the sweet side of what herbs can offer. By doing so, you’re sure to find endless combinations that will tickle your palate and give you more pleasing menu experiences.
The Culinary Crew wants you to know …
… that the two-zone method is certainly a practice that you will want to master and prioritize in your wood cooking toolkit, especially when grilling and smoking delicate fresh consumables like herbs. Not only will two-zone cooking avoid those acrid tastes associated with flare ups, it will infuse your food items with a nice balance of wood smoke flavoring.
The four season has an affect on wood storage and its cooking or smoking potential
Listen about proper wood storage
Wood Storage-I recently had a lovely telephone conversation with a new customer who had previously lived in the Carolinas and now was dealing with the great variability of climate in the state of Colorado. This customer had the fortitude to think about the altitude, humidity and temperature differences in Colorado and how they might affect hardwood purchased from us and stored in his new home state.
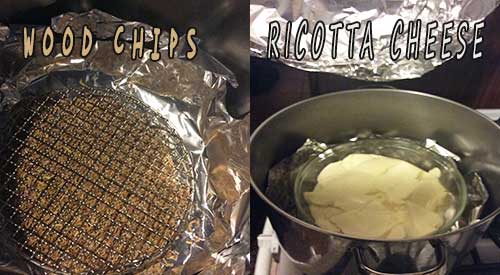
Smoked Ricotta Cheese – I know not everyone has a dedicated stove top smoker but I do know that we all have a large stock pot handy. I’m going to show you an easy way to convert that pot to a stove top smoker by using micro wood chips, aluminum foil, and a roasting rack. I’ll explain to you a combination hot/cold smoking method to bring a smoke flavor to whole milk ricotta, that will allow you to use this product in any recipe calling for traditional ricotta. Find your stock pot and roasting rack, and let’s get smoking!
Once you’ve selected a stock pot to use for the smoking, the preparation of the pot is quite simple. Start by placing 2 sheets of heavy-duty aluminum foil in the bottom of the pot, allowing it to go up the sides slightly. Then select the micro wood chips of your choice – I’m using a Sugar Maple Minuto® wood chip in size #6 – and spread into a thin layer on the foiled bottom. Add a roasting rack. Mine is round to fit easily in my pot. I also like to line the lid of the pot in foil as all hardwood contains creosote which can cause some discoloration to the pot. The foil will protect this from happening and makes clean up a breeze.
Then place the prepared pot with the lid in place over a medium-high heat and allow the chips to heat until they are consistently producing smoke. This will take less than 15 minutes.
Once the chips have started to combust and produce smoke vapor, it will be time to add the ricotta. I am doing 3 pounds of whole milk ricotta as I plan to make a dessert pastry horn and then keep some spare smoked ricotta cheese for pasta recipes.
After 12-15 minutes of heating, lift the lid and place a heat safe container of the ricotta on the rack inside your smoking pot. Secure the lid in place and allow this to stay on the heat for about 5 minutes. Then shut the heat off and leave the pot with the ricotta inside untouched for about an hour. Let the smoke infusion occur with this cold smoke technique.
Tasting Notes: Any hardwood can be used for the smoke infusion but note that by retaining the pot lid in place, you are limiting the oxygen that can enter the pot. This produces a much bolder smoke infusion than is common with the same wood used on a traditional smoker or grill.
Smoked Ricotta Cheese- Smoky, Creamy Goodness
Here’s something to keep in mind with this stove top DIY smoking technique. I have a very tight seal on my pot which means it doesn’t take a lot of wood chip product to infuse a smoky flavor in the ricotta. Plus, the fat level of this dairy product attracts smoke vapor well as this is high in water content which smoke vapor is naturally attracted to.
If after about an hour, and after you’ve sampled the smoked ricotta, you still desire more smoke, simply turn the heat back on for about 10 minutes to stimulate the chips for additional combustion. Then repeat turning off the heat and allowing the ricotta to sit absorbing the smoke for the set amount of additional time you want. Once done, refrigerate the smoked ricotta until you are ready to use it, keeping this covered well. If any liquid accumulates while refrigerated, simply pour off before using the smoked ricotta in a recipe.
To get your recipe ideas stimulated, I’ll offer up my Smoked Ricotta Pastry Horn recipe which is super easy, fabulous looking, and can be made with an assortment of filling options. Keep watching our website for the announcement on this recipe release.
What’s your favorite food to stove top smoke? Leave us a comment to opine and subscribe to get all our postings on tips, techniques and recipes. Bringing innovation to wood fired cooking with recipes, techniques and the science behind the fire, smoke, and flavor. That’s SmokinLicious®.
The Culinary Crew wants you to know…
… that experimenting with “Do It Yourself” techniques can certainly apply to using your outside charcoal or LP gas grill as a quasi-smoker too! We’ve heard from many of our followers about deep dished aluminum food serving trays and even pie tins being used to offer a quick and easy try to food smoking.
Wood Smokers need Charcoal for fuel/heat/combustion and smoking wood for flavor!
WOOD SMOKERS & GRILLING- RETURN TO THE BASICS! – I recently received an email from a new customer who was questioning the moisture level of the wood she recently purchased. Her claim was, she thought the moisture wasn’t ideal as she was finding that the wood chunks “weren’t catching fire.” That got me thinking that despite what we publish for information on the various methods of wood-fired cooking, when it comes to smoking, the very basics of this method may not be understood, as well as the basics of grilling with wood.
My goal with this article is to remind you of what is needed to be successful with each type of wood-fired method.
One of the knowledge areas I feel is weak is understanding what is needed from the wood for different styles of wood-fired cooking. Let me get you educated.
Smoking
Hopefully you know that hot smoking means you are cooking with wood material to affect the color, aroma, texture, and flavor of the food. This method requires a lower temperature, a longer cook time, fuel for temperature and wood for flavor. Certainly, you can use wood for both flavor and fuel but a more cost-effective method is to use charcoal or briquets for fuel and wood just for the flavor, aroma, color, and texture to food.
For cold smoking, you still need the same items listed above but the temperature needs to be under 80°F which means the fuel is often wood which will flavor, color, provide texture, as well as the minimal heat level.
What’s the difference for these methods? Moisture of the wood product.
Hot smoking needs hardwood that is at least 20% moisture and preferably under 30%. Cold smoking needs hardwood that is under 15% moisture.
Wood-Fired Grilling
This method of grilling generally requires the use of wood both for higher temperature and for flavor. Here’s a big difference with this method: you can vary the type of food used on the grill but how you position the food to the active fire versus the hot coals is another need. Often operators of a wood-fired grill will have a couple of stations to the fire. One will be direct fire or flame cooking. This is for mostly animal proteins that you want to get a great char on the outside while cooking relatively quickly. Then there is wood grilling with the hot coals from the fire. By raking hot coals to one side, you can direct fire items that need less char to them like fish, vegetables, fruits, etc.
Another option with wood-fired grills is you can do both direct heat cooking and indirect. These two methods can also be done directly on cooking grates or by using grilling accessories like high heat tolerant cookware, grill baskets, and grilling pans.
Animal Protein Preparation
Everyone has their own preference when it comes to preparing meat or poultry for the grill or smoker. But did you know that marinating meat or poultry should be done for shorter periods of time not over night or longer. Why? Marinades contain oil and meat contains water so… just like the old saying “oil and water don’t mix”. Don’t take a risk of breaking the fibers down too far and stick to short marinating times. Don’t forget – any marinade left in the bag or pan after removing the meat or poultry should be discarded as it CANNOT be reused due to bacteria growth potential from exposure to raw product.
Now if you’re thinking about a dry rub, feel free to marinate just as long as you want. In fact, I’ve been known to marinate up to 3 days!
A wet rub, however, goes by the rule of a marinade. If you’ve included oil in that rub, short marinating time is best.
Wood Smokers- Wood Quantity Doesn’t Make It Better
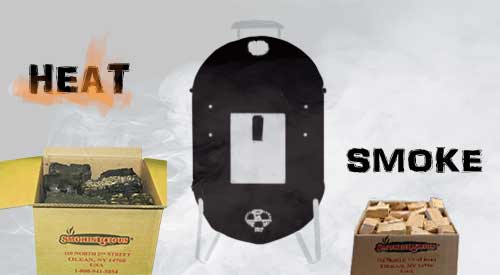
If you’ve made the commitment to introduce wood flavor to the grill or smoker, then know up front, it doesn’t take a lot of wood to add flavor. As mentioned at the start of the article, you need to be sure you select the right wood chips, chunks or charwood with the right moisture level for the right application.
When smoking, about 6 ounces of hardwood is ideal to start. Although you may need to add wood during the cooking process dependent on what your cooking (larger cuts of meat may require you to feed additional wood every hour), always start with a reserved amount.
When grilling, the same quantity of wood applies – about 6 ounces. Wood is the ingredient that works with the other flavors to bring out a balanced wood-fired flavoring of the food. Put too much wood on and you’ll have food that tastes like an ashtray. Put wood on that contains too much moisture and it will produce an acrid smoke that will leave bitter flavors and black coloring to the skin or bark.
Let’s summarize. Decide what method of wood-fire cooking you plan to do, if you plan to set up a direct cooking method or indirect, and the hardwood you plan to use. If smoking, plan on that hardwood to smolder given a moisture level of at least 20%. If wood grilling, plan on that hardwood to be drier, between 15-20% to allow it to release flavonoids quickly. Start with about 6 ounces of wood regardless of the method you select and add only as the previous wood has combusted. That’s the basics to having a fun, positive experience no matter what you elect to put on the grill or smoker.
Making you an informed consumer through valuable articles like this one. Leave us a comment and follow us or subscribe for more great recipes, techniques, tips, and the science behind the flavor and fire. That’s SmokinLicious®.
We explore the question “is wood-tar creosote” bad for your BBQ food?
IS CREOSOTE THE ‘MONSTER’ TO WOOD-FIRED COOKING
There are lots of stories out there in the BBQ world about creosote! Most have the same tone: creosote is not something you want when you cook with wood.
Unfortunately, that can never happen as creosote is always present in wood.
So, why has creosote become the monster of BBQ cooking?
Likely because there is confusion with another type of creosote: coal-tar creosote, commonly used to preserve such things as railroad ties, telephone poles, bridges, etc. You know when material has been exposed to coal-tar by the black, charred appearance.
Wood-Tar Creosote- Advantages
One of the primary advantages to having creosote in hardwood is its ability to act as a preservative. Long before equipment was designed for cooking, people would dig holes in the ground to produce a smokehouse for preserving game meats they hunted. It was the only method of ensuring safe consumption when refrigeration wasn’t readily available.
Wood-tar creosote is colorless to yellowish and presents as a grease or oil consistency. It is a combination of natural phenols which are the natural compounds that produce the flavors of BBQ when the wood is combusted or burned. In addition to the distinct flavor, phenols are also responsible for the aroma and color of BBQ foods.
Guaiacol is a compound derived from methyl ether and is responsible for BBQ’s smoky taste while the dimethyl ether syringol is the chemical responsible for BBQ’s smoky aroma.
Wood-Tar Creosote- Risks
Now that you know not all of creosote’s chemical composition is bad, what are the risks to a wood-tar creosote?
The biggest risk is in burning wood that is not at an ideal combustion rate. I’m sure you’ve had experience with campfires that produce an acrid aroma and literally cause a foul “taste” in the air from poor combustion rate (too slow burning). That is the challenge and risk when using wood products with food for hot smoking. Remember, hot smoking requires temperatures that are lower – generally below 275°F. To achieve a consistent low temperature, you must control air intake and damper or exhaust. If you don’t achieve a good balance, the result will be a sooty, bitter tasting and smelling food outcome.
How do you know if your crossing into risky and poor outcome territory?
By the color of the smoke. A poorly balanced combustion of wood will produce a black smoke. Repeat these conditions and you’ll stimulate creosote deposits within your equipment which can reduce the draft needed to ensure the fire gets enough air to optimally combust. Remember, creosote on its own is highly combustible which is why there are many wood stove house fires occurring due to poor maintenance/clean out of these units.
Not All Hardwoods Are Equal In Compound Percentages
Now that your aware that phenolic compounds, specifically guaiacol and syringol are key to tasty, flavorful BBQ foods, let’s talk about these compounds in specific hardwoods.
Interestingly, Beech wood is highly prized and used in Europe for smoking particularly in meat processing facilities. This is no surprise to me since Beechwood has one of the highest percentages of guaiacol when at a high heat level (distilling). Know that the phenolic compounds present in all wood distill at variant percentage levels and usually require a combustion temperature of nearly 400°F to peak. Yet another reason why you want to keep a balance to your fire so combustion is optimal. Thus the resulting flavors and aromas are pleasant.
More Related reading on “What Wood for Smoking” and other great smoking and grilling tips and techniques
Dr Smoke- “We as chefs need to always monitor how much wood tar creosote is good for our BBQ by balancing the time of each cook versus the taste of our results.”