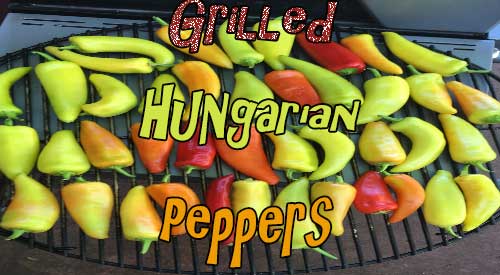
I love growing Hungarian wax peppers in my garden and then harvesting for recipes and freezing for future recipes. Hungarian wax pepper come in different levels of heat depending on the variety chosen. Mine are a hot variety but work perfectly for mixing with other creamy flavors to produce some great condiments and sauces. I will introduce you to two versions of my Smoked Hungarian Pepper Spread in our recipe blog which will post soon.
If you’ve followed my writings for some time now, you’ve likely learned that I believe outdoor equipment is the same if not better than the traditional indoor options. You literally can make anything on the outdoor equipment that you make inside your home.
Knowing this, I have received many questions regarding the type of cookware that I use when grilling and/or smoking on said equipment. Today, I’m going to discuss the preferred cookware materials and the potential issues that can arise if you use a material that is not considered ideal for high heat temperatures.
Material #1: Cast Iron- Cookware for the Grill
This is my first choice and many other cooks, and the only material I use when I coal cook with cookware. Why? It is durable, it is relatively inexpensive, it is unbelievable at heat retention, and you can cook almost anything in it. Literally, it never wears out!
Downside? It is a material that needs to be maintained meaning oiled consistently. It is heavy!
Carbon steel is a beast at retaining heat and it can be used on any cooking surface. Although lighter in weight than cast iron it is still heavier than stainless steel. Similar in many attributes to cast iron, it also requires frequent seasoning and the base of the pan will become discolored from the high heat exposure. Plus, it is not dishwasher safe so you need to love this material and be willing to put some work into maintaining it. If you’re lucky enough to find a piece you love, you will make magic in it whether near or in the fire.
Material #3: Stainless Steel Combo
I’m sure every one of us owns at least one piece of stainless steel. This is a very attractive piece of cookware from the aesthetic view. However, on its own, stainless steel is not the best heat conductor. This is the main reason why it often is combined with another material to improve its heat retention properties and keep it light in weight. Suitable pairs you’ll find for stainless steel include copper and aluminum. All three of these materials on their own, are not ideal. Cooper and aluminum heat very quickly which means they can burn very quickly as well, while stainless steel on its own can take forever to heat up. But combine copper and aluminum or aluminum and steel and you have an ideal heat conductor and safe high heat material. Rule of thumb: never use aluminum and copper cookware on their own for high heat cooking.
Material #5: Enameled Cast Iron- Cookware for the Grill
Know as the “pretty” cookware, enameled cast iron is cast iron at the heart-and-soul but with beautiful ceramic enamel outside surfaces. It has fabulous heat conductivity and retention but it is not non-stick which can cause some issues. I find it works really well when I use more of a two-zone cooking set up rather than direct coal or heat cooking.
Teflon is a non-stick, promoted material, that should be avoided. It has no ability to be used for high heat and in fact, excessive heat can melt this material. Also, Teflon is documented to flakes off after extended use, moving these flakes into your foods. At higher temperatures, the material produces toxic fumes that have been proven to be a health risk.
What Are High Heat Levels?
Now we know what materials are optimal for high heat cooking but what are the actual temperatures that can be handled?
Cast iron and stainless-steel combos can tolerate 1500°F, with stainless steel excelling to 2200°F. Although copper has a melting point of 1984°F and aluminum at 1221°F, cast iron, and steel materials in cookware still perform the best.
Now you have the education behind your choice of cookware. My last piece of advice is to always think about how you plan to use the cookware. If you love to nestle in the coals or be as close to the flame as you can, the items that may not look as pretty are likely the best choice. Take our tips in this blog USEFUL COOKWARE OPTIONS FOR YOUR GRILL and expand you cooking/Grilling skills and techniques!
As a billion-dollar business, selling grills is likely not going away any time soon. In fact, sales are gaining strength thanks to COVID-19 which forced many to find ways to keep cooking and eating interesting while forced to stay out of restaurants.
When asked, most people say they grill or barbeque for flavor. If that is the case, then why are some of the most common practices the ones causing the most variation in the taste of your grilled foods?
Here are the top 12 grilling mistakes you should avoid.
#1 Skipping Preheat of the Grill
It does not matter if you prefer to use a gas grill or a charcoal unit, you need to preheat the grill before adding food. Why? It is the only way to avoid having your foods stick to the grill grate. When you allow the metal to heat to a very hot level, the protein in meats cannot form a bond with the metal grate. Plan about 5 minutes preheat time for charcoal grills and 15 minutes for gas units.
#2 Cooking on an Unclean Grill
Yeah, I know. The grill is located outside so you think it does not need the same care and cleaning as your kitchen equipment indoors. Wrong! Leftover food particles, grease, smoke tar and creosote can build up on various parts of the grill and cause changes in food flavors as well as make the food stick. Plus, a grease trap that has never been emptied can ignite which will ruin your planned grill day! Get in the habit of scraping the grill grate after preheating and lightly scrub the cooled down grill including the lid area, with steel wool and water. The lid likes to hold on to carbonized grease which becomes flaky and falls off onto your foods if left in place.
There seems to be some legend out there that wood-fired cooking methods are all about the endless hours of tending food and fire that produce taste results that are only granted to a small percentage of committed cooks; nothing could be further from the truth. Ready for simple methods of wood flavor infusion that do not take stockpiles of wood and equipment so large, you start thinking about adding on to your house?
Wood-fired cooking includes the simplest methods of wood infusion like the current rage with hand-held food smokers or even the stovetop smoker. Kitchen gadgets that have opened the door to anyone who wants to explore the fragrant and flavorful bounty that awaits all foods and beverages. One thing that still is evolving is the concept of spices not for your food but for your equipment!
If you’ve read some of our previous articles on wood flavoring you’ll come to understand and appreciate that there is no set rule on wood-fired cooking. Oh, yes, there is plenty of science when it comes to cooking with fire or as I like to say when you combust to flavor, which is what you are accomplishing with wood for cooking. I feel more attention should be given to the actual wood products; rather than focusing on the ingredients to the foods being cooked.
Wood is an ingredient
First, wood to us IS an ingredient, one that still needs to be balanced with the other components to bring forth a food memory. As an ingredient, the easiest by far to manage for wood flavor infusion is sawdust or in our Company’s listing,Smokin’ Dust®. Compatible with all types of equipment, Smokin’ Dust®literally becomes a ‘spice’ for your equipment.
Thinking of island flavors of pineapple, coconut, and mango for a recipe? Why not add one or more of those flavorings through the wood product? Yes, using all-natural flavoring infused into ourSmokin’ Dust® is one of the quickest methods of getting the great flavor to a specific regional dish. With 15 flavor-infused options that are 100% all natural, designed for cooking, and infused in hardwood, as well as 8 natural hardwood flavors, we’ve given new meaning to the word ‘spice’ as ours can now apply to the wood product! Remember, applewood doesn’t smell or taste anything like an apple. Use our apple infused product, and you’ll experience hints of cinnamon, nutmeg, and the bite of an apple!
Why settle for a run-of-the-mill smoking sawdust product that you don’t know where it comes from? A softwood, swept from the floor, shoveled from the ground, or worse, taken from under an animal? Instead, get excited about the flavor opportunities awaiting you and your equipment when you use a smoking sawdust product from a real cooking wood company. Get excited about the opportunities out there to experiment with, whether for hot smoking, cold smoking,handheld food smoking,stovetop smoking, or even traditional LP and charcoal grilling. And get ready to experience the world through flavor aroma!
Dr. Smoke- “Smokin’ Dust is one of our most customized and versatile cooking wood product.” which is a spice for your equipment
The handheld food smoker allows you to smoke fresh corn indoors! It’s so easy and so tasty!
SMOKE FRESH CORN INDOORS
Listen to our blog
Corn is one of those vegetables that has an extended season to allow you to do all kinds of recipes and techniques. Given that there are times when you frankly don’t have a lot of time to stand over a grill to do whole ears of corn, I’m giving you an easy technique to add smoke flavor using a handheld food smoker. Then, I’ll give you a recipe for a spicy butter to coat the corn in to bring out the best in this seasonal vegetable. I’ll also provide some flavoring pairing that works great for other butter topping recipes. Go visit your favorite corn seller and pick up some fresh corn.
Smoke Fresh Corn Indoors- Easy Corn Prep
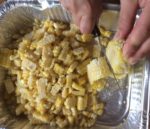
I’ve purchased 6 ears of corn and have boiled them in water until tender, which is the most traditional way of cooking corn. I allow them to cool enough to handle, then using a sharp knife, I stand the ear of corn on its wide end and cut the kernels from the cob into a disposable foil pan. If you cook the corn and then refrigerate it prior to removing the kernels, know that the kernels will not come off individually but as one long strand. Don’t worry about reducing these strands as when we add the butter topping, it will break down the kernels. Next, I’ll be taking the fresh kernels to the smoke using the Breville-PolyScience The Smoking Gun Pro Smoke Infuser which is a cold smoke application anyone can do!
Smoke Fresh Corn Indoors- Cold Smoke Infusion
If you’re familiar with The Smoking Gun™ note that the version I’m using was a collaboration between Breville and PolyScience, the originator of the concept, and designed specifically for commercial use. It is manufactured from heavier materials and can stand independently while you work the smoke vapor production.
I’ve gathered together my pan of previously cooked corn kernels, the handheld food smoke infuser, SmokinLicious® Minuto® wood chips in size #8, a lighter, a plastic food bag, and a cable tie. After sliding my corn pan into the plastic bag, I place a pinch or two of the wood chips in the unit’s bowl, extend the smoking tube into the plastic bag, then pinch off the end of the bag around the tube, and lite the chips.
Tasting Notes: You may select any hardwood microchip for the smoking but do note that this infuser produces a lot of smoke vapor. I tend to recommend using light to medium boldness levels of hardwood: Ash, Maple, Cherry.
After placing the corn pan in the plastic bag and lighting the chips with the handheld food infuser, I synch the bag’s end tightly around the tubing. This allows me to trap all the smoke vapor in the bag and surround the corn. Once filled – the bag will expand – I turn off the smoker, remove the tubing, and attach a cable tie to the bag’s end. I prefer to wait until the smoke vapor has dissipated from the bag. That’s when I cut the tie and remove the corn tray from the bag. Time to take this to the kitchen and make a spicy butter for the fresh, smoked corn.
Spicy Butter and More Recipes
Time to share my recipe for a spicy butter that works perfectly with the sweetness of the corn.
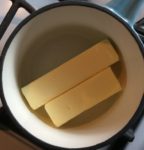
First, melt 1-1/2 sticks of butter over medium heat. Add 2 tablespoons chili-garlic sauce, 2 tablespoons Chipotle Chili pepper, 2 tablespoons lime or lemon juice, and 1 tablespoon Hoisin sauce. Whisk together, then remove from heat. This will be poured directly over the smoked corn and reheated until warmed through. Serve immediately.
There are so many options for corn that it depends if you want a spicy flavor, sweet, savory, or citrus. In addition to the spicy butter recipe I provided, here are some other flavor combinations that work just as well:
Truffle Butter: garlic, butter, truffle oil, salt & pepper
Sundried Tomato Butter: butter, chopped sundried tomato, basil, parsley and a sprinkle of Parmesan
No matter what combination you prefer, adding another flavor level through smoke vapor will make this corn season one to remember and enjoy! Remember with this kitchen Handheld smoke method for fresh corn can be finished quickly without lighting a grill!
Wood grilled avocado is a fun way to add different flavor to this wonderful fruit.
WOOD FIRED GRILLED AVOCADO
Oh, the wonderful, healthy, creamy, flavorful avocado. With more potassium than a banana and 18 amino acids for daily intake, you can’t go wrong with this single seed fruit.
Did you ever think to grill this fabulous fruit with a little wood to give it even more flavor? We’ll show you just how easy grilled avocado can be on the gas grill using wood chunks for your smoke infusion.
Grilled Avocado with a Wood Fired Touch
Regardless of the brand of gas grill you have, you can add wood chunks to the grill for wood fired flavor. My grill has heat shields over the burners so I use that area to add one small wood chunk under the grill grate, directly on the heat shield. No, you won’t damage your grill, as the wood combusts to ash and basically blows away.
One chunk is all it will take to get great flavor into the avocados. I keep the burner that the wood chunk is located on set to medium as well as the burner next to that one on medium. Since I have 4 burners, 2 are on and 2 are off.
Once the grill is to 300° F, this technique will take less than 20 minutes.
Simple Preparation for Wood Fired Grilled Avocado
The only preparation needed for the avocados is to cut them in half and remove the seed. The avocados are placed flesh side down on the grate only on the side with the burners off. The heat captured within the grill will spread throughout the grilling area and cook the avocado while adding wood smoke vapor. Note, it’s important that you don’t attempt to move the avocados for at least 10 minutes otherwise you will find the avocado flesh will stick to the grate and you’ll lose much of the fruit’s flesh. Wait until some of the fat renders and chars making removal so simple.
Grilled Avocado- Prep To Finish In Less Than 20 Minutes
In less than 20 minutes you will have wonderfully wood flavored, charred flesh avocados ready for your favorite recipes. Think of using this fruit in smoothies, dips, on salads, as a creamy ingredient for sauces – remember, avocado can be used to substitute the amount of butter used in most recipes. We will take some of our avocado and make a wood fired guacamole first. Our recipe will post soon so stay tuned and don’t’ forget to send us your pics of wood fired avocado.
Did you get motivated to fire up the grill with wood? Send us a comment or your avocado fired pics and don’t forget to subscribe. Bringing you fun, innovative tips, techniques and recipes on all wood fired methods for foods, beverages, spices, herbs and so much more.
More Related reading on “What Wood for Smoking” and other great smoking and grilling tips and techniques
Our Grilled Peaches for the perfect salad addition with sweet onion, Tomatoes, and fresh herbs!
GRILLED PEACH SALAD- THE PERFECT SALAD!
Listen to our blog
If you’ve been a follower of our recipes and techniques for a while, then you’re aware of our preference to grill, smoke, coal cook, and ember fire in-season produce. Peaches are no exception and with our Grilled Peach Salad, get your taste buds ready for a real treat!
I’ve got my two quarts of fresh peaches and a plan to grill these on the charcoal grill using charwood coals. Then I’ll use my luscious smoked peaches in a salad that features two additional seasonal ingredients – tomato and shallots.
Get your chimney starter of charwood or charcoal and meet me at the grill for this quick technique and grilled peach salad recipe.
Whenever you use the charcoal grill, it’s always best to get it lit about 30 minutes ahead of cooking. I’m using a kettle-style grill made by Stôk that has a removable center grate for an assortment of inserts. I won’t be using any inserts for this cook as my peaches for the grilled peach salad recipe will stay in a disposable foil pan for easy cooking and removal.
Start by placing charcoal or charwood in a chimney starter. Place a Firestarter in the charcoal area of the grill and place the filled chimney starter over the starter. Lite the Firestarter and allow to remain in place until all the charwood has ignited and started to reduce to hot coals. While that’s burning, let’s prepare the peaches. Be sure you have a couple of wood chunks available to add to the coals when we are ready to grill. I like to use the single filet wood chunk size from SmokinLicious®.
Tasting Notes: there are differences in charcoal so be sure to use a natural charcoal or charwood product rather than briquets as briquets will produce more heat than you need.
Perfect Peach Bites
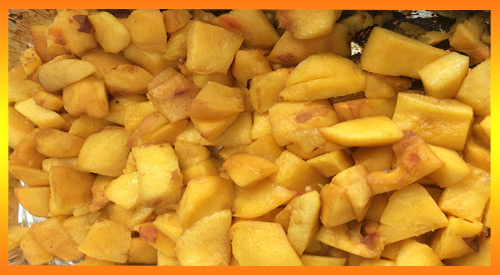
With our charcoal grill going, it’s time to start on the peaches. There are a few ways to remove the skin from peaches including placing them in hot water for a few minutes then removing and placing in a bowl of ice water. The skins will just peel off. I’m an old school so I use a sharp paring knife and just remove the skin.
Once the skin is removed, it’s time to cut the peach into bite-size pieces. You can easily cut around the pit and cut those slices into pieces. Place all the pieces in a foil pan in an even layer.
Tasting Notes: Try to purchase peaches that have some firmness to them if you don’t plan to grill them right away. The peaches should have no bruising and have a slight give when touched. Too soft and those peaches won’t hold their shape when exposed to the grill’s heat.
Smoking Process for the Perfect Grilled Peach Salad
With the peaches prepared, time to take them to the grill. Pour the chimney of hot coals into the grill’s charcoal area and add the wood chunks. Add the pan of prepared peaches and placed the lid on the grill. Be sure the outtake vent on the lid is ½ way open. The intake vent at the charcoal area should be ¼ way open. Now allow smoking for 15 minutes prior to checking. Remember, we want to add smoke without reducing the peaches to a puree.
Tasting Notes: Since peaches contain 89% water, they take in the smoke vapor extremely well. Keep that in mind when you select both the charcoal and wood. Remember, oak based charcoal tends to burn hot and has a stronger undertone to fruit.
Final Salad Prep- Grilled Peaches for the perfect salad addition!
While the peaches are absorbing all that great smoke flavor, return to the kitchen and prepare the remaining ingredients for our salad. You’ll need:
1 lb. tomatoes cut into 1/2’” pieces; or if using cherry or grape tomato, halved
3 tablespoons extra virgin olive oil, plus additional for final drizzle
2 tablespoons rice vinegar
½ teaspoon lemon zest
1 tablespoon lemon juice
1 shallot, sliced thin
fresh mint leaves torn
salt and pepper
I start by slicing my tomatoes in half, then add a teaspoon of salt to them while sitting in a colander so I can render some of the water. While the tomatoes sit, I start slicing the shallot into thin strips. At this point, you’ll want to check the peaches. They should be close to or ready to remove from the grill. I like to place them in the refrigerator for about 10 minutes to cool them down for the salad. While that’s happening, let’s prepare the vinaigrette.
I prefer to mix all the vinaigrette ingredients in a measuring cup so I can easily pour it to the salad right before serving, to keep the tomato and peach from getting too soggy. Start with the extra virgin olive oil and add the rice vinegar. Next, the lemon zest, lemon juice, salt, and fresh pepper. Whisk it all together and set aside while you combine the salad ingredients.
Tasting Notes: you can substitute cider vinegar for the rice vinegar and any color of tomato will do though I lean toward the reds and purples to give a color contrast from the orange peach.
Smoked peaches go into the serving bowl first, following by the tomatoes, and shallots. Pour the vinaigrette over the salad within an hour of serving and top with the torn mint leaves. A perfect balance of sweet, tart, smoky, and refreshing. An easy method and recipe you can have in 60 minutes. I love peaches so try our grilled peaches for the perfect salad addition for your next dish to pass! You will tantalize the guest taste buds!