Since our start as a company in 2005, we’ve heard this question asked more times than we can count. Is there any way to use wood chips with my pellet smoker?
The equipment manufacturer protection response is, No. But, as with any thought of a new potential sales market, many manufacturers wanted a means of saying “yes”.
Leading the Way
Years ago, there were attempts to integrate hardwood sawdust in the pellet hopper. Thinking that sawdust is so fine it would never cause an equipment breakdown, many pellet owners used this method. In the end, it never gained legs due to no change in overall flavor.
It wasn’t until recently that one grill/smoker manufacturer wanted to step into the pellet smoker market. You might say, that’s nothing new but this was a different effort. Instead of just making a piece of equipment, this manufacturer tested the affect of combing pellets and wood chips on the equipment. He found it worked!
Did We Follow?
We include a database on our site called, Match Your Cooker that allows for product match to be made to hundreds of equipment brands on the market. There are all types of equipment listed: ceramic cookers, kettle grills, electric grill/smokers, offset smoker, commercial-grade brands, bullet smokers, etc. One group of equipment that we don’t include and won’t plan to include is pellet smokers.
The reason is simple. The majority of pellet grills and smokers instructions clearly state to only use pellets. There is an unspoken understanding that if you go against this instruction, you will void any warranty.
Minuto® Chip Option
SmokinLicious® prides itself on helping others navigate the wood cooking world. For this reason, we can state that using our Minuto® Wood Chips in sizing #4 IS an option for pellet smokers. The key is in the mix between the pellets and wood chips. There are many suggestions for using equal parts of each but we feel it is more important to always blend a larger percentage of pellets to chips. The hopper is designed for the compressed wood pieces that are called pellets. Wood chips are not compressed. The other key factor is to only use wood chips that are sifted or screened into one concise size. Remember, pellets are uniform. The wood chips must mimic this uniformity.
This could finally be the first modification in using a pellet smoker for increased smoke flavor. It’s a great time to experiment. A great time to share your findings with others who love the ease of use of the pellet smoker but want just a bit more for the flavor outcome.
Cocktail smoker kits have become the new rage! You may have had your first smoked cocktail at a craft bar and became hooked. That led to finding an easy-to-use home kit for crafting your own smoked cocktails. But, what about the cocktail smoker wood chips? If they don’t come with your kit, how do you know what size chip to purchase?
Cocktail smoker wood chips have one distinct difference from general barbeque wood chips. They are much smaller. Because the purpose is to generate a cold smoking environment to flavor the cocktail of choice, these wood chips need to produce a quick burst of flavor. Most home cocktail kits contain the wood chip fuel source but don’t indicate the actual size of the chip.
Let’s educate you on micro wood chip sizing.
The Higher the Number, the Smaller the Chip
AtSmokinLicious®, we follow the European standard for sizing micro wood chips. Since these chips were originally designed for biomass usage (biofuel), the screening or separation process to select sizes was crucial. For cocktail smoking, this point is less needed.
What is important when smoking cocktails is to use a fuel wood chip that fits in the burn chamber and ignites quickly. Trapping the smoke vapor from the smoker wood chips allows the flavor to transfer to your cocktail of choice.
Although cocktail smoker kits have different features, they all require a smoker wood chip to generate smoke. Some kits may include a small amount of the chip product while others don’t. SmokinLicious® has found that most of these kits work best with our Minuto®Wood Chip sizing, specifically, chip size #6 or #8. These numbers reference millimeter sizing of the chip. So, a #8 is smaller than the #6.
With a smaller size, ignition is quick allowing for the smoke to generate and be trapped. Within seconds, you’ll be sitting with a fresh smoked cocktail!
Brands and Models
I’m sure we don’t know all the brands and models of Cocktail Smoker Kits out there but this is a short list of those that work with the Minuto® Wood Chips:
Breville Polyscience The Smoking Gun Pro
Crafthouse by Fortessa Cocktail Smoking Box
MITBAK Smoking Gun with Dome Lid
Oklahoma Joe’s Cocktail Smoking Box
Homia Smoking Gun Wood Smoke Infuser
Aged and Charred Smoke Top Lid Cocktail Smoker Kit
TMKEFFC Portable Smoking Gun
Cheers to finding the perfect cocktail smoker kit!
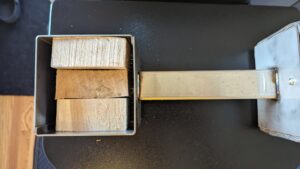
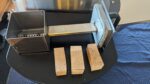
The perfect fit of wood chunks in the Camp Chef Smoke Box
We frequently take phone calls and emails from people who don’t find their purchased equipment on our Match Your Cooker listing. As you can imagine, it can be a challenge to know every brand and model available of grilling equipment. But, our goal is always to find the perfect fit of wood to grill.
Recently, Steve W. of Bartlett, IL, passed along information on his newly purchased grill – the Camp Chef Woodwind Pro
Dial In the Amount of Smoke
Here’s the cool thing about this particular grill. The smoker box was designed to accommodate pellets, charcoal, wood chunks or wood chips. You can even use a combination of fuel products! Pretty awesome! The manufacturer’s design was specific to allow for more control of smoke flavor. This point is fascinating to me. I’ve listened to owners tell me they love the convenience of a pellet grill but hate the low smoke flavor. Or, that electric grills don’t allow for enough smoke production before the wood chips burn up.
Similar to the introduction of the hybrid grill, I put the Camp Chef Woodwind Pro in a similar category. It allows for variation in flavor and heat level (cooking technique) which is what a hybrid is all about.
A Little Goes a Long Way
With Steve’s help, the Camp Chef smoker boxworks best with just a few of our Double Filet Wood Chunkcuts. Steve indicated that if these are small pieces, a total of 3 pieces works perfectly! He can even add a bit a charcoal for extra great flavor. Our suggestion when ordering wood – just put a note in the special instruction section that you want smaller pieces of wood. We are always thrilled to customize when we can.
Make the Most of Your Grill Investment
In days gone by, everyone would own more than one grill to allow for flexibility with cooking style and flavor. However, we find that more people want to simplify their equipment and make one purchase that can offer more option. With the design of all inclusive grills like American Barbecue Systems, KBQ®, M Grills®, Char-Broil® Hybrid Grill and Medallion Series, and Coyote Gas HybridGrill, one quality purchase can do it all.
So, if your in the market for a new grill and want the versatility of various cooking techniques, consider a hybrid multi fuel option. Then find the perfect, forest grown wood product at SmokinLicious® to pair with it.
We call 2023 the transition year! We’ve taken a look at our production and found more ways to bring you great hardwood. That includes improvements in our handling of our products.
We’ve added more hands-free packaging options for our wood chip product. We’ve improved our cutting process to our wood chunks, blocks and logs. And, we gave you a simple web design for quicker shopping. All adding up to bring you great hardwoods in 8 wood types of different products.
Great Information Is a Click Away!
Best of all, we still offer great advise on cooking with wood. Whether your looking to grill or smoke a specific food, or need a solution to equipment issues, we have the answers! With our extensive recipe categories, you’ll find something for every occasion.
Reminder: Order Early for the Holidays
Have a grilling or smoking enthusiast? We have something for everyone and every type of equipment. Orders received generally have a quick turn around – most within 24 hours! Pus, shipping is included for all orders placed in the USA.
It’s great to reconnect. We look forward to providing new content in 2024 and answering all your wood fired questions about North American hardwood.
when you smoke flavored food too much and how to correct!
I’m going to start this by stating smoke is a lot like salt. You can add more of it but if you add too much to smoke flavored food, it’s hard to correct. All is not lost though. I’m going to provide a tip that could save a smoke flavored food item that has been over smoked.
It’s All in the Ingredients
You’ve made the mistake of either using too much wood material to smoke or you smoked for too long. Either way, the outcome appears to be a disaster. Take a breath and a step back and assess the ingredients you used.
Often, you can correct the smoke level by adding an ingredient that was not included in the recipe. For instance, if your smoke flavored food involved a vegetable for a soup, find an ingredient in the soup recipe that has not been used. This may be cream, sugar or vinegar. Additionally, by adding the ingredient that was smoked in a non-smoked fashion, you can reduce the smoke flavor intensity. If you infused too much smoke in the broccoli for your broccoli cream soup, think about steaming some additional raw broccoli and adding with the smoked base. That will diffuse the smokiness.
SMOKE IS A GAS- Prime Factor for Smoke Flavored Food Items
Smoke is a vapor or gas. That means it is readily absorbed by the food product especially if moisture is present. This is one of the reasons why a water pan is used in a smoker.
Certain foods are more apt to be over smoked. Items like vegetables, fruits, dough item like breads, pies and tarts, and dairy items like egg-based recipes. Wood choice, amount of wood and length of the smoking process all play a part in how much essence comes from the wood.
Remember, smoke flavored food like a cut of meat can taste bitter with too much smoke vapor. This results from using wood that is too wet or using a wood that is not ideal for food.
But even a bitter smoked meat item can be saved by blending the meat with a sauce or glaze, especially one that contains a balance of sweet and heat.
In the end, you may find a smoke flavored food destined for the trash becomes a star dish when you know how to balance the smokiness with another flavor.
Our team developing traditional family recipes for the “Passing it on” series
If you have been a follower of our blog, you’re likely aware that we often feature a Guest Blogger. It’s great to get other ideas on outdoor cooking, recipes, and tips on anything to do with cooking and the outdoors. Many of our blogs offer a sharing of cooking styles and cherished traditional family recipes.
Recently, I had the opportunity to become another platform’s guest blogger. Or rather, guest cook!
Hello South Africa!
In 2019, we had the good fortune to begin offering our wood chip products in South Africa. This would not have been possible if it wasn’t for the help of some great South Africans. Who could have known that a pandemic would strike in 2020 and force a change in our business plan.
But here’s something great that came out of this! SmokinLicious® had the honor of meeting Clinton Phillay. Clinton has a passion for ensuring that traditional family recipes get passed on to others in order to keep the spirit of family cooking alive.
What a great goal and a needed purpose. SmokinLicious® was happy and honored to participate. Plus, the timing was perfect. SmokinLicious® is about to release our new YouTube channels featuring our step-by-step recipes as well as a channel just for business customers.
While you wait to see the first episode featuring our Smoked Dry Rubbed Chicken Drumsticks, check out the Passing It On channel: https://www.youtube.com/c/PassingItOn
This is a recipe source you’ll want to subscribe to and hit the notify button so you can begin a great collection of traditional family recipes.
Coming soon their TikTok account will feature these same recipes. Watch for it soon and subscribe!
Our traceability of forest fresh products to your smoke generator
listen to our blog
Our view of wood – it is not simply what produces vapor or being a smoke generator. It is THE ingredient that provides for colour, aroma, flavour and even texture to food.
Just like the other ingredients used in your operation, you need peace of mind knowing that if questions arise, you can produce the documentation to show where the wood came from and how it was handled.
Tracing from Mill to You- A Key Factor for Wood to Be a Smoke Generator
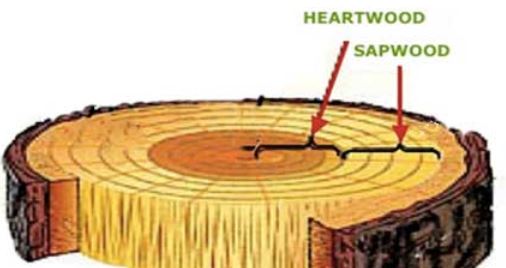
First, when you partner with SmokinLicious®, you’ll be using fresh forest hardwoods from Western New York and Northwestern Pennsylvania. Second, all our hardwoods arrive at our facility de-barked. Third, we only use pure heartwood for the log. This is considered the purest part of the tree and one that is resistant to decay, pests, and fungi.
We trace each wood piece we manufacture. We have information on:
the harvest date
what mill processed the raw wood
our heat treatment date and data
ship date
That is forest to oven.
Why is Traceability Important?
Without it, your operation could be interrupted.
Any time your company’s standards are reviewed, we have the data on the wood. That means, it’s at your fingertips. Plus, our commitment to a higher heat treatment level (75°C for a minimum of 75 minutes) ensures Thermal Death Time. Potentially dangerous organisms like fungi spore, mold spores and listeria can’t survive with our heat level!
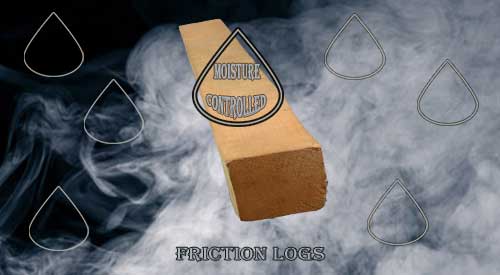
The Smokinlicious® friction log is not only cut to the correct sizing, we also customize the moisture level for optimal smoke generation.
You started your food process by ensuring you were unique in the market. You tested and retested ingredients and procedures for the perfect smoking program. Did you think of everything? What about the wood you use with your friction logs?
Friction Logs- How to Create Balance with Moisture and Wood
Do you know hardwood needs moisture to smolder and produce smoke aerosol? Why? First, friction logs are designed to produce a pre-stage to combustion. That means, no flames or fire. Secondly, this stage occurs at a lower temperature. That means less of the bad components of wood are introduced. Finally, reach the ideal moisture level and you are guaranteed a better product. Clean flavours, perfect colour and great aroma. Our logs bring that to you!
Why Things Go Wrong
Moisture in wood is critical. If you use a wood that is too wet, acrid flavours will form. Wood that is too dry gives no or limited flavour to foods. In short, that’s the reason why dialing in moisture for your friction logs is essential.
Isn’t it time you dial in the moisture level of your friction logs for flavour that makes your foods an experience for the customer?
We know what it takes to gain the perfect essence from the wood. Learn why SmokinLicious® is the perfect partner for your food process and explore the world of hardwood as an ingredient!
There are many terms around the world to describe wood used for wood-fired cooking. We take for granted in America the use of the term barbecue. In fact, even that word has its spelling variations. BBQ, barbeque, barbecue are just a few that relate to this style of cooking. Grilling is NOT barbecue! For many BBQers, low and slow charcoal is the way to go but consider this approach with a charcoal like product that accelerates wood smoke vapor and flavoring.
When Its Barbecue It’s Best with Low and Slow Charcoal Wood
Barbecue is cooking with smoke. Considered an aerosol, smoke imparts the true flavor of barbecue. You need a vessel to cook in and a combustible material to produce the smoke. The number one choice is wood.
Not just any wood will do. Hardwood is the best choice for Charwood.
What is low and slow charcoal wood? This is wood that has the perfect balance of moisture. It allows the wood to smolder, producing a flavorful smoke to foods cooked over it. As you burn the wood it becomes fully carbonized in the form of charcoal. When it completely burns, all that remains is ash.
What to Look For
Although hardwood is the choice for low and slow cooking, not every hardwood is ideal. You should use hardwoods that are common: maple, cherry, hickory, oak, ash, alder, beech. Be sure the wood is not “seasoned” for a long period of time or you will simply end up with firewood. That means wood that is too try to smolder. No smolder means no smoke. No smoke means no flavor.
Also, check on where the wood comes from. Natural forest lands are best as these woods haven’t been altered. Be wary of orchard sourced woods which can be treated with chemicals or enhancers.
In the end, a true low and slow charcoal wood gives you the perfect balance in flavor and texture to your barbecue. Learn why SmokinLicious® is the perfect brand for low and slow charcoal wood and explore the world of hardwood as an ingredient!
More Related reading on “What Wood for Smoking” and other great smoking and grilling tips and techniques
I love our Charwood in place of charcoal- has a great woody aroma when burned
Smoking and wood-fired cooking are a passion for many. You invested in a quality piece of equipment. Shopped for the best ingredients. Dedicated time to watching videos and reading articles on smoking. Sourced hardwood that claims to be for smoking. But do you know for sure?
So Many Terms
Food labeling over the years has become complicated. That seems to have passed on to hardwoods for smoking and cooking as well. Package labeling for wood is not usually accurate. In fact, it implies certain information.
Case in point, many suppliers now use the term 100% natural. But what does that mean? Natural used for food labeling means there are no artificial ingredients or preservatives and there has been minimal processing. Certainly, a supplier that sources wood from orchards uses the “natural” term but you have no assurance the tree has not been genetically modified. Translation – chemicals have been added.
Move on to the various drying processes and even more confusion occurs.
Kiln-dried, air-dried, and naturally cured are all common labeling for wood. But that’s as far it may go. No one references how long that process is, or at what temperature the drying occurs, or even where this process happens (i.e. open yard, shed, etc.).
True Forest Hardwood for Smoking
When you see forest grown on the package you assume the wood comes from a natural growing area. Even if there is a reference to a drying process, be sure the wood does not appear cracked and light in weight. If too much moisture is taken from the wood, you’ll end up with seasoned firewood and not a hardwood for smoking. Remember, moisture is needed to produce a clean smoke. No moisture means no flavor from the wood.
Be sure the label states 100% of the hardwood named on the package. If not, you may be using a combination of hardwood AND softwood! You have to make the decision on whether you want to use bark-on or bark-free wood. Off-flavors can develop with bark.
In the end, by reading wood labels in detail like you do with food labels, can guarantee you a better choice. After all, some of the best flavors come from those items direct from the land around us.
Friction log cutter for Customized friction logs need a special piece of equipment to produce the exact tolerance for the shaft.
Have you grown tired of the limited choices in friction logs? Are you questioning why the colour, texture and/or flavour of your food products is not meeting your expectations?
You found the solution right here, in SmokinLicious® Friction Logs!
Why Are We Different?
Because we customize! That’s right! We can customize the sizing of the log with our specialized machinery for exact tolerance measurements, the moisture content level of the log, and offer hardwood choices ideal for food products. No more settling for just a few sizes of logs or wood species.
SmokinLicious® has the perfect hardwoods for any food need, harvesting Ash, Hickory, Sugar Maple, Cherry and even the Oaks – Red and White – into our custom friction log product. Despite each wood presenting its own challenge for warping and cracking, our process to reduce these challenges has been mastered.
North American Hardwoods Selected For You!
Imagine the flavour possibilities hardwood choices will do for your business – fish and poultry bursting with the essence of maple, the beautiful colour and flavour of cherry on salumi, and the boldness of oak on a double smoked ham. Bring the possibilities to life with SmokinLicious®.
It’s time to work with a friction log manufacturer that respects the hardwood as an ingredient to your food process and knows what it takes to gain the perfect essence from the wood. Learn why SmokinLicious® is the perfect partner for your food process and explore the world of hardwood as an ingredient!
More Related reading on our customized friction logs and smoke generators.
Dr. Smoke and the team take great pride in producing customized friction logs for the commercial smoke houses
Prevent Shrinkage to Grilled Hot Dogs–There is nothing more frustrating than getting your family and friends all excited for a good hot dog barbecue only to have great disappointment when the dogs come off the grill. There they are. All shrunk and shriveled that it would take a least two hot dogs to fill a standard hot dog bun.
That’s why I’m going to share with you my top tips to prevent shrinkage and shriveling of your grilled hot dogs. All these tips are done before adding the hot dogs to the grill of your choice, making them very simple.
Let’s get started!
Three Techniques to Keep Size of Grilled Hot Dogs
Before I start with the first preparation tip, let me just clarify some information about the standard hot dog or frankfurter or wiener, additional terms you may be familiar with.
Hot dogs now come in a variety of options including all beef, beef and pork, chicken, turkey and even a vegetarian or vegan style. One thing that is common with hot dogs is that they contain a lot of water, fat and generally, sodium. Know that the water can be in the form of ice mixed with the meat trimmings and flavor ingredients. To adjust for all the wetness, dry starches or powdered milk are used to absorb the extra moisture, as starches do not allow moisture to enter the hot dog until heated. Once heated, the starch granules breakdown and allow the moisture to enter which makes the starch swell. This is the plumping commonly seen when grilled hot dogs are cooked on charcoal or gas fired equipment.
Know that all hot dogs are fully cooked before being packaged and some brands may also include smoking the hot dogs which gives them extra flavor and color.
Now, for our first tip on preventing grilled hot dogs from shrinking while being reheated or “cooked” on the grill.
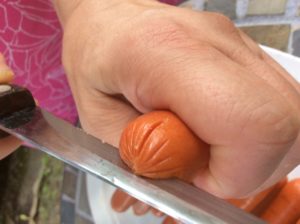
Tip #1: The “X” End Slice to prevent Shrinkage of Grilled Hot Dogs
#xendslice
This is the easiest method of preparing the hot dog without an obvious change to its overall shape. Simply take the blade of a knife and cut an “X” shape on each end. This cut should go only about ½-inch deep into the meat. The ends will curl slightly and get additional crispness that make them extra tasty. Essentially, these dogs maintain most of their original shape.
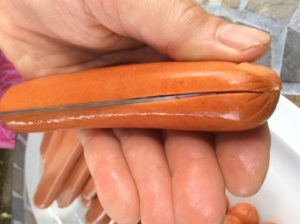
Tip #2: The Length Cut to prevent Shrinkage to Grilled Hot Dogs
#cuttolength
One of the reasons I prefer the length cut preparation to hot dogs is that if you are planning a large variety of toppings, this is an ideal preparation. Additionally, it allows the toppings to nestle comfortably in the middle of the grilled hot dogs and gives every bite full flavor. Simply take the blade of a knife and run it down the center of the hot dog from end to end about halfway down the meat’s thickness. You can know cook these in the flat form.
Tip #3: The Spiral Cut to prevent Shrinkage to Grilled Hot Dogs
#spiralcut
The spiral cut is another easy method of keeping your grilled hot dogs true to size. For this technique, simply pass the blade of a knife thru the skin of the hot dog about 1/2 -inch deep every inch or so down the length of the hot dog. Be sure to do both sides of the hot dog.
Load Up Those Grilled Hot Dogs!
#onthegrill
I’ve done all three preparation tips so you can see that the size of the grilled hot dogs remains essentially intact no matter which technique you elect to do. I also used both a charcoal and gas grill equipped with wood chunks for added smoky flavor to the grilled hot dogs.
I did set up an indirect cooking method on the gas grill to allow for a holding spot if I had some hot dogs cook faster than others, which tends to happen more on a gas grill than a charcoal unit.
I’ve got four topping options each that contains three ingredients. Now, let’s look at each option in more detail.
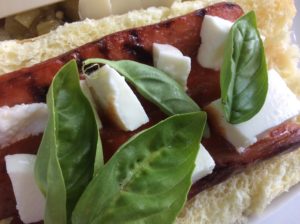
The Italiano Dog
Featuring: fresh mozzarella, fresh basil leaves, and marina sauce
#italianodog
I am a lover of fresh ingredients and summer harvest season makes it easy to get those fresh flavors. I start by spooning on a flavorful marina sauce followed by cubes of fresh mozzarella and finally topped with fresh whole basil leaves.
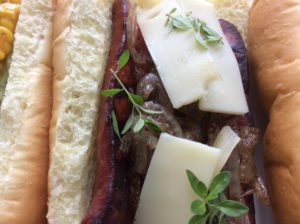
I call this one the Allie Dog in honor of the onions used as a bold flavor, which onion is part of the allium family, thus, the “allie” name. Load on the buttery, caramelized onions, then top with Gruyére cheese and fresh thyme sprigs.
The Jalo-Bean Dog
Featuring re-fried beans, white cheddar, jalapeño
#jalobeandog
If you have a taste for tacos, then this is the dog for you. Start by loading on a good quality refried beans. Then top with chopped jalapeño and cheddar cheese – I prefer the white version.
The Dog From Mexico
Featuring fresh guacamole, corn, fresh cilantro
#mexicodog
I love this hot dog combination! For me, spice is great so I tend to use a spicy corn but you can use just plain corn or buttered corn kernels if desired. Start with fresh guacamole on the grilled hot dogs. After that add the corn, and top with fresh cilantro.
There are no rules when it comes to toppings for your grilled hot dogs so experiment and find what combinations you enjoy. That includes experimenting with the bread as well so know that though I did not change the rolls on my combinations, that is another flavor level that can vary right along with the toppings.
What is your favorite method for grilled hot dogs and what makes your topping list? Let us know in the comments and don’t forget to follow us on all platforms. Providing tips, techniques, recipes, and the science behind the flame and fire to improve your skills with wood-fired cooking! That’s SmokinLicious®!
It is obvious that a return to a “normal” work environment is not likely soon. You may be one of the blessed who has decided you do not want to return to an office but rather continue the joys and challenges of working, educating, entertainment and sleeping from home.
To manage all these needs, meal planning needs to be addressed to allow for more family time. Rather than discuss animal proteins as we have previously done, the focus will be on other food categories that provide for endless options at mealtime.
Time to bring in our top 10 foods to get on the grill or smoker for fabulous flavor to your meals!
Foods to Bulk Grill
#1 Peppers
Do not purchase fire roasted peppers in the store! They are so easy to make using any type of grill you own and any pepper you prefer. By grilling in bulk, these can be added to meals like grilled sausage topped with peppers and onions, whipped into a fire roasted pepper tapenade for snacks or appetizers, bring an elevation to a salad, or as an addition to Dutch oven meals (think chili, goulash, mac and cheese).
Our outdoor kitchen guest blog is authored by Mike Cahil
Mike is part of the Content Marketing team and enjoys applying market insights to provide valuable content on all things real estate. Mike’s dream home would be mid-century modern style near the water.
As days get warmer and summer approaches we’re all looking for more ways to spend time outside. Whether it be biking, running, hiking, or walking we can all agree that being outside is one of the best ways to spend time during the summer. So why not cook outside too? Having an inviting outdoor space that can double as a beautiful kitchen is a great way to be outside and create memories to be cherished for years to come. For that, we reached out to the experts from Yolo to Palm City to provide our readers with a few tips for creating the Ultimate Outdoor Kitchen.
Make it your own Outdoor Kitchen
The trend of outdoor design is experiencing a dramatic shift today. Landscape designers are moving away from traditional masonry-built structures to waterproof cabinets equipped with storage, trash receptacles and even vegetable and herb potting areas providing a whole new experience. Moya Living and Urban Bonfire offer two creative and functional products that bring color and extreme functionality into the design and provide the structure with every ability to create the perfect outdoor kitchen. Whether the homeowner desires a smoker from Kalamazoo, a pizza oven from Lynx, or Versa Powder Cooker from Alfresco, the options are endless in the design creation. Outdoor kitchen design now takes front and center focus when planning a remodeled home and now is simply an extension from the indoor to the outdoor so that every space of the home is utilized. – Annette Reeves
Find a proper grill
The focus of any outdoor kitchen is the grill. At Chicago Outdoor Living we believe a grill’s value shouldn’t be based solely on price. Features such as design, quality of materials, and functionality, combined with price, play an important role in choosing the grill that is right for you. It is also important to be aware of the manufacturer’s warranty. Chicago Outdoor Living carries a variety of high-quality grills to fit everyone’s grilling needs and budget – Chicago Outdoor Living
Our Authors image of cooking burgers
Choose complimentary finishes
Leather finish granite countertops are my go-to countertop surface for outdoor kitchens. It looks matte enough to feel like it belongs outdoors but is cleanable and ages well. – Attainable Form
Utilize misting systems
During sweltering summer days that are hot enough to have you fantasizing about moving to Antarctica, it can be difficult to enjoy your outdoor kitchen while you are feeling sweaty and scorched. With our misting systems that cool the air by up to 30 degrees without getting anyone drenched, you’ll be able to elevate your lifestyle and enjoy your outdoor kitchen in comfort all you want. – Advanced Misting Systems
Incorporate patio heaters
Enjoying your outdoor kitchen can be extremely difficult during winter days that are so cold it feels like you could chip a tooth from shivering. With our outdoor patio heaters that emit radiant heat to keep an area warm, you’ll have your own patio encased in a bubble of warmth, allowing you to enjoy your patio and outdoor kitchen while the neighbors are stuck indoors. – Gas Outdoor Patio Heaters
Storage is key in your Outdoor Kitchen
You can never have enough storage outside. The key is drawers: paper plates, utensils, corn on the cob holders, grill grates…. Keep them at your fingertips and you will be much happier. Drawer cabinets have to be fully enclosed to avoid creatures from crawling in for a vacation. – Cowgirl Q
If you love wood-fired flavors to foods cooked outdoors then be sure to consider wood storage when designing your outdoor kitchen. Pizza ovens, ceramic or clay ovens/smokers, traditional smokers and gas/hybrid grills all allow for the addition of charcoal, charwood, and/or hardwood to bring flavor essence to favorite cuts of protein, vegetables and fruit. Include in your design wood storage that allows for good air circulation to the wood as well as storage placed close to the equipment. Mesh bins or small wood crates work well for smaller pieces of wood that can fit on shelving under the counter or design open shelving in metal, stucco or concrete material that allow larger pieces of wood to remain dry, nonreactive and at the ready. – Smokinlicious
Don’t forget about the island
The best way to start creating your own Ultimate outdoor Kitchen is by getting ideas of different types of islands and kitchens. Researching will help you brainstorm an idea of your own (shape, size, color, components, etc). The next step is to find out where your Island will be placed. After finding a perfect fit, take a few measurements to see how the unit will be laid out. Over the years, KoKoMo has created various Outdoor Kitchen models with all kinds of different designs. A good example is our custom sports bar. This unit is fully stocked with all of our most popular components and accessories. This kitchen has a beautiful white-looking stone that covers the base, with a nice steel-looking tile to go with it. We used a large 15×15 aluminum shade cover with two giant TVs to entertain both sides of the island. – KoKoMo Grills
Keep it comfortable
Outdoor kitchens draw people in, whether it’s your guests gathering to offer help or little ones looking for a snack before the big meal. Make everyone comfortable with our thick, high-density cushions. Bonus tip: all our cushions are covered in water-resistant fabric, making rain and spills the least of your worries. And at the end of the party, if you need a special type of cover for your furniture or grill, we’ve got you covered with custom-made covers! – Classic Accessories
Consult with a pro for the Ultimate Outdoor Kitchen
For homeowners who want to build a fully functional outdoor kitchen area in their homes, I always recommend consulting with a designer, in addition to the outdoor kitchen company themselves. One thing I have learned with my experience in the business, is one layout for a kitchen does not necessarily work for every future buyer of the home — so the key is: versatility and simplicity. Most buyers these days are not so focused on decking, they want to see more grass. So artificial grass is a great alternative to decking, plus easy to maintain. Keep your dining area separate, and not built-in, should someone in the future want to change it, or if you entertain and need a different layout for a specific event. – Jenny Okhovat Homes
This certainly is a clear example of how anyone can produce authentic barbecue on the equipment they have even if it’s not a traditional smoker.
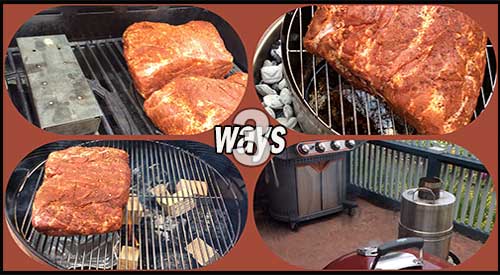
3 Methods of Smoking Boston Butt-
It should come as no surprise that majority of grill owners invest in a gas grill for their outdoor cooking with over 80% of these owners investing in multiple accessories for that grill. Often, many of these grill owners will venture to make an additional purchase of a second type of grill like a charcoal or pellet grill/smoker, in order to be able to cook more barbecue or smoked food options.
My intent is to demonstrate to you that you can produce authentic flavors, colors, textures, and aromas of favorite barbecue proteins with a variety of equipment, all outfitted with hardwood for the authentic wood flavoring.
I’ll be taking Boston butt to a traditional gas grill, a kettle charcoal grill, and a convection-style grill to demonstrate just how easy it is to cook this popular animal protein while giving you a bit of education on how these units are different when hardwood is incorporated.
Set Up Similarities and Differences for Smoking Boston Butt
When it comes to setting up the grills for smoking, there are some obvious differences. First, let me name the equipment brands I’ve included and the intended set up of each for cooking and smoking the Boston Butt cuts, all of which approximate 8 lbs.
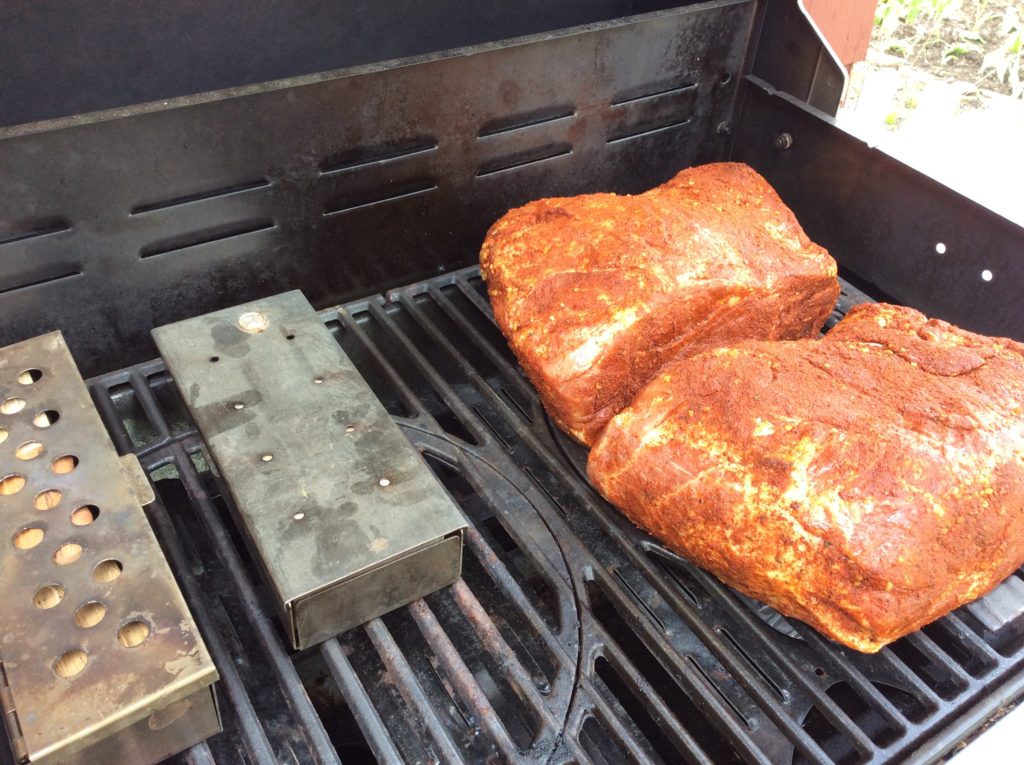
Our Boston Butt (s) on the Stok Gas Grill with accompanying Smoker boxes
The Stôk Quattro 4-Burner Grill:
If you are not familiar with this grill, it is equipped with an insert system to allow you to use a standard grilling grate, a griddle, grill basket, vegetable tray, pizza stone, Dutch oven, Wok, and other inserts that easily pop in and out of the cast iron grates. Despite this feature, you can do traditional smoking using wood chunks without the need for the smoker/infuser insert.
Whenever I smoke on a traditional gas grill, I always set up a two-zone cooking method. This means, on my 4-burner Stôk, I will ignite just two of the burners on one side. You can either place wood chunks directly on the heat shields of the unit or use a metal smoker box. My Boston butt will cook on the unlit side of the grill with a metal smoker box containing 3 wood chunks on the hot side. I’ve also included a second smoker box to make it easier to swap out the first when the wood becomes completed charred. My temperature is 225°F for the actual cooking.
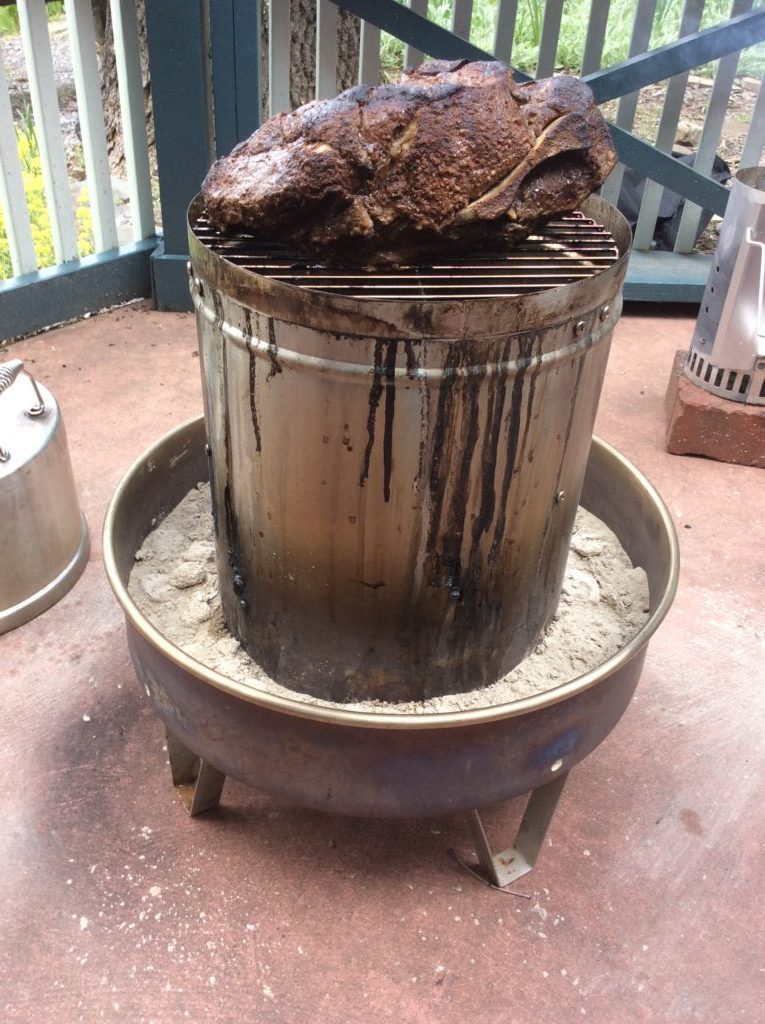
Our Boston Butt on the Orion Cooker with Minuto® wood chips in the inner ring
This is an outdoor convection unit that uses briquets for the heat and Minuto® Wood Chips placed around the drip/water pan for the wood flavoring. This unit will be the fastest to cook the Boston Butt, with an anticipated timing of 4-1/2 hours total. This is a direct cooking method that uses the radiated heat of the stainless-steel body to trap and circulate the heat for faster cooking time.
There is no ability to replenish the wood chips with this unit due to the high heat level. About 15 lbs. of briquet and 4 ounces of OrionCustom Wood Chips is all that is needed to smoke, plus some water in the water/drip pan for a moist outcome.
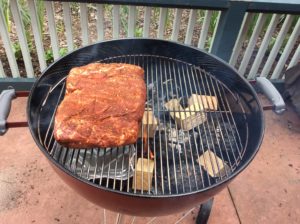
Our Boston Butt on the Weber® kettle Grill with double filet wood chunks
Weber® Kettle 22” Charcoal Grill:
Likely one of the most popular charcoal grills, the Weber® kettle provides for the opportunity to cook with charcoal and hardwood. I’ll be setting up my grill using a two-zone method; charcoal/wood on half the fire area and the meat placed on the indirect side.
Due to the length of time Boston butt takes to cook, you likely will need to replenish the charcoal for maintenance of heat level. I prefer to maintain a temperature around 250° F.
For similarities: both the Weber® and the Stôk grill were set up with a two-zone cooking method. Both included use of the SmokinLicious® double filet wood chunk. The length of cooking time between the charcoal unit and the gas unit are very similar, taking close to 10 hours.
For differences: temperature maintenance is easier with the gas and convection units. The charcoal unit requires much more supervision to ensure that the fuel (charcoal) is replenished prior to the temperature of the grill decreasing significantly. You are also able to check on the meat’s coloring and evenness of cooking with the charcoal and gas units while the convection unit is generally left alone until closer to the recommended cooking times. Though you can check on the doneness of the meat at any point with the convection unit, generally there is no need to do anything but wait.
Regarding cooking variations, let’s discuss color, bark formation, moisture of the meat.
Barbecue By All Methods
With all four of the Boston Butt (s) prepared in the same manner – excess fat trimmed to ¼-inch or less, a dry rub applied on all sides, and marinated for 24 hours – this is a fair comparison of how each grilling and smoking method produces the barbecue results commonly looked for.
Bark:
Without question, bark or the outer crust that develops from exposure to a lower temperature, long cook time, and smoke vapor infusion was greatest on the Boston butt cooked on the Weber® Kettle 22” Charcoal Grill. The gas grill produces the least amount of bark which is dominate on the outer edges and top surface.
Color:
The darkest coloring to the bark and the most obvious smoke ring was on the meat cooked on the charcoal grill. The Orion Cooker produced a brown hue to the meat’s exterior while the meat cooked on the gas grill retained a red hue that was indicative of the dry rub color. Charcoal grills will produce a black hued coloring due to two combustible materials: charcoal or charred wood and hardwood.
Moisture:
The meat that produced the greatest amount of rendered juice was from the charcoal cooking method. Second, the convection grill method followed by the gas grill. However, the greatest internal moisture level was obtained from the indirect cooking method on the gas grill, followed by the charcoal method and lastly the convection method.
Final Notes:
What we’ve set out to accomplish with this multi cook segment is to prove that no matter what equipment you have, you can produce authentic flavor, aroma and texture to Boston butt. This can be invaluable for those times when you may not have a lot of time to supervise the smoker or grill but still want authentic barbecue. Or, when you must make a lot of meat meaning you must use all the equipment options you have available.
All four Boston Butt (s) one done on charcoal with the Weber, another in the Orion with wood chips and two on the gas grill with wood chunks- the coloring is not much different!
From a taste perspective, our sampling group indicated that the strongest smoked flavor was from the charcoal unit, followed by the convection grill and lastly, the gas grill. Keep this information in mind when you’re cooking for others, as boldness of the smoke flavor can be controlled not only by the amount of time exposed to the smoke vapor, but also with the equipment used for the cooking and the amount and type of hardwood used in the process.
This certainly is a clear example of how anyone can produce authentic barbecue on the equipment they have even if it’s not a traditional smoker.
Making you an informed consumer through valuable articles like this one. Leave us a comment and follow us or subscribe for more great recipes, techniques, tips, and the science behind the flavor. That’s SmokinLicious®.