The Smokinlicious® Test Kitchen had an opportunity to use the Technique® Cast Iron Pan and Smoker which many of you purchased via QVC. Here are some preliminary findings by our Culinary Team:
➝Use caution when selecting cuts of meat with this cast iron pan! We had purchased a 10 lb. pork shoulder and struggled to get the cover tightly on the pan. Right now, it appears that cuts less than 8 lbs. would be ideal for cooking/smoking/roasting/grilling.
➝I’m sure we were not the only purchasers to be disappointed to read in the Technique® brochure that you should “not try to smoke in the oven” with this unit. Rest assured, Dr. Smoke will see if there is a means of actually smoking in a conventional oven by using low temperature and LiquidInfusedWoodChips /Smokin’ Dust®. /WoodChunks with this smoker unit (more on these findings as they become available).
➝ We cooked both a bone-in pork shoulder and bone-in chicken breast. Both cooks revealed great moisture to the meat. We used the recommended medium heat setting on our gas range but found that the cast iron pan radiates a significant amount of heat. Thus, we recommend reducing the heat setting to a low-medium (“3″ if you have a digital setting) on gas units. We also turned the heat off our cast iron pan approximately 20 minutes prior to completing the cooking time in order to benefit from the pan’s ability to generate further heat on its own. Remember, all meat should rest prior to cutting.
➝ There was considerable “rendering” out of the fat drippings into the drip pan. There is significant staining on the stainless steel drip pan so you may want to consider lining the pan with foil or even parchment paper to reduce metal staining.
➝ Smokin’ Dust® Usage: although the dust will render black in this pan, it did give off a tremendous amount of aroma. We used the Smokin’ Dust® dry, about 2 Tablespoons worth, in the center of the smoking pan. This appears to be the correct amount although we did not feel it produced as much flavor to the meat as a conventional smoker.
➝ WoodChips: we used Wild Cherry WoodChips (standard grind) in the smoker pan while cooking a bone-in chicken breast on the gas stovetop. The chips also produced significant aroma in the air but we found that they produce much more flavor to the meat. Keep in mind, our chicken breast was just over 2lbs so it fit easily in the grill pan with the cover tightly on. The fact that more flavor was infused in the chicken could be the result of less air leakage than the pork shoulder and the fact the chicken is much more porous allowing for ease in accepting smoke. We used the WoodChips pre-soaked for 15 minutes in water, then allowed to drip dry before placing in the smoker pan. We used approximately 1 handful and spread them in the smoking pan to allow the drip pan to fit easily in place. Once our chicken was finished, we noted that the wood chips also blackened during the cooking process, much like the Smokin’ Dust®.
At this stage in our testing of the Technique® Cast Iron Pan and Smoker, we feel it is comparable to other stovetop units that we’ve tested. One important difference is the fact that there is no built in thermometer, so you must check the meat with a handheld or wireless thermometer to ensure you remove the food at the proper cooking temperature. Here are some other points worthy of mention:
➝ this is a heavy cast iron pan and all parts of it become very hot ➝ the pan can use some additional seasoning as there is some food sticking occurring with the grill pan ➝ it does take some effort to clean but if you re-season and continue to use the cast iron pan, I would anticipate this to become less of an issue ➝ there is a significant convection occurrence when cooking which produces a very moist product but as mentioned above, you must time the cooking process to ensure no over-cooking
Stay tuned for additional posting regarding this cookware. Our plans are to try the Smokin’ Dust®. mixed with liquid as well as to try our Woodscuit®Flavor-Infused products.
Till then, “Bon-Bar-B-Q!”
Donna G
Dr. Smoke- The Technique® Cast Iron Pan & Smoker passes the Smokinlicious® kitchen test with flying colors when using our sized hardwood smoking chips!
For more related reading on stove top smoking, check out these articles:
We all love the time of year when we can abandon the indoor kitchen and head out to the grill for open air breathing, relaxing, and some great food. For those of you who are new to outdoor grilling or who may need a refresher, we are giving you our top TIPS FOR GRILLING SAFETY so there’s no chance your summer grilling season is remembered for another reason.
Tip #1
You probably wondered why about 15 years ago, outdoor kitchens became all the rage. The real purpose in having an area designated for outdoor cooking took hold when people realized these structures were highly durable and allowed for measures to be in place to ensure rogue hot coals from charcoal fires or excessive heat from gas grills didn’t ignite the surrounding structures like the house and garage. If you can’t afford a full outdoor kitchen layout, at least follow some of the basic ideas: set the cooking area a distance away from any building and preferably on a fire-proof surface like concrete, that is safely away from trees and grass.
Tip #2
Keep your grill clean. Whether it’s propane, natural gas, electric or charcoal, all grills need periodic cleaning to keep them performing optimally as well as to prevent those surprise grease fires. Any grill can have a grease fire! Clean the drip pan, grease pan, lid, walls and grilling grates. In addition to the safety need, this will give you the longest life out of the grills parts. If you grill a lot in a single season, then clean the equipment more than just at the start and end of the season.
Tip #3
Don’t use lighter fluid. This is a chemical designed to give quick life to briquets, charcoal, and wood. Don’t use it! It adds a prominent chemical taste to your foods and can result in a fire that goes wild. Learn what a chimney starter is, buy one, and use it. It is the safest and easiest method of lighting a fire for a charcoal/wood grill.
Tip #4
Take note of the clothing you choose to wear when you know you’re going to be in control of the grill. No dangling sleeves, strings, or flammable materials should be near the grill. Aprons are a great way to keep clean as well as to keep flowing clothing under control. Just be sure the ties to said apron don’t become a fire starter.
Tip #5
Outdoor cooking is an adult activity. Don’t assign a youngster to watch the grill. Grease fires account for most of the damaging fires resulting from grilling. Plus, it is so easy for youngsters to receive burns from brushing or directly touching the hot grill surfaces. Animals, too, should be kept away.
Tip #6
Always prepare for catastrophic events! That means keep a fire extinguisher handy, sand, or baking soda at the ready. Never attempt to put out a grease fire with water. Remember, when using a fire extinguisher, spray ahead of the fire and then move toward it.
Tip #7
Understand how your grill works. With multi-fuel options in one piece of equipment, you need to know how to close vents, valves to gas, and output drafts. Firing up the grill and having something uncontrollable occur is not the time to learn what those knobs, slides, and dials are for.
Tip #8
If nuts, bolts, or screws loosen up, take the time to secure them back in place, especially if they are on lids, wheels, or fuel areas. Grills need to be sturdy to withstand the constant opening and closing of the lid. Protect the surface the grill is on by investing in a grill mat that is fire retardant. Not only can it prevent the start of a fire, but it will protect your deck or patio material from needing replacement.
Tip #9
When lighting a gas grill, be sure to keep the lid open. Lighting when the lid is down can result in the gas pooling and exploding. This will result in the lid becoming a weapon of its own when it is blown off the grill!
Tip #10
Never move a grill indoors including to a garage! I know. Space is always an issue when you entertain and a grill can take a lot of that valuable space. But there is no way around the fact that these pieces of equipment require outdoor air to prevent accumulation of volatile gases that can make you and everyone around ill or worse. Plus, these units radiate a lot of heat and that heat can spread quickly to other surfaces like the garage door, walls, siding, canopies, lawn chairs – you name it. Always maintain a 3- foot barrier around the grill including above it to ensure no issues.
Have you experienced a disaster while grilling? Tell us what safety tip you wish you had known about before disaster struck. Get tips, techniques, recipes, and the science behind the flame and fire to improve your skills with wood-fired cooking! Follow our TIPS FOR GRILLING SAFETY for a wonderful safe grilling season!
When you are going through the steps of installing an outdoor kitchen, you’ll quickly find that deciding where to set it up is one of the most difficult and impactful decisions of the process. Since you have multiple options, it can be hard to figure out exactly where to put it. We’ve come up with a list of things to consider to help you decide!
Be Conscious of Sun and Shade
Summer is prime time for outdoor kitchen use. So, when planning your outdoor kitchen, bank on warm temperatures and lots of sun, and take reactive measures. Placing your outdoor kitchen under existing shade, or planning to add new sources of shade will provide you and your guest’s comfort year-round.
Natural shade from trees and vines is best because they ventilate easily. As an added bonus vines and trees “transpire,” evaporate moisture to cool themselves, creating their own natural misting system.
There are plenty of man-made shade options as well, such as pergolas, or trellises. The growing popularity of transition rooms provides an even more permanent and durable option for your outdoor kitchen.
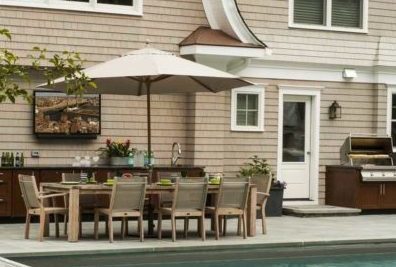
Leverage Your Natural Space
Do you have a pool or hot tub in your yard? A beautiful garden? When choosing where to add your outdoor kitchen, take note of any existing structures or features that you want to complement. Also be wary of design overlap. The last thing you want is for your outdoor kitchen covering to inadvertently shade your vegetable garden.
In addition, when planning the placement of your outdoor kitchen, it’s important to consider the relationship between the indoor and outdoor versions, and how they will be used together when cooking or entertaining. If you have a large outdoor space to work with, it may prove prudent to place your outdoor kitchen in closer proximity to your indoor kitchen to create a seamless transition between indoors and outdoors.
Consider the View
Another crucial element to consider when you’re placing your outdoor kitchen is your views and sight lines. You can have the most beautiful outdoor kitchen in the world, but when your guests sit down to eat at the table, if they’re facing a brick wall or the old shed in your backyard, that’s what they’re going to remember. So, be sure to consider the view when you’re trying to find the perfect location for your stainless steel outdoor kitchen.
Another key consideration is the location that will provide the most privacy from neighbors. Screening views with trees and shrubbery will provide privacy while also providing a noise buffer for your close neighbors.
Don’t Forget Utilities
When planning your outdoor kitchen layouts, keep in mind the best practical placement or installation of the necessary gas, water, and electrical supply. Note where your water, gas and electric lines are, and design your kitchen accordingly.
Furthermore, when placing your grill or smoker, think about the natural flow of wind – make sure that smoke from the grill will be carried away from dining and living areas. You should also think about making sure the kitchen area is located a safe distance from doors and entryways to keep foot traffic away from potential hazards.
Additionally, make sure to place all outdoor cooking appliances away from areas where children play or where people play sports. You’ll want to avoid basketballs or soccer balls bouncing over onto a hot grill.
Don’t Shy Away From the Roof
When one thinks “outdoor kitchen,” the tendency is to think of backyards – but that doesn’t have to always be the case. Especially if you have a small or nonexistent lawn space, building your stainless outdoor kitchen on the roof can prove a very viable design option.
If you are choosing this option though, pay special attention to restrictions and codes. They vary by municipality, so check with your town’s building department to find out rules about setbacks, fire safety, and what kind of permits you’ll need to file. We recommend working with a general contractor so you are up to code and all safety requirements are included.
Fit Your Needs
The right spot to place an outdoor kitchen will vary from homeowner to homeowner. You may like the idea of an outdoor cooking area just outside the back door of your house or a freestanding pavilion near your pool area.
At the end of the day, there’s no one “right” spot for your outdoor kitchen. But by using these outdoor kitchen location tips, you’ll ensure you make an excellent choice.