Our traceability of forest fresh products to your smoke generator
listen to our blog
Our view of wood – it is not simply what produces vapor or being a smoke generator. It is THE ingredient that provides for colour, aroma, flavour and even texture to food.
Just like the other ingredients used in your operation, you need peace of mind knowing that if questions arise, you can produce the documentation to show where the wood came from and how it was handled.
Tracing from Mill to You- A Key Factor for Wood to Be a Smoke Generator
First, when you partner with SmokinLicious®, you’ll be using fresh forest hardwoods from Western New York and Northwestern Pennsylvania. Second, all our hardwoods arrive at our facility de-barked. Third, we only use pure heartwood for the log. This is considered the purest part of the tree and one that is resistant to decay, pests, and fungi.
We trace each wood piece we manufacture. We have information on:
the harvest date
what mill processed the raw wood
our heat treatment date and data
ship date
That is forest to oven.
Why is Traceability Important?
Without it, your operation could be interrupted.
Any time your company’s standards are reviewed, we have the data on the wood. That means, it’s at your fingertips. Plus, our commitment to a higher heat treatment level (75°C for a minimum of 75 minutes) ensures Thermal Death Time. Potentially dangerous organisms like fungi spore, mold spores and listeria can’t survive with our heat level!
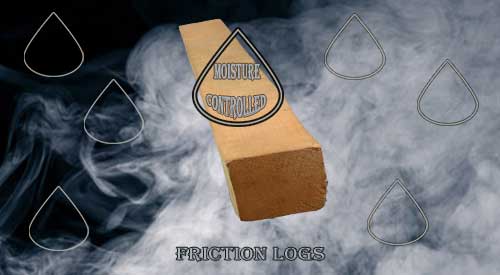
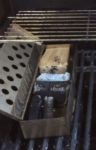
The Smokinlicious® friction log is not only cut to the correct sizing, we also customize the moisture level for optimal smoke generation.
You started your food process by ensuring you were unique in the market. You tested and retested ingredients and procedures for the perfect smoking program. Did you think of everything? What about the wood you use with your friction logs?
Friction Logs- How to Create Balance with Moisture and Wood
Do you know hardwood needs moisture to smolder and produce smoke aerosol? Why? First, friction logs are designed to produce a pre-stage to combustion. That means, no flames or fire. Secondly, this stage occurs at a lower temperature. That means less of the bad components of wood are introduced. Finally, reach the ideal moisture level and you are guaranteed a better product. Clean flavours, perfect colour and great aroma. Our logs bring that to you!
Why Things Go Wrong
Moisture in wood is critical. If you use a wood that is too wet, acrid flavours will form. Wood that is too dry gives no or limited flavour to foods. In short, that’s the reason why dialing in moisture for your friction logs is essential.
Isn’t it time you dial in the moisture level of your friction logs for flavour that makes your foods an experience for the customer?
We know what it takes to gain the perfect essence from the wood. Learn why SmokinLicious® is the perfect partner for your food process and explore the world of hardwood as an ingredient!
Over the past several months, you have learned how your own hands can play host to transmitting the virus known as COVID-19. Once transmitted, the virus can potentially live on surfaces for up to several days.
Of course, there are factors that determine how attracted the virus is to the surface. Porous surfaces like those of cardboard and wood are not very attractive to the virus. It prefers smooth surfaces.
But there is still so much we do not know. SmokinLicious® continues to prioritize limiting human contact with our product manufacture and packaging. Our position is, we do not know enough to stop being diligent in our efforts.
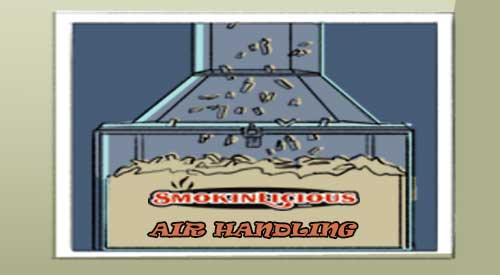
Time to revisit our cartoon friends! Tom and Bert recently discussed the SmokinLicious® air collection process for wood chips.
Why Air Collected Packaging is Better!
Tom asks a great question, as often, we do not think about the wood we cook with. How is it bulk stored, what has it been exposed to, how much dust is in the product? Remember, dust slows combustion and can cause equipment failures. This is the main reason why SmokinLicious® designed a process for screening our wood chips to eliminate as much dust as possible. That is just step #2 in the process after producing the chips from larger pieces of wood.
It is one of our top questions. Wood storage. Where to store wood, how to store wood, temperature ideal for storing wood, shelf life of stored wood. If you are an avid follower of our readings, you are likely familiar with our two cartoon characters, Tom and Bert. Thru these characters, SmokinLicious® has been able to guide millions of home grilling and smoking enthusiasts on techniques and tips to make every wood-fired cooking event a success.
There seems to be some legend out there that wood-fired cooking methods are all about the endless hours of tending food and fire that produce taste results that are only granted to a small percentage of committed cooks; nothing could be further from the truth. Ready for simple methods of wood flavor infusion that do not take stockpiles of wood and equipment so large, you start thinking about adding on to your house?
Wood-fired cooking includes the simplest methods of wood infusion like the current rage with hand-held food smokers or even the stovetop smoker. Kitchen gadgets that have opened the door to anyone who wants to explore the fragrant and flavorful bounty that awaits all foods and beverages. One thing that still is evolving is the concept of spices not for your food but for your equipment!
If you’ve read some of our previous articles on wood flavoring you’ll come to understand and appreciate that there is no set rule on wood-fired cooking. Oh, yes, there is plenty of science when it comes to cooking with fire or as I like to say when you combust to flavor, which is what you are accomplishing with wood for cooking. I feel more attention should be given to the actual wood products; rather than focusing on the ingredients to the foods being cooked.
Wood is an ingredient
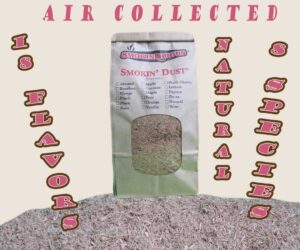
First, wood to us IS an ingredient, one that still needs to be balanced with the other components to bring forth a food memory. As an ingredient, the easiest by far to manage for wood flavor infusion is sawdust or in our Company’s listing,Smokin’ Dust®. Compatible with all types of equipment, Smokin’ Dust®literally becomes a ‘spice’ for your equipment.
Thinking of island flavors of pineapple, coconut, and mango for a recipe? Why not add one or more of those flavorings through the wood product? Yes, using all-natural flavoring infused into ourSmokin’ Dust® is one of the quickest methods of getting the great flavor to a specific regional dish. With 15 flavor-infused options that are 100% all natural, designed for cooking, and infused in hardwood, as well as 8 natural hardwood flavors, we’ve given new meaning to the word ‘spice’ as ours can now apply to the wood product! Remember, applewood doesn’t smell or taste anything like an apple. Use our apple infused product, and you’ll experience hints of cinnamon, nutmeg, and the bite of an apple!
Why settle for a run-of-the-mill smoking sawdust product that you don’t know where it comes from? A softwood, swept from the floor, shoveled from the ground, or worse, taken from under an animal? Instead, get excited about the flavor opportunities awaiting you and your equipment when you use a smoking sawdust product from a real cooking wood company. Get excited about the opportunities out there to experiment with, whether for hot smoking, cold smoking,handheld food smoking,stovetop smoking, or even traditional LP and charcoal grilling. And get ready to experience the world through flavor aroma!
Dr. Smoke- “Smokin’ Dust is one of our most customized and versatile cooking wood product.” which is a spice for your equipment
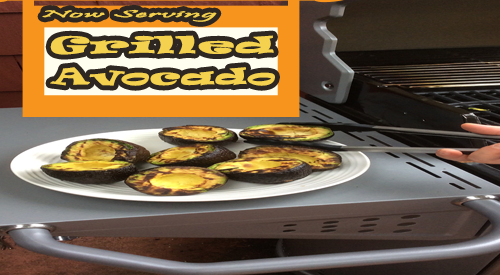
Wood grilled avocado is a fun way to add different flavor to this wonderful fruit.
WOOD FIRED GRILLED AVOCADO
Oh, the wonderful, healthy, creamy, flavorful avocado. With more potassium than a banana and 18 amino acids for daily intake, you can’t go wrong with this single seed fruit.
Did you ever think to grill this fabulous fruit with a little wood to give it even more flavor? We’ll show you just how easy grilled avocado can be on the gas grill using wood chunks for your smoke infusion.
Grilled Avocado with a Wood Fired Touch
Regardless of the brand of gas grill you have, you can add wood chunks to the grill for wood fired flavor. My grill has heat shields over the burners so I use that area to add one small wood chunk under the grill grate, directly on the heat shield. No, you won’t damage your grill, as the wood combusts to ash and basically blows away.
One chunk is all it will take to get great flavor into the avocados. I keep the burner that the wood chunk is located on set to medium as well as the burner next to that one on medium. Since I have 4 burners, 2 are on and 2 are off.
Once the grill is to 300° F, this technique will take less than 20 minutes.
Simple Preparation for Wood Fired Grilled Avocado
The only preparation needed for the avocados is to cut them in half and remove the seed. The avocados are placed flesh side down on the grate only on the side with the burners off. The heat captured within the grill will spread throughout the grilling area and cook the avocado while adding wood smoke vapor. Note, it’s important that you don’t attempt to move the avocados for at least 10 minutes otherwise you will find the avocado flesh will stick to the grate and you’ll lose much of the fruit’s flesh. Wait until some of the fat renders and chars making removal so simple.
Grilled Avocado- Prep To Finish In Less Than 20 Minutes
In less than 20 minutes you will have wonderfully wood flavored, charred flesh avocados ready for your favorite recipes. Think of using this fruit in smoothies, dips, on salads, as a creamy ingredient for sauces – remember, avocado can be used to substitute the amount of butter used in most recipes. We will take some of our avocado and make a wood fired guacamole first. Our recipe will post soon so stay tuned and don’t’ forget to send us your pics of wood fired avocado.
Did you get motivated to fire up the grill with wood? Send us a comment or your avocado fired pics and don’t forget to subscribe. Bringing you fun, innovative tips, techniques and recipes on all wood fired methods for foods, beverages, spices, herbs and so much more.
More Related reading on “What Wood for Smoking” and other great smoking and grilling tips and techniques
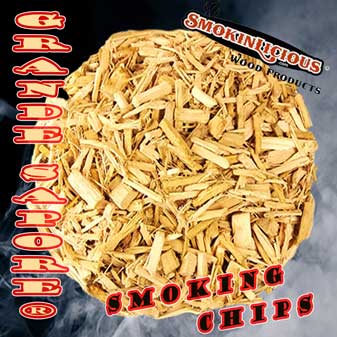
Smokinlicious® Grande Sapore-larger smoker wood chips or woood nuggets are crushed to preserve the great moisture level to be released during the cooking process.
A MESSAGE FROM DR. SMOKE on WOOD NUGGETS:
I want to thank everyone for their feedback and comments regarding “One Size Does Not Fit Everything!” There are so many smokers/grills on the market today, and we’ve always felt that one wood chip size does not fit every piece of equipment! Is the description “wafer”, nuggets, or chip size?? Users of the various equipment always seem to be trying to fit either an oversized piece or an undersized into unit to make it work! Just like when a recipe calls for a Tablespoon, you don’t add a cup. It’s the same concept with wood smoke flavoring of food!
So, after much research and work in the test kitchen, we, at SmokinLicious® will be welcoming new equipment at our facility to manufacture a variety of wood chip sizes. Our packages will begin to distinguish the following new concepts:
Wood Species
Sizing of the product
Fines Fraction
Bark Particles
Wetness (moisture) level
Ash level
Although we have been providing this customization to our wholesale customers for some time, we feel the time is right to make this information available to our internet/home user customers!
The first scheduled product will be the “SmokinLicious® “Wood Nuggets.” This product will consist of wood pieces approximately 30-35 mm by 15 mm, a perfect size when you want to add something other than a “double filet” chunk to the process but need something more than a small chip in order to avoid flare ups over hot coals. The Wood Nugget will have plenty of substance to produce excellent smoke vapor, the most vital element for infusing wood smoke flavor in foods.
This will allow the backyard barbecuer the means to set up the fire with a base hardwood for smoking and add something at the end to match- just like what commercial smokehouses do! Use your base hickory and add cherry nuggets to provide some great red hue to the end product!
At SmokinLicious®, we are constantly refining products and techniques for food smoking, grilling, ember fire and oven cooking. We will have a classification of products anticipated to be completed by the end of this year. We will introduce this array of wood cooking and smoking products over the internet by Spring 2015! As always, we welcome your comments and feedback!
Bon Bar B Que,
Dr. Smoke- Our wood Nuggets offer the same superb Smokinlicious® flavor quality when your smoker or grill needs something bigger than chips but less that chunks.
For more reading on cooking and smoking wood, check out these article:
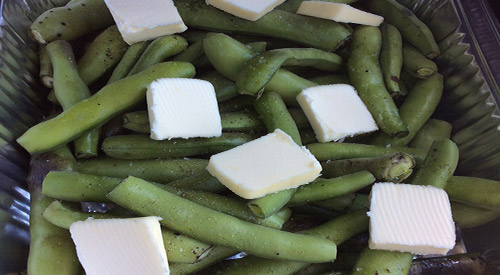
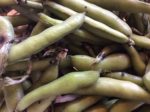
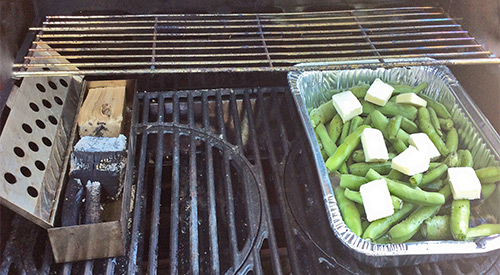
Fresh Fava Beans with Butter ready to become Grilled Fava Bean with a smoky flare!
ODE TO GRILLED FAVA BEANS
I love when the ideal weather comes around when at the same time there are so many options for fresh produce either at the Farmer’s Market or local grocery store. I tend to lean toward my grill and smoker for most of my cooking when the weather turns hot and steamy.
Beans are one of those vegetables that are spectacular on the grill but they get even better when you add a few wood chunks. I’ll show you how to prepare Fava Beans for the grill and give you my easy, fool-proof technique for incorporating wood chunks for flavor.
Before preparing the Fava beans, get the gas grill heated by turning on only half the grills’ burners which will be the side that radiates out the heat and holds the smoker box. For the smoker box, I’m using a stainless-steel model that has a hinged lid. I place 3 double filet wood chunks from SmokinLicious® in the box in a combination of woods. I’m using hickory, white oak and sugar maple to give me a great smoke balance to the beans. This will ensure I don’t overpower with the smoke vapor. By placing the smoker box with chunks on the grill grate as it preheats, it will be smoking by the time you have the beans ready.
Simple Bean Prep for Grilled Fava Beans
There is little to do with the Fava beans before they go on the grill. Wash them to start to make sure all the dirt and debris is removed. Pat dry with a paper towel and then move them to the cutting board. Remove any leaves and cut just the stem end to remove the stem. Place in a disposable foil pan, spread out evenly, and add roughly 6 tablespoons of butter to the beans, as well as salt and fresh ground pepper. That’s it. Leave the bean pods intact as they are going to act like a miniature steamer to cook the beans and ensure they don’t become over smoked.
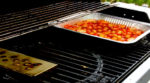
With the grill heated and the wood chunks smoking in the smoker box, place the pan of beans on the unlit side of the grill and close the cover. Check that your grill temperature steadies out at about 375°F. If lower, simply increase the heat setting on the active burners. Too high, decrease the heat setting. Leave the beans untouched for about 30 minutes. Return to the grill, stir the beans and check the wood chunks. If the chunks are still emitting smoke, close the grill lid and leave for an additional 10 minutes or so, or until fork tender. Remove the pan from the grill and allow to cool for about 10 minutes.
Grilled Fava Beans- Buttery, Smoky Finish
After the beans have cooled enough to be handled, take each pod and push the beans out one end into a bowl. You may keep the empty pods to use for making broth or for puree in a sauce or smoothie. These Fava beans are now ready for you to enjoy as is or use in your favorite recipe. Now, I’m taking my Fava beans and making a dip with goat cheese, lemon and tarragon.
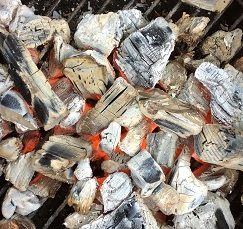
Our coals showing their hot glow and ready for direct wood ember cooking!
THE GLOW OF WOOD EMBER COOKING!
So what exactly is wood ember cooking and why is it suddenly gaining attention as a method of cooking? Well, first, it’s most certainly not a new cooking concept. Cooking over a fire and hot coals have been around for thousands of years. Recently, some Chefs and well-known restaurants have taken to returning to this method of cooking because they know where great flavor can come from and they know how to manage the heat from hot wood embers.
An ember is a glowing, hot coal made of greatly heated wood, coal or other carbon-based material that remain after a fire. The heat radiated from hot embers can be as hot as the fire which created them. You can see this first hand, by placing new wood pieces on hot embers and watching a full fire develop. An ember is usually formed when a fire has only partially burnt a piece of fuel and there is still usable chemical energy in that piece of fuel. It continues to stay hot and does not lose its thermal energy quickly because combustion is still happening at a low level. The small yellow, orange, and red lights are often seen among the embers are actually combustions. There just is not enough combustion happening at one time to create a flame. Once the embers are completely ‘burned through’, they are not carbon as is commonly believed (carbon burns, and is not normally left behind), but rather various other oxidized minerals like calcium and phosphorus. At that point, they are commonly called ashes. But why cook on the embers versus over a live fire? Because embers radiate a more constant form of heat, as opposed to an open fire which is constantly changing along with the heat it radiates (think water trapped within the wood and you’ll understand why there is heat fluctuation).
Ember cooking techniques include placing thickly skinned food items directly into the embers (i.e. garlic, onion, peppers, eggplant, steaks, etc.), placing a cast iron skillet into the embers that can hold any food items from vegetables, meats, poultry, fish – really anything. The results produced from this method are super moist, super flavorful, and the aromas are exceptional.
Sweet Peppers over direct wood ember cooking
Dr. Smoke- You don’t need a flashy grill, a simple fireplace with enough room, just like Asado, you can do direct wood ember cooking
You’re limiting your time in stores and other public places. You’ve taken to online shopping as well as searching for ways to keep your meals interesting and flavorful. You’re ready to do more grilling in order to keep the family in the household yard, getting some fresh air and UV light when available. The only concern you have is, how safe is it to receive all these packages at home? Won’t they be hosts to the virus as well?
Your concern is certainly a valid one and most definitely has basis. Let’s examine this concern further and explain how the SmokinLicious® procedures protect you.
Why our Thermal Heating Process Makes a Difference
Since 2005, every product manufactured by SmokinLicious® undergoes our Thermal heating process that is a 4-probe computerized system to ensure optimum function of our chamber. Because we know some fungi spores are only killed at 60°C/140°F, mold spores at 56°C/133°F, and listeria at 74°C/165.2°F, we exceed any regulation for heat level and duration in order to protect the food chain system. Currently, we use a temperature of 75°C/167°F for a sustained duration of 75 minutes. We also developed a re-hydration process within our chamber to ensure the hardwood is not depleted of all moisture enabling it to be used for a variety of live fire cooking methods.
The SmokinLicious® culinary crew’s two-zone cooking method set up to smoke Fava Beans on the Gas grill with Wood chunks!
WHY TWO-ZONE COOKING METHOD LET’S YOU WALK AWAY FROM THE GRILL
listen to our blog
We all know that the key to easy and successful outdoor cooking is to control the temperature. I also believe that outdoor cooking should not hold you hostage at the grill. That’s why everyone should learn the two-zone cooking method for grilling.
Let’s cover what type of cooking you can do by this method, why it’s so successful, and how to set up the zones.
Two Zone Cooking Method- Why it is Best
Two-zone cooking can be done on any type of grill no matter the fuel source. What is two-zone cooking? Using the fuel source on only half the grill while the other half holds the food. Although you may use the unlit side of the grill for most of the cooking, you have the benefit of finishing crispy skins of items or quick cooking thinner cuts of meats on the direct heat side.
Two-zone cooking is also called direct and indirect cooking. The indirect side uses indirect convection heat to cook the food which means the heat generated by the lit side radiates into the material of the equipment and produces heat (convection heat) on the unlit side. The direct side produces the heat within the unit and can be used when quick cooking is needed or when a food that has been cooked on the indirect side needs crisping, additional coloring, or some char.
Two Zone Cooking Method- The Set Up
The primary reason you want to set up two-zone cooking is most of the grill cooking does not require direct heat. When you consistently cook foods, especially meats, over direct heat, you easily can have dried, stiff, flavorless results. This is due to the components of meat reacting at different temperatures that with direct cooking occur too fast to react.
I will tell you that you need a grilling area that is large enough to establish two zones. I judge the space needed with a rectangular, disposable foil pan. If the pan can fit on half the grill area without issue, then you have plenty of room for a two-zone setup. When using a gas grill, this means lighting the burners on one half of the grill. If you don’t have an even number of burners, then decide how many are to be turned on and how many left off. With a charcoal grill, placing the hot coals on only half the charcoal area. On an electric unit, if you can manipulate the heating element, isolate the element to one side of the unit. The temperature that works ideally for two-zone cooking is 225°F. Of course, I always add wood chunks to give a smoky flavor to the foods. Remember, the hardwood goes on the direct side of the grill or lit burner or hot coals.
#chefbertandtom
Note that you can also use a water pan using two zones. This can be placed on either side of the grill depending on when you need the direct heat side. Keep in mind, when doing meats, it’s great to place a pan under the meat with vegetables (onions, potatoes, celery, peppers, etc.) and a small amount of liquid that can collect the meat renderings. You can also place pans of beans to catch those drippings. Anything is fair game.
For those times when you don’t want to add any additional foods, you can simply lay a thin foil pan under the grill grate of the indirect side or a sheet of foil. That will collect any fat drippings.
Cook Anything!
Since radiant heat is what you are cooking with when foods are placed on the indirect side, you can cook anything. I love doing tarts and cakes via this method, especially during the hot months when you don’t want to lite your indoor oven. In fact, those are the times that I cook an entire meal using a two-zone setup.
You can also cook multiple items using both direct and indirect heat. A long cooking meat goes on the indirect side, is cooked to temperature and held there, while a side dish is cooked on direct heat. Don’t forget, if the cookware you use is high heat tolerant, you can use cookware as well. This is how I can make cakes, tarts, and bread on the grill. You need to view this equipment like an oven as that is essentially what it is!
Two Zone Cooking Method- Use Like an Oven & Walk Away
I’m going, to be honest. Although it’s true that you can produce more moist foods using a two-zone method the real reason I love this method of cooking is I can walk away from the grill. This is particularly true when using a gas grill which holds the temperature steady, which for me, is 250°F for long cook meats and regular baking temperatures for all my cookies, cakes, tarts, bread. Remember, charcoal grills will still require you to refuel so the temperature can fluctuate more if you’re not careful. Keeping an extra chimney starter of charcoal going will solve that issue.
What is a two zone fire? You may ask…
A two zone fire is also called two-zone cooking method can be used to grill or smoke any type of food on any grill (smoker, gas, charcoal, wood-fired or electric)! Setting up a two-zone cooking method is very easy- have a hotter side on one half of the grill and a lower or no setting on the other half. A two zone fire gives the cook or chef “a stylized or finessed” way to grill without ruining great food flavors by over cooking. It is especially the best way to cook meats and vegetables. Keep in mind that grills radiate and transfer heat, so it’s really not necessary to crank up every burner or heat source to a temp equivalent to the Sun! It’s as simple as that!
As a final note, even though two-zone cooking allows you more time away from the grill, you still need a good digital thermometer to monitor the temperature of the food. Invest in an easy read one and you’ll really enjoy this new way of grilling and smoking.
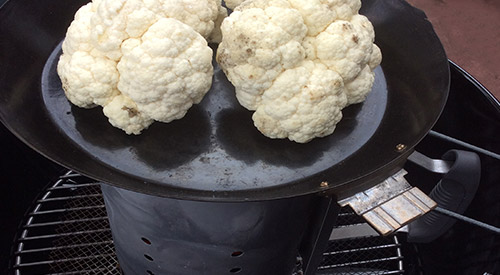
We are cooking on a chimney starter with a grill pan to nicely char our head of Cauliflower for this recipe!
COAL FIRE CAULIFLOWER BY COOKING ON A CHIMNEY STARTER
listen to our blog
A cousin to broccoli, #cauliflower is one of those vegetables that can be eaten raw or cooked and converted to so many different textures. Best yet, cauliflower is one of those super cancer-fighting foods as it contains sulforaphane known to kill cancer stem cells.
I’ll be taking my head of cauliflower and introducing it to hot coals, first, direct heat using a #chimneystarter for the actual cooking and then directly on the hot coals to give it the perfect “meat” char. No matter what color you enjoy – white, yellow, purple – grab a head and get your chimney starter ready, as I show you how to use a chimney starter as an actual grill.
Cooking on a Chimney Starter: Why a Chimney Starter?
There are times when you really don’t need to fire up a full charcoal area of coals on the charcoal grill. I have the perfect solution when you’re doing just a small quantity of a food, like our head of cauliflower. Use your chimney starter
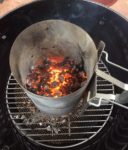
To start, I place a mesh screen on the charcoal grill grate to help retain the small, hot coals for cooking. I have a collection of micro charcoal pieces that work perfectly for this type of cooking.
After lighting a Firestarter, I place the charcoal filled chimney starter on top of the Firestarter and allow the coals to burn down to hot embers. Hot embers are what I will be using to cook my fresh cauliflower, first, directly on the chimney starter, then on the mesh screen once I dump the hot embers from the chimney starter.
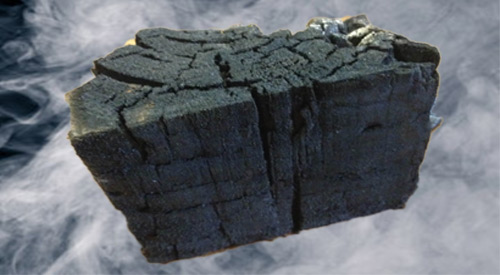
Our Char-wood is produced by Direct firing our North American hardwood blocks until the right amount of Carbonization is achieved!
WHY CHAR-WOOD IS THE BETTER OPTION OVER CHARCOAL
SUMMARY:
Binchotan charcoal is made from the Japanese direct fire method of making charcoal with Kiln! Japanese charcoal making has been around for centuries and burns longer than lump hardwood charcoal! We have replicated their process and make our Char-wood from our North American hardwood blocks! Carbonization is key to Char!
listen to our blog
Frankly, the term “charwood” may be a new one for you. Although its function is like charcoal, the benefits clearly outweigh those of charcoal. Let’s examine the key reasons why charwood may be the better option for outdoor cooking over standard charcoal.
Char-wood- Carbonization
Hopefully, if you’ve been engaging in outdoor grilling and/or smoking for some time. You’ve understood the need for a fuel material that burns evenly and hot. You’ve likely also heard the controversy that’s brewed for years about what is the best product to use for the fuel. Products range from briquets, lump hardwood charcoal, specialty wood charcoal, and compressed woods like pellets and compressed wood blocks. The key is to understand that some of these products could contain binding agents as well as accelerants to make for easy lighting.
Carbonization is the conversion of an organic matter into carbon. Carbon is an element that forms when the organic matter is heated to a high level without oxygen, burning off the volatile gases, leaving the pure carbon behind. Although commercial material production, whether briquet, hardwood charcoal, or standard charcoal have different percentages of carbonization in the outcome, most are above 90%. That high level of carbonization is what allows for heat to be produced for outdoor cooking.
Flavor
When you use straight charcoal briquets, you are getting heat only with no flavor as that is a fully carbonized or charred product. Many prefer to use briquets because they are uniform in size and give the same outcome every time they are used. Fill a chimney starter with briquets, and you’ll have the same number of briquets fit in the chimney every time.
When you use lump hardwood charcoal, you will get variation in sizing from small, chip-like pieces to half-log size pieces. Here’s information you need to know. Although the label may read “hardwood”, there is no information on where that hardwood derived from. Often, manufacturers of lump hardwood charcoal produce their product from recycled materials such as old pallets, lumber scraps from flooring, cabinet, and furniture makers. They may take in scraps from lumber mills. When this material is carbonized, it will do so at various levels due to the variation in material sizing.
That means when you cook with it or for that matter when you lite it, expect great variation from use to use due to all the inconsistency in sizing. The inconsistency will produce a lower percentage of carbonized material than briquets. So know you may get some minimal flavor from lump hardwood due to poorly carbonized larger pieces of product. This is the reason there is more ash production with lump hardwood charcoals.
Specialty charcoals, generally made in other countries, are a particularly hard substance, light in weight product, that can be a challenge to lite. Once they are ignited, however, they produce a lot of heat – often more than the standard briquet. Very little ash is produced and there is no flavor from this product.
Char-wood- Benefits
When SmokinLicious® made the decision to manufacture a charwood product, we researched extensively why the Japanese binchotan charcoal, also called white charcoal, was so popular and expensive. We found that though it could be a challenge to lite, it burned extremely hot, clean, leaving little to no ash, produced no smoke and no flavor. We produced a similar set up to the Japanese direct-fire method with our charwood production. Instead of using miniature branches, we use consistently sized wood blocks. Unlike the binchotan, we do not do a complete carbonization. The result is you get the ease of lighting like a lump hardwood charcoal, the flavor of premium hardwood. Plus, the reduced ash production of a briquet, and reduced smoke output than burning wood alone. We see this as the best of all the options out there.
Now, instead of viewing your charcoal as just a heat generator, when you use SmokinLicious® charwood you have one product that can be used as fuel for temperature while the reduced carbonized center portion produces the flavor. A premium product that gives premium results!
What is Japanese charcoal?
Binchotan charcoal is made from the Japanese direct fire method of making charcoal with a kiln that has been around for centuries. Japanese charcoal is very expensive and burns longer than lump hardwood charcoal!
Is charcoal made from wood?
Charcoal briquets and lump charcoal are made from recycled materials such as old pallets, lumber scraps from flooring, cabinet, and furniture makers. Some charcoal products may contain binding agents as well as accelerants to make for easy lighting.
Is wood better than charcoal?
Cooking wood can offer an ease of lighting and flavor to your foods while its fuel performance is more consistent than that of many carbonized charcoal products. Plus, wood produces less ash than lump charcoal or briquettes.
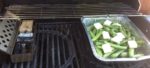
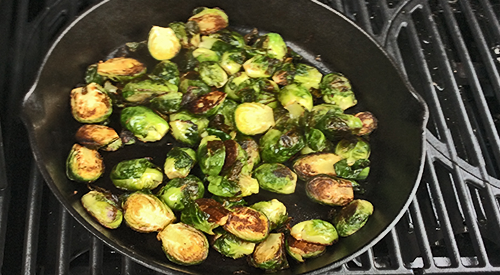
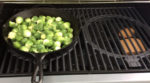
Infusing cherry wood smoke into Brussels sprouts using the gas grill is simple and easy and adds a very flavorful touch to this hearty vegetable.
INFUSING WOOD SMOKE INTO BRUSSELS SPROUTS
A favorite of the cabbage family, Brussels sprouts came to the United States via French immigration in the 18th century. They are dominantly grown in California and available June thru January making them a Fall and holiday menu favorite. SmokinLicious® will take the flavors up a notch and add wood smoke into Brussels sprouts for two upcoming recipes. We’ll do this on the gas grill fit with wild cherry wood chunks to bring subtle smokiness to the finish sprouts. First purchase 3 lbs. of Brussels sprouts and get two cherry single filet chunks, and you’re ready to fire up the grill and get smoking.
The Easy Grill Method for Infusing Wood Smoke into Brussels Sprouts
Bringing the flavor of wood smoke into Brussels sprouts is so easy. To start, gather about 3 lbs. of Brussels sprouts, some cooking oil, butter, and a heavy-duty skillet. I prefer a nut oil like walnut or almond. For a skillet I’ll be using cast iron. I’ve trimmed the ends on about half the sprouts and for the other half, I’ve trimmed the ends and cut them in half. That’s it! Fire up the grill and get ready for a quick method of adding great wood-fired flavor.
It only takes a couple of pieces of wood chunk to bring fabulous flavor to the grill. I set up a cast iron pan on one side and place two cherry wood chunks on the heat shields of the far burner. Let the pan heat up for about 5 minutes then pour in a couple of tablespoons of oil and heat. Right before I add the Brussels sprouts, I add a couple of tablespoons of butter. In go the whole Brussels sprouts and the lid comes down. Leave untouched for about 5 minutes before turning.
Flavor Finish
As I have two recipes in mind I’m cooking two batches of Brussels sprouts: one batch whole and one batch halved. After leaving for 5 minutes, I stir them to ensure that all surfaces are infused with wood flavor. I maintain a temperature of 350-375° F which will make this a quick cooking method. The first 5 minutes, the lid is down but once stirred, you can finish the cooking with lid up. Remember, cast iron will retain heat, so you can turn the heat off and let sit for about 5 minutes.
After stirring a couple of times, both the whole and halved Brussels sprouts are ready in about 20 minutes time. I simply remove them from the heat and bring them in to be added to my favorite recipes.
I have two recipes I’ll be working on: Smoky Brussels Sprout Gratin and Tortellini with Lemon and Smoked Brussels Sprouts. These truly are the most flavorful Brussels sprouts! For those of you thinking about a holiday meal with them, well, the grill will give you that extra oven room you need. Take advantage of the long harvest season and try these mini cabbages on your grill. Check in for our recipes soon so we can get you started on how to use your prized sprouts.
Bringing you new methods of infusing wood fired flavor into seasonal items. Be sure to subscribe and follow us to gain great tips, techniques, recipes and the science behind the fire.
The Culinary Crew wants you to know…
#chefbertandtom
… that the direct infusion of hardwood-fired smoke to foods, like Brussels Sprouts, is considered a flavor ingredient, much in the same way that spices, minerals and sauces enhance taste. When fired, the components of smoke vapor carry the hardwood’s distinctive flavor profile directly into meats, seafood, fruits or vegetables with pleasing results to the palate.
SmokinLicious Products used in this recipe- wood smoke into brussels sprouts:
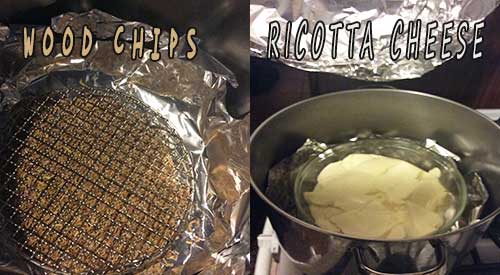
Smoked Ricotta Cheese – I know not everyone has a dedicated stove top smoker but I do know that we all have a large stock pot handy. I’m going to show you an easy way to convert that pot to a stove top smoker by using micro wood chips, aluminum foil, and a roasting rack. I’ll explain to you a combination hot/cold smoking method to bring a smoke flavor to whole milk ricotta, that will allow you to use this product in any recipe calling for traditional ricotta. Find your stock pot and roasting rack, and let’s get smoking!
Once you’ve selected a stock pot to use for the smoking, the preparation of the pot is quite simple. Start by placing 2 sheets of heavy-duty aluminum foil in the bottom of the pot, allowing it to go up the sides slightly. Then select the micro wood chips of your choice – I’m using a Sugar Maple Minuto® wood chip in size #6 – and spread into a thin layer on the foiled bottom. Add a roasting rack. Mine is round to fit easily in my pot. I also like to line the lid of the pot in foil as all hardwood contains creosote which can cause some discoloration to the pot. The foil will protect this from happening and makes clean up a breeze.
Then place the prepared pot with the lid in place over a medium-high heat and allow the chips to heat until they are consistently producing smoke. This will take less than 15 minutes.
Once the chips have started to combust and produce smoke vapor, it will be time to add the ricotta. I am doing 3 pounds of whole milk ricotta as I plan to make a dessert pastry horn and then keep some spare smoked ricotta cheese for pasta recipes.
After 12-15 minutes of heating, lift the lid and place a heat safe container of the ricotta on the rack inside your smoking pot. Secure the lid in place and allow this to stay on the heat for about 5 minutes. Then shut the heat off and leave the pot with the ricotta inside untouched for about an hour. Let the smoke infusion occur with this cold smoke technique.
Tasting Notes: Any hardwood can be used for the smoke infusion but note that by retaining the pot lid in place, you are limiting the oxygen that can enter the pot. This produces a much bolder smoke infusion than is common with the same wood used on a traditional smoker or grill.
Smoked Ricotta Cheese- Smoky, Creamy Goodness
Here’s something to keep in mind with this stove top DIY smoking technique. I have a very tight seal on my pot which means it doesn’t take a lot of wood chip product to infuse a smoky flavor in the ricotta. Plus, the fat level of this dairy product attracts smoke vapor well as this is high in water content which smoke vapor is naturally attracted to.
If after about an hour, and after you’ve sampled the smoked ricotta, you still desire more smoke, simply turn the heat back on for about 10 minutes to stimulate the chips for additional combustion. Then repeat turning off the heat and allowing the ricotta to sit absorbing the smoke for the set amount of additional time you want. Once done, refrigerate the smoked ricotta until you are ready to use it, keeping this covered well. If any liquid accumulates while refrigerated, simply pour off before using the smoked ricotta in a recipe.
To get your recipe ideas stimulated, I’ll offer up my Smoked Ricotta Pastry Horn recipe which is super easy, fabulous looking, and can be made with an assortment of filling options. Keep watching our website for the announcement on this recipe release.
What’s your favorite food to stove top smoke? Leave us a comment to opine and subscribe to get all our postings on tips, techniques and recipes. Bringing innovation to wood fired cooking with recipes, techniques and the science behind the fire, smoke, and flavor. That’s SmokinLicious®.
The Culinary Crew wants you to know…
… that experimenting with “Do It Yourself” techniques can certainly apply to using your outside charcoal or LP gas grill as a quasi-smoker too! We’ve heard from many of our followers about deep dished aluminum food serving trays and even pie tins being used to offer a quick and easy try to food smoking.


 After stirring a couple of times, both the whole and halved Brussels sprouts are ready in about 20 minutes time. I simply remove them from the heat and bring them in to be added to my favorite recipes.