You’re likely at the point where you’re starting to ask a few more questions about the handling of some items you purchase that previously may never have been given a second thought. You also may be receiving frequent updates from suppliers apprising you of the steps they are taking to ensure no viral agents are being transferred with products they are handling.
Air Handling- Our Priority to Provide for a Healthy Product Line
This is the point where SmokinLicious® is different. Handling and cleanliness of our products has been a priority from the start. We worked to establish our procedures and improve on them as our business grew.
Air Handling- Dust Free Products
Currently, we have in place an air collection system that allows us to capture our sawdust and wood chip products utilizing clean air piping that provides for a dust-free product outcome, cleaner air for our employees to work in, and ease of moving the products from the collection bins to the finished packaging areas. An added benefit, the product is not exposed to human handling. Our employees handle the bins of finished product initially, then stage these for packaging as needed.
Our products are not stored as raw material on the ground or floors. There are dedicated storage bins for each level of product that can easily be disinfected with natural, food-grade disinfectant methods as needed.
For SmokinLicious®, steps were already in place to maintain a healthy safe environment for our employees and products that make this recent pandemic concern easily managed by us.
It’s further piece of mind that we can continue to supply our pure, clean cooking woods for those that value the benefits of live fire cooking, whether on the grill, fire pit, smoker or fireplace. Embrace the safety and ease of grilling at home once again with the incomparable flavor of wood.
Do you plan to grill and/or smoke more at home with the recent COVID-19 scare? Leave us a comment and subscribe to get our latest tips, techniques, recipes and the science behind the fire and smoke, for all live fire cooking methods. That’s your SmokinLicious®! Ensuring your safety and knowledge.
More related reading on air collection and other grilling safety tips see our smoking & Grilling tips and technique see our directory on previous blogs!
We are approaching that exciting time of the year when just about all of North America can start to enjoy cooking outdoors again! Make it the best outdoor cooking season yet by learning the steps to using wood for cooking and grilling successfully, avoiding the common wood cooking mistakes that can sink those outdoor meals.
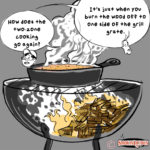
Our 75 degree c for 75 minutes is for wood safety product to protect your health and the environment.
Wood Safety
You’re likely giving thought to many more potential hosts for the COVID-19 in an effort to keep everyone important to you safe and healthy. Without question, everything you touch has the potential to be a host for the virus that is spreading so rapidly around the world. It is without question, a scary time. What you likely don’t realize is SmokinLicious® has always been committed to protecting our customers from the transfer of potential contaminants.
Our Commitment for Wood Safety- Not Just Any Wood Supplier
In our previously published article titled, DEMYSTIFYING TERMS USED FOR SELLING SMOKING & GRILLING WOODwe attempted to explain what the varying words used to describe preparation to wood sold for grilling and smoking actually meant. The important point to take from this article is that these various “labels” don’t relate to what can assure bacterium and viral agents don’t survive if they grab onto the wood to ride as a viral or bacteria host. In the end, we are the only current supplier who not only sells hardwood only for the purpose of cooking, but utilizes a heat treatment process that is at a level to ensure no microbial or viral agent can latch on to the wood and infect the user.
Even though we use an intense heat level of 75°C/167°F, we developed a method to ensure the hardwood is not dried out to to where it would be classified as firewood, something we never want to be compared with.
Remember, we know some fungi spores are only killed at 60 °C/140 °F, mold spores at 56 °C/133 °F, and listeria at 74 °C/165.2 °F. Although there is no confirmed data on the heat level that COVID-19 dies, we do know that sunlight results in the viral agent only surviving a few hours, given the intensity of the ultraviolet rays. This suggests that heat does play an important role in reducing the virus surviving.
The current regulations in place for wood just don’t make assurances to safety. Our efforts reinforce that potentially fatal bacterium cannot enter our food chain. You can handle our packaging and cook with our products knowing we’ve done our part to ensure no transfer of bacterium or infectious agent.
Can your local firewood or other wood supplier make the same claim?SmokinLicious® – the brand that’s pure, clean, and safe for cooking.
Do you plan to grill and/or smoke more at home with the recent COVID-19 scare? Leave us a comment and subscribe to get our latest tips, techniques, recipes and the science behind the fire and smoke, for all live fire cooking methods. That’s SmokinLicious®!
Collage of smoked bananas & their SMOKY CREAMY GOODNESS!
SMOKED BANANAS- CREAMY GOODNESS!
Banana’s peak season is from January thru April but you can enjoy this fruit any time of the year! Although you’ve likely enjoyed most of your bananas raw, they are one fruit that works exceptionally well in all types of recipes, from bread, puddings, smoothies, cookies, and muffins, their sweet undertone makes them ideal as a dessert item. With a light, creamy flavor you’ll find bananas are compatible with so many other ingredients like dark and white chocolate, coconut, blueberries, caramel, ginger, honey, sugar, vanilla, and many nuts. The best part, is they work in recipes whether ripe, under-ripe, or overripe! The level of ripeness determines what you do with it.
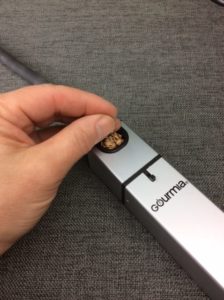
In this series, we’re going to use the Gourmia® handheld food smoker with Minuto® Chips in Size 8 from SmokinLicious® to get the perfect level of smoke using this quick, easy method. No spending hours over a traditional smoker and taking the risk of your bananas turning to mush! Get ready for a new flavor to your traditional banana for drinks, breakfast items, and desserts.
MATERIALS FOR SMOKED BANANAS:
I’ll be using the Gourmia® handheld food smoker for this series, but any similar unit will work fine. In addition, you will need a cookie sheet, a food storage bag large enough to go over the cookie sheet or you can use plastic wrap, bananas – any variety will do, SmokinLicious® Minuto® Chips in either size #6, #8 or #10, and a lighter or kitchen torch. When selecting your bananas, look for evenly colored yellow bananas flecked with tiny brown specks which indicates ripeness. Avoid those with any visible blemishes as that usually indicates the fruit is bruised.
Be sure you are doing the smoking process in a well-ventilated area or even outside. Kitchen hoods work great!
A good rule of thumb prior to starting your smoking process is to be sure everything is in working order. Check the batteries of your handheld food smoker and the butane level of your lighter. You’ll also need a few tablespoons of SmokinLicious®Minuto® Wood Chips available. I’m going to use Cherry today to keep the fruit flavoring marriage.
Attach the smoking tube to the handheld unit and have a lighter at the ready. It is important not to overstuff the bowl of the handheld smoker with chips as a little goes a long way. Now, place the Minuto® wood chips in the bowl of the unit being sure not to stuff. Remember, once lit, these handheld units produce a lot of smoke vapor quickly so everything needs to be set up well.
PREPARING THE SMOKED BANANAS:
Removing the peel
I have a preference for using a small sheet pan or cookie sheet when I cold smoke fruits. It makes it very easy to expose the fruit to the smoke vapor without the need to rotate the food. As I want to get the good wood flavor to the bananas, I am peeling them and cutting them in 2-inch pieces as the recipe I plan to use them in will require smaller segments. I then placed the cut pieces on the sheet pan, and then secure a food storage bag or plastic wrap over the pan. Be sure you are able to draw at the end of the bag as if you’re going to tie it off with a twist tie. The ability to cinch off the bag is what will ensure that the smoke vapor produced is trapped within the food bag and infuses each piece. If using plastic wrap, leave one end loose so you can insert the smoking tube. The length of time you leave the smoke vapor in the bag or under the plastic wrap will determine the strength of the flavor. I plan to incorporate dark chocolate, coconut, and nuts with my smoked banana so I will be filling the bag with smoke vapor and allowing it to dissipate on its own. Remember, you have control of when you release the smoke so timing is up to you!
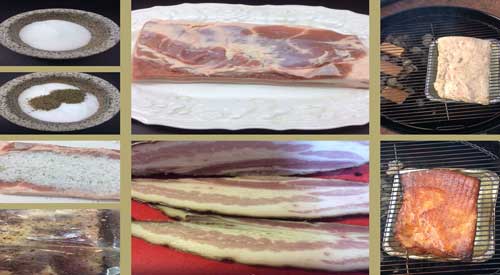
Just about everyone I know loves bacon, even if it’s the store-bought type. There are so many foods that have been designed around bacon including a chocolate chip cookie recipe featuring caramelized bacon pieces and a bacon ice cream! (which we’ll offer a recipe for soon).
One thing most bacon lovers don’t know is just how easy it is to make your own bacon at home, even the smoked type. You’ll be amazed at how different the taste and texture are with bacon you make at home. Just know, my technique will require you to cure the pork belly for a minimum of 7 days so be sure you have refrigerator room and time to wait. I know – when it comes to bacon it’s sooooo hard! But it will be worth the wait!
Quality Meat a Must for Homemade Smoked Bacon
#porkbelly
When making homemade bacon, you’ll need a slab of pork belly, which is a relatively inexpensive cut of pork. Since this process is a time investment, consider purchasing a quality cut of belly which would be labeled “organic”. This cut normally comes from heritage breeds like Kurobuta and Berkshire. This investment will result in richer, meatier, and cleaner flavors to the finished product.
Although a full pork belly will weigh around 12 lbs., you only need about 3 lbs. to give you a sizeable quantity of bacon. Also, some belly will come with the skin still intact while others will already have the skin removed. Note, you will need to remove the skin before curing so you likely will want to ask the butcher to do this for you. If you’re doing skin removal yourself, simply separate the skin from the fat layer at one corner by inserting a knife point. Grab hold of the skin and begin making horizontal cuts with the knife in short sections, pulling the skin back as you go. Leave as much fat layer as you can. Once removed, it’s time to rub and cure.
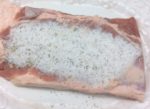
Homemade Smoked Bacon- Rub and Cure to Flavor
Curing is preserving the meat. This is done not only by the ingredients in our rub but also by the process of hot smoking which contains antimicrobial benefits. Remember, when we are done with the smoking process, your bacon will be ready to eat as is, though you will be able to crisp it up if you want in a pan.
For my rub, I’ll be combining the following:
1 cup of maple sugar, coconut sugar or regular sugar
½ cup kosher salt
1 tablespoon cracked black peppercorn
2 teaspoons minced fresh thyme
¾ teaspoon pink salt also known as Prague Powder #1
1 crumbled bay leaf
1 teaspoon ground coriander
#briningporkbelly
Now cover every area of the pork belly with your rub. Place the rubbed pork belly in either a 13×9 baking dish covered with plastic wrap or in a storage bag. I prefer the jumbo size bags. Just be sure to remove all the air from the bag before sealing.
Place the belly in the refrigerator. Now starts the curing process. As it cures, the meat releases liquid. You’ll need to flip the meat every other day to ensure the cure is evenly distributed. Begin checking after 7 days if the belly is fully cured. You’ll know the pork belly is ready to be smoked when the meat feels firm to the touch but is still pliable. Rinse the pork belly under cold water to remove any excess cure or the outcome will be too salty. We are ready to smoke!
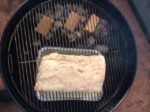
For Your Homemade Smoked Bacon- Make the Pork Belly Smoke!
Even if you don’t own a traditional smoker, you can still smoke the pork belly. Here’s the technique:
Charcoal Grill:
You will set up the charcoal grill using a two-zone cooking method. Start by loading about 3 lbs. of briquets or hardwood charcoal on one side of the charcoal fuel area. Place a water pan filled with water about 2-inches deep on the non-charcoal side. Then fill a chimney starter ½ full of briquets or hardwood charcoal. Lite and allow to burn to hot coals, then pour the hot coals over the top of the unlit charcoal in your charcoal grill. Add a couple of hardwood chunk pieces to the hot coals and allow to start smoking before you add the pork belly. Once the chunks are smoking, place the cured pork belly on the unlit side of the grate fat side up. Put the lid on and allow to smoke for about an hour without disturbing. Keep in mind, your intake vent should be open ½ way as well as the outtake vent at ½. A 3lb. pork belly will take about 1-1/2 to 2 hours to reach 150°F internal temperature. By using both hot and cold charcoal, you should not need to replenish the coal bed, just may need to add another chunk or two of hardwood.
#charcoalgrilling
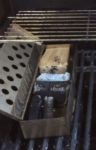
Gas Grill:
Place a smoker box of small wood chunks directly on your heat shield or on the grill grate. Turn on only ½ the burners on your gas/LP grill and set to medium temperature setting. Place a small pan of water on the warming grate to keep a moisture rich environment during the cooking process. Allow the grill to reach 225°F and to have the wood chunks begin smoking. Place the cured pork belly fat side up on the unlit side of the grill. Allow the pork belly to cook until it reaches an internal temperature of 150°F. Replenish the wood chunks in the smoker box as needed.
Traditional Smoker:
Set up your smoker as normal targeting a 225°F cooking temperature. Be sure to include a water pan if your smoker doesn’t include one (a disposable foil pan works great). Again, use 2-3 hardwood wood chunks for the flavor. Place the pork belly fat side up and cook until the internal temperature reaches 150°F.
Homemade Smoked Bacon- Ready to Eat!
Once the pork belly has reached 150°F internal temperature, it is ready to eat as it is fully cooked! Remember, smoke has an antimicrobial quality which helps to make this consumable at this temperature level. I recommend you allow the bacon to cool to room temperature on a wire rack set over a sheet pan. Then wrap in plastic wrap and refrigerate for at least 4 hours. This will set all those great flavors.
By slicing it paper thin, you can consume this cold and enjoy a more prominent smoke flavor. However, you may pan fry this like traditional store-bought bacon or oven cook this on a rack over a foiled lined sheet pan for those who prefer a healthier, more rendered fat version. This method also allows you to do a lot more bacon at one time then pan frying allows.
Refrigerated homemade bacon will last 5-7 days while frozen will keep for several months. Once you sample your own homemade smoked bacon, you’ll never purchase prepackaged again!
Price is NOT everything-THE TOP THINGS TO CONSIDER WHEN PURCHASING COOKING WOOD
THINGS TO CONSIDER WHEN PURCHASING COOKING WOOD
We have your top things to consider when purchasing cooking wood! We are getting closer to peak season in North America for outdoor cooking. What a perfect time to start thinking about what you want to get out of your outdoor cooking time this year so you’ll be able to source the supplies you’ll need and feel confident in your decisions. This includes the wood used for cooking.
There are many companies who offer woods for cooking in the United States. We thought we’d assist you in determining the perfect fit for your needs based on what you’re looking for in the cooking wood as well as a match for your equipment.
Today, we are going to compare 7 popular cooking wood companies who may use the terms cooking woods, grilling woods, wood, and BBQ, or BBQ products. The comparison will include 9 key areas: Established date of the business, where the wood is harvested or sourced from, wood types offered, how the wood is sold, shipping costs, treatment process the wood is exposed to, packaging of the product, if bark is present, and primary claim made by the Company. Following this listing, I will highlight any information that you may want to question further.
Our goal is to arm the purchaser with needed information to ensure that they are getting the perfect wood for the cooking technique(s) they plan to do. Remember, there are different variables needed in a wood for different methods of wood-fired cooking which you can read about further in our blog Taste is Aroma.
A ‘MUST HAVE’ RESOURCE FOR CERAMIC SMOKER Posted By: Dr. Smoke
We know you are all likely aware of the excessive number of cookbooks and resource books available in the area of grilling and smoking, and I’m sure you’ve purchased your share. I’m also sure you’ve experienced periods of disappointment when you finally get the opportunity to delve into the pages of that book only to find that the recipes don’t all relate to cooking on the grill or ceramic smoker, and the tips are in short supply.
With that being said, I want to give my stamp of approval on a great resource for all you advocates of ceramic cookers out there!
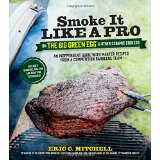
Smoke It Like A Pro on the Big Green Egg & Other Ceramic Cookers by Eric Mitchell is the ultimate resource for all things done on ceramic cookers! Over the years, I’ve lamented about the need for a cookbook that includes all the detail to actual cook the recipes on the smoker and/or grill! Finally, Mr. Mitchell does just that!
His personal commitment to ceramic smokers truly shows not only in the beautiful photographs of the foods and cooker techniques, but in his simplistic terminology and focus on the small details that will make this resource a favorite. Even if you don’t own a ceramic cooker, you will gain great tips on fire starting and manipulation of the fire for fuel and flavor, as well as exceptional recipes – my personal favorite is that extensive dessert listing that is all done on the cooker.
Now available online and at select bookstores, Smoke It Like A Pro on the Big Green Egg & Other Ceramic Cookers by Eric Mitchell will get you firing up that cooker despite the weather! “Bon-Bar-B-Q!”
Dr. Smoke- For our friends that own a ceramic smoker, here’s a helpful resource you shouldn’t pass up- “Smoke It Like a Pro” by Eric Mitchell!
For additional reading and insight on ceramic smoker, here’s a list that will interest you:
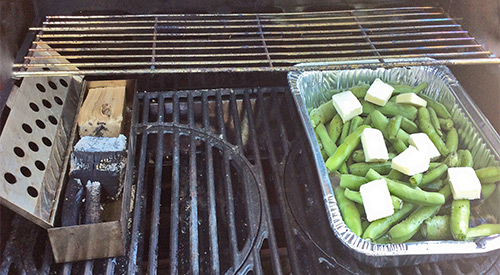
The SmokinLicious® culinary crew’s two-zone cooking method set up to smoke Fava Beans on the Gas grill with Wood chunks!
WHY TWO-ZONE COOKING METHOD LET’S YOU WALK AWAY FROM THE GRILL
listen to our blog
We all know that the key to easy and successful outdoor cooking is to control the temperature. I also believe that outdoor cooking should not hold you hostage at the grill. That’s why everyone should learn the two-zone cooking method for grilling.
Let’s cover what type of cooking you can do by this method, why it’s so successful, and how to set up the zones.
Two Zone Cooking Method- Why it is Best
Two-zone cooking can be done on any type of grill no matter the fuel source. What is two-zone cooking? Using the fuel source on only half the grill while the other half holds the food. Although you may use the unlit side of the grill for most of the cooking, you have the benefit of finishing crispy skins of items or quick cooking thinner cuts of meats on the direct heat side.
Two-zone cooking is also called direct and indirect cooking. The indirect side uses indirect convection heat to cook the food which means the heat generated by the lit side radiates into the material of the equipment and produces heat (convection heat) on the unlit side. The direct side produces the heat within the unit and can be used when quick cooking is needed or when a food that has been cooked on the indirect side needs crisping, additional coloring, or some char.
Two Zone Cooking Method- The Set Up
The primary reason you want to set up two-zone cooking is most of the grill cooking does not require direct heat. When you consistently cook foods, especially meats, over direct heat, you easily can have dried, stiff, flavorless results. This is due to the components of meat reacting at different temperatures that with direct cooking occur too fast to react.
I will tell you that you need a grilling area that is large enough to establish two zones. I judge the space needed with a rectangular, disposable foil pan. If the pan can fit on half the grill area without issue, then you have plenty of room for a two-zone setup. When using a gas grill, this means lighting the burners on one half of the grill. If you don’t have an even number of burners, then decide how many are to be turned on and how many left off. With a charcoal grill, placing the hot coals on only half the charcoal area. On an electric unit, if you can manipulate the heating element, isolate the element to one side of the unit. The temperature that works ideally for two-zone cooking is 225°F. Of course, I always add wood chunks to give a smoky flavor to the foods. Remember, the hardwood goes on the direct side of the grill or lit burner or hot coals.
#chefbertandtom
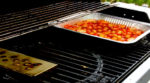
Note that you can also use a water pan using two zones. This can be placed on either side of the grill depending on when you need the direct heat side. Keep in mind, when doing meats, it’s great to place a pan under the meat with vegetables (onions, potatoes, celery, peppers, etc.) and a small amount of liquid that can collect the meat renderings. You can also place pans of beans to catch those drippings. Anything is fair game.
For those times when you don’t want to add any additional foods, you can simply lay a thin foil pan under the grill grate of the indirect side or a sheet of foil. That will collect any fat drippings.
Cook Anything!
Since radiant heat is what you are cooking with when foods are placed on the indirect side, you can cook anything. I love doing tarts and cakes via this method, especially during the hot months when you don’t want to lite your indoor oven. In fact, those are the times that I cook an entire meal using a two-zone setup.
You can also cook multiple items using both direct and indirect heat. A long cooking meat goes on the indirect side, is cooked to temperature and held there, while a side dish is cooked on direct heat. Don’t forget, if the cookware you use is high heat tolerant, you can use cookware as well. This is how I can make cakes, tarts, and bread on the grill. You need to view this equipment like an oven as that is essentially what it is!
Two Zone Cooking Method- Use Like an Oven & Walk Away
I’m going, to be honest. Although it’s true that you can produce more moist foods using a two-zone method the real reason I love this method of cooking is I can walk away from the grill. This is particularly true when using a gas grill which holds the temperature steady, which for me, is 250°F for long cook meats and regular baking temperatures for all my cookies, cakes, tarts, bread. Remember, charcoal grills will still require you to refuel so the temperature can fluctuate more if you’re not careful. Keeping an extra chimney starter of charcoal going will solve that issue.
What is a two zone fire? You may ask…
A two zone fire is also called two-zone cooking method can be used to grill or smoke any type of food on any grill (smoker, gas, charcoal, wood-fired or electric)! Setting up a two-zone cooking method is very easy- have a hotter side on one half of the grill and a lower or no setting on the other half. A two zone fire gives the cook or chef “a stylized or finessed” way to grill without ruining great food flavors by over cooking. It is especially the best way to cook meats and vegetables. Keep in mind that grills radiate and transfer heat, so it’s really not necessary to crank up every burner or heat source to a temp equivalent to the Sun! It’s as simple as that!
As a final note, even though two-zone cooking allows you more time away from the grill, you still need a good digital thermometer to monitor the temperature of the food. Invest in an easy read one and you’ll really enjoy this new way of grilling and smoking.
Loyal users of our culinary quality hardwoods know the benefits of our woods but we still hear this one question a lot: what is the best hardwood to use with specific foods, especially meats?
Let’s start with a feature on the mighty maple tree which could turn out to be the best choice!
Maple hardwood is part of the Aceraceae family of wood. The scientific name for the variety we manufacture is Acer pensylvanicum L. but the common names for the varieties found in the Western New York and Northwestern Pennsylvania regions include: Black Sugar Maple, Hard Maple, Rock Maple, Striped Maple, Moosewood.
Hard Maple is considered the king of all maples because it is stronger, stiffer, harder, and denser than any other maple variety.
Maple can be used with any food for natural wood flavouring/smoking. The flavour profile is on the mild side with a sweet undertone. Feel free to use the wood with any food: chicken, turkey, game birds, beef, lamb, fruit, vegetables, chocolate, eggs, etc.
Depending on the time of year the maple is harvested will determine the coloring to the food. Color range can be from a deeper brown to a lighter tan. Why so much color variation? Maple has peak periods for harvesting in order to avoid the heavy sap run in this wood which generally starts in December finishing in March.
Cherry wood for smoking will bring out the sweetness in anything in the smoker!
WILL CHERRY HARDWOOD SWEETEN EVERYTHING IT TOUCHES?-Without question, Cherry is one of the most popular woods for wood-fired cooking, particularly when it comes to hot smoking using traditional smoking equipment. Despite information SmokinLicious® has provided on this hardwood species (Put a Cherry on It blog & Cherry Wood Question blog), there are still many questions posed and many misunderstandings about this wood. My intention here is to speak on the cherry varieties in North America and ensure that you can make an informed decision when selecting this hardwood for cooking.