There is no question, North Americans love maple trees! Although we don’t have as many as the continent of Asia, we sure have a good share with some 12 varieties available. Plus, the Sugar Maple tree is the official tree of New York State!
Maple is a very popular hardwood for wood-fired cooking, especially hot smoking. We are blessed at SmokinLicious® to have in our harvest Sweet Sugar Maple hardwood. This extremely versatile wood can be used to smoke everything from eggs to brisket. It is a very even tempered wood so it works with spicy rubs as well as fruity sauces.
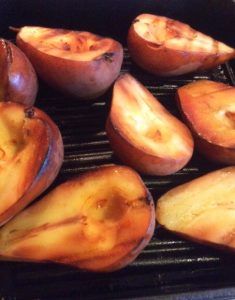
Pears, pears, everywhere! Why not try your hand with this easy method for smoked pears Depending on where you’re located, you’ll have at least a few varieties of pears to select from. Rather than just enjoy these as a raw fruit, try something truly unique that will give them a kiss of wood flavoring?
Stovetop smoking is so easy and a great way to still enjoy wood-fired flavorings during the winter months, when you may not want to venture out to the grill or smoker. I’ll be highlighting Bosc pears in today’s technique. To do this technique you will need:
Fresh pears – 4 will likely fill the smoker pan one time
A Chef’s knife, paring knife, and cutting board
A cooling rack
Pears cut in half
PREPARING THE SMOKED PEARS
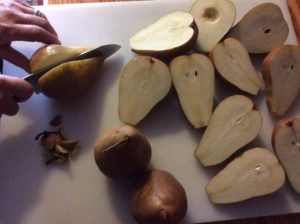
When I purchased my Bosc pears, I made sure that they were firm to the touch so that I would have some longevity to their use in recipes for a while. Carefully, wash each pear and then pat dry with a paper towel. I then slice each pear in half, removing the stem tip. This will give me a flat surface to smoke and cook my pears since I am using a stovetop grill pan with my process. That will allow me to form some great grill marks on the pears while they cook. The benefit to using halves of pear is I can feature larger pear cuts in a salad or dessert, highlighting the golden smoked color.
Once the pears are halved and the stems removed, I will core out the seeds and hard seed membrane with a small paring knife. Once that step is complete, I start the heat under my stovetop smoking pan.
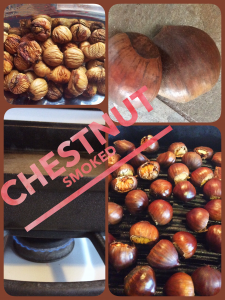
Collage of Smoked Chestnuts go on a Stovetop Smoker
SMOKED CHESTNUTS ON A STOVETOP SMOKER!
Depending on where your located, chestnuts may only be available for a short period each year, usually around the holidays. Mostly pan roasted in the oven, why not do something unique with this prized fruit and smoke them! In addition to the chestnuts, you’ll need a stovetop smoker, purchased or you can make your own with tools likely in your kitchen. You can see our writing on the “The Kitchen Find” which will guide you on what is needed.
about 2 hours of time. Be sure you also have a hood vent where you will be using the stovetop smoker in order to maintain a smoke-free kitchen.
You will find chestnuts available prepackaged or in bulk when in season. Although the packaged product will include a directive to cut an X in the flat surface of each nut, I grew up in a household where we always cut off the stem side. This is the small, dark cap side to the chestnut. The chestnut has a cap and a pointed end giving it a bloated teardrop look. I have found that when smoking, I get better control of the smoke infusion with a fresh cut to one end. Keep in mind, not all the chestnuts purchased will likely be viable as often mold will take hold of some of the chestnuts which you won’t see until you cut into them. As the chestnuts age, they can develop a fuzzy mold on the outside which will tell you not to waste your time cutting that one open! Simply discard!
Generally, chestnuts have a flat side and a rounded side.
To prepare them:
lay the chestnut on the cutting board with the flat side down. Place your knife blade over the small dark cap, and slice off in one motion. This will reveal the chestnut meat inside which will have a yellow-white hue. Once the cap is off, you’ll be able to tell if any mold has set in as it will have a marked gray/black appearance. If any mold is noted, discard the chestnut as it won’t cook tender. If the majority is free of mold, go ahead and keep it for the smoking/cooking process.
To do stovetop smoking, there are 4 parts needed:
a pan to hold the heat and wood chips
a drip pan to prevent rendered fat and juices from entering the wood. Generally, you only need the drip pan when you actually have a food item that will produce juices or fat drippings.
a grill pan
a lid.
Note: Smoked chestnuts will not produce any drippings though they do have a percentage of water that will be released as steam into the lid of the pan. Just be sure when you open the lid that you keep any collected water from dripping back into the cooking grate.
Thinking about using cedar wood for cooking? 6 reasons to don’t!
6 REASONS TO AVOID CEDAR WOOD FOR COOKING
You love different techniques for cooking and absorb new information like a sponge. In particularly, you love outdoor methods of cooking. One of your favorites is plank cooking on cedar wood. Every time you read a recipe, they all call for use of a cedar plank or other methods to use cedar wood for cooking.
But is cedar really the best choice? More so, is cedar wood for cooking a safe choice?
#1 Softwood Classification Presents a Concern for Using Cedar Wood for Cooking
Cedar wood is not a hardwood. It is a softwood that is from the gymnosperm trees meaning, it is a conifer or cone producing tree. As a rule, softwoods should not be used for cooking as they contain a lot of air and sap which equates to a fast burn and unpleasant flavors. In fact, there are many softwoods that can be toxic if cooked over.
#2 Poor Fire Resistance
During plank cooking, you are using the wood as a vessel to infuse flavor to whatever food is placed on top of the plank. Here’s the concern with cedar – because it is a lower density wood (23 lb./ft³), it has very poor fire resistance. That means, it reaches full combustion much faster than hardwood and will burn as a result. Certainly, that’s not what you’re looking for when you plank cook.
#3 Poreless
Unlike hardwood which contain pores in the cell walls, softwoods like cedar are poreless. They use cell components called tracheids to transport water and nutrients. In addition, the organic compound lignin found in the cell walls, is much lower than in traditional hardwoods used for cooking. Why is this an issue? Lignin is what gives wood fired cooking the distinct flavor and aroma to foods. In using cedar wood for cooking, the average lignin composition is 20%±4 compared to common hardwoods used for wood-fired cooking which average 28%±3.
#4 Plicatic Acid
Cedar contains chemical properties (specifically plicatic acid) that are shown to be a good absorber of odors and moisture. This is one of the key reasons why cedar is a preferred softwood for pest control to keep fleas, ants, mites, moths, and mosquitoes away. When exposed to plicatic acid for lengthy periods of time, a condition known as “cedar asthma” can develop.
Additionally, a regular exposure to the cedar oil found in the wood can result in contact dermatitis or skin irritation, rhinitis, and conjunctivitis.
#5 Animal Toxicity
There are many studies available on how the use of cedar wood chips and shavings have affected animals continually exposed to these products. Most studies show a correlation with liver dysfunction in animals such as rabbits, guinea pigs, and hamsters. In fact, smaller animals, like guinea pigs and hamsters, have a higher incidence of death which may be attributed to plicatic acid exposure. The phenols and aromatic hydrocarbons also have been shown to cause respiratory problems in animals like those listed above.
#6 Not All Cedar Is The Same
Cedar is part of the pine family of trees with native origin in North Africa and Asia. There are no native cedar trees to North America. The red cedar common in the Eastern USA is part of the Juniper family and can be highly toxic if taken internally. Under no circumstances should you ever cook with red cedar from the Eastern states of the USA.
USA cedar trees are referred to as false cedars since there are no native varieties. There are commonly 5 varieties of the false cedars available: Western Red Cedar (common to Southern Alaska, Northern California, and the Rockies), Northern White Cedar (Southeastern Canada, Northeastern quarter of the USA, south into Tennessee, and west into Iowa), Eastern Red (Aromatic) Cedar (Eastern USA), Yellow Cedar (Pacific Northwest from Alaska to British Columbia into Oregon), Spanish Cedar (although Native to South and Central America, it was planted in Florida). Every false cedar has some known health risks with the most common being respiratory due to toxicity of its pollen, oil, or other chemical compound.
Now you’re asking..
“So if there are all these documented health risks, how and why have cedar plank cooking and other methods of cedar wood cooking gain so much popularity?” I suppose the easiest answer is that cedar was used by the earliest settlers in the Pacific Northwest as a means of preserving, storing and cooking the seasonal fish. Think about the limitations of the day: they would be using resources that are available without thought to the items we ponder today like health, future risk, etc. This concept was examined from a different perspective many years later with the desire for flavor, appearance, and functionality.
We often make the mistake of jumping into something full throttle before asking some of the key questions to keep our bodies safe and healthy. Remember, there’s lots of documentation out there stating why you should not cook with softwood yet when it comes to cedar wood cooking, specifically, cedar plank cooking, we don’t seem to carry that issue forward. I don’t think I’ll ever understand why.
We love providing information to our readers and subscribers that is not in the open and letting you weigh the information for your own verdict. All types of questions are welcome and we encourage you to follow and subscribe to our social channels so you don’t miss anything. We look forward to providing you with tips, techniques, recipes, and the science for all things wood-fired cooked.
Build an open pit cooking fire for grilling and ember cooking! Is easier than you may think follow our steps below!
OPEN PIT COOKING- BUILDING THE PERFECT FIRE
SmokinLicious® receives a lot of questions about wood-fired cooking and one of the most repetitive concerns the building of the fire for cooking. We’ve developed this series to address how to build the fire by equipment and technique. For Part I, we cover the open pit cooking fire.
Get Organized- Open Pit Cooking
The first step is to know where you will build the fire. Are you planning on using an outdoor fireplace, a fire pit, or will you construct a temporary fire location?
When using an existing fireplace located outdoors, you must ensure that the firebox is clean of previous ash and wood. The same is true for a open pit cooking fire pit. If you will set up a temporary location for the fire, consider what you will use for materials to secure the area. It is never recommended to use your patio, paved driveway or lawn because a hot fire is sure to damage them or, at the very least, mar their appearance (thin charcoal black coating the surface). Using large stones, interlocking bricks, or a metal fire ring work great at securing the area to contain your fire.
Once you’ve decided on the location, you’ll need to collect some supplies to make the cooking safe and fun.
▪ material to contain the fire like stones, bricks or a cast iron/wrought iron ring. You can use an outdoor fireplace or open pit cooking fire pit whether permanent or portable
▪ water, shovel, dirt, and/or fire extinguisher to deal with potential fire spread or wayward embers
▪Smokinlicious® smoking wood chips for quick lighting
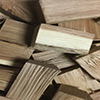
▪ small twigs or small pieces of hardwood to create a tepee around the wood chips (we like our Smokinlicious® smoking double or single filet chunks)
▪ larger hardwood pieces to create a 2nd tepee around the first (Smokinlicious®1/4 cut logs work great for that)
▪ rolled newspaper or fire starters
▪ have additional hardwood for producing more coals for cooking as needed
▪ a coal rake, fireplace tongs for moving and relocating wood pieces, spray bottle of water to tame flames near food, instant read thermometer (you can also use a traditional wrought-iron log holder to make the fire – the hot coals will fall through and then you rake them to the cooking side)
The Perfect Fire for Open Pit Cooking
Always take note of the day’s temperature, wind conditions/direction, and conditions of your wood (dry or wet, fresh cut or aged) before you start. You want to be sure you set up and start the fire where the wind direction won’t cause smoke to enter house windows or the dining area. Keep those locations upwind.
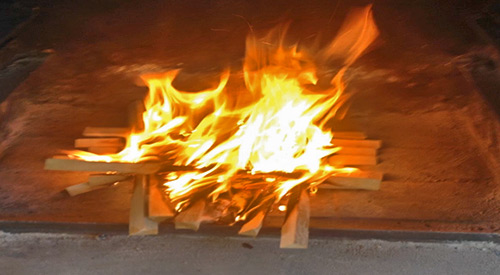
In your fire safe area, pile up a few handfuls of hardwood chips (you can use newspaper but I like to try to stay with wood in its natural state). Make a small tepee around the wood chips using small wood pieces (our single filet wood chunks work great) or twigs. Make a second tepee of larger wood pieces around the first one. You’ll see that you’re graduating from small wood pieces to larger as you build but you’re also ensuring good oxygen pockets to help feed the fire to the next level. This is what ensures even combustion and even coals. Now, light the wood chips at the center and allow everything to ignite. Don’t add any additional wood until you see the outside wood ablaze.
Fire for Fuel, Coals for Open Pit Cooking
The purpose of your shovel other than as protector of wayward fire, is to take those hot coals and move them to the cooking area. Remember, the fire area is not where you are going to cook. That location is nearby but not with the flames. You should never cook over direct flame as it will overcarbonize the foods and result in bitter tastes.
Ideally, you want to cook over coals that have a white colored ash over them. Now, here’s how to determine temperature of those coals: hold your hand over the coals the distance your foods will be. If you can only hold your hand for a count of 2 seconds before you need to pull it away, that is high heat. 3-4 seconds is medium-high, 5-6 seconds is medium and 7-8 seconds is low heat.
Bring on the Food!
Once your coals are at the perfect temperature for the foods you want to cook, it’s all about cooking! Remember, you can set up different heat areas to cook different foods. That’s what makes the experience with wood cooking, specifically with coals, so exhilarating.
We hope this article was full information you didn’t know. Leave us a comment and subscribe so you don’t miss anything concerning wood fired cooking, flavors, and the science behind the fire.
More Related reading on “What Wood for Smoking” and other great smoking and grilling tips and techniques
This article was born from a question which was recently forwarded to SmokinLicious® to answer. “Why salt choices are necessary in food despite adding different ingredients even for sweet dish need(ing) salt”.
I realized just how important salt is to the style of cooking known as barbecue.
Salt Choices- Why the Need to Salt?
Salt is a mineral found in crystalline form that is used as a seasoning for food. Simply put, salt brings out the flavor or natural essence of food. Salt choices draw out the natural juices in raw meat and dissolves with the liquid forming a brine that gets reabsorbed by the meat. This results in the meat’s ability to hold on to more of its own natural juices during cooking.
Salt Choices- Types
Over the past 5 years, salt choices have become a very hot commodity in the food industry. There are hundreds of kinds of salts but for simplicity sake, I will discuss those that are commonly found in grocery and food specialty stores.
Table Salt:
Decades ago, this was simply known as iodized salt. This is the most refined salt that is known to have a metallic taste due to the grinding process and high-heat process to produce it. It is almost pure sodium chloride and has the highest per-granule sodium content of all salts. When used in cooking, the cook generally will use too much due to this refined grind size. I recommend you never cook with standard table salt.
Sea Salt:
This salt type is made by the evaporation of seawater which results in the retainment of natural micronutrients. Unlike table salt which uses a high-heat process, sea salt provides minerals of iodine, magnesium, calcium, potassium and bromide. There are many different grind levels in sea salt and each of those, affect the taste, color, and mouthfeel of the salt itself.
Kosher Salt:
Known for its ability to distribute evenly on the surface of food, kosher salt is harvested by mining dried up ocean and sea beds. It has a much coarser grind than table salt, which is considered flaky (For cooks, it is reliable, consistent, inexpensive, and pure).
Finishing Salt:
Just as the name implies, this type of salt is used only when a dish is finished, for instance, sliced tomato with mozzarella and basil, grilled to perfection steak, and even watermelon. Therefore, it is considered a very light tasting salt.
Tamari and Soy Sauce:
I am including tamari and soy sauce as these are very common substitutes for salts in sauces used for barbecue. Sometimes, soy sauce is used in addition to salt or garlic and onion salt for these items, making them much higher in overall sodium content. On average tamari has 700mg sodium per serving while soy sauce comes in at a whopping 1000mg per serving.
Salt Choices in Relation to BBQ Rubs & Seasonings
Hopefully, you’ve learned how to read an ingredient list on any label. The first ingredients listed make up the largest amount of the contents, while the last few ingredients make up the least. I looked at five (5) popular BBQ rubs and seasonings sold on Amazon.com to see what ingredients made up the bulk of these items and where salt rated on the ingredient list. Here are my findings:
As you can see, salt is a primary ingredient of commercially marketed rubs/seasonings for barbecue. Therefore, I always recommend that you give some consideration to making your own rub or seasoning. When produced in large quantity, you can keep these in the refrigerator for up to a month in an air tight container. Best of all, you’ll have the peace of mind knowing you can control the level of sodium in your meal.
We hope you found this article informative and valuable. We’d love your comments! Don’t forget to subscribe to and follow us so you don’t miss a thing. We’ll continue to bring you tips, techniques, recipes, and the science behind all things wood-fired!
More Related reading on “What Wood for Smoking” and other great smoking and grilling tips and techniques
listen to our blog regarding wood chips for smoking
One vegetable that is available throughout the year is the onion. Although you’re likely accustomed to using this in recipes as an added natural flavor when you wood-fire the onion, something magical happens to its cell structure that turns these into the buttery, melt-in-your-mouth gems that you’ll want to use in even more recipes.
Onions are high in vitamin C, can aid in weight loss, and have reduced certain cancer risks, especially those associated with the digestive tract.
Whether you elect to do the standard yellow onion, the sweet red onion, or shallots, you will love how smoke vapor works to bring out the best in any variety.
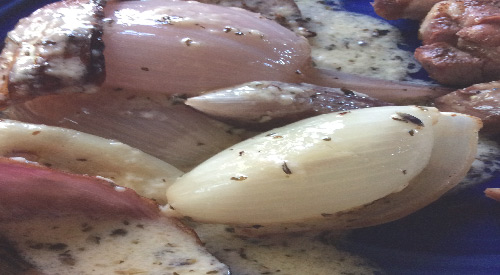
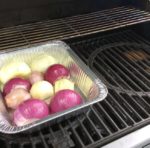
Wood Roasted Onions- Preparing for the Grill
Before preparing the onions for the grill, let’s get the grill started by lighting the burners on only half the grill. This is referred to as two zone cooking. On the lit burner side, I place 2 wood chunks – I’m using the Single Filet size from SmokinLicious® – directly on the heat shields of my hot burners. This will provide the wood flavoring to the onions. My burners are set to medium-low which usually produces a cooking temperature of about 300°F. Simply adjust your burner setting to reach this temperature.
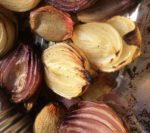
For the onions, I simply cut the tops of, slice in half and remove the skins. I place the halves cut side down in a roasting pan and add about ¼ cup of oil to the pan. With my pan ready, I place it on the unlit side of the grill and close the lid. In about 75 minutes, these will slightly charred, tender, and juicy.
Tasting Notes: Although I used avocado oil since you are not grilling over direct heat, you can use other oils such as olive, almond, walnut, grapeseed, coconut, sesame, canola, etc. Remember, some varieties of onion are considered herbs so doing an assortment of types will give you an abundance of flavors.
Wood Roasted Onions- The Longer the Wood Roast the More Flavor
You’ll find as these onions cook and absorb both the smoke vapor and oil, the scales of the onions will separate and caramelize. The results are tender, juicy and flavorful with a hint of woodsy from the charred edges.
I decided to make a simple sauce of butter, cheese, parsley, and pepper for my onion mix and served these alongside a pork steak, also cooked on the grill with a two-zone method.
The best part is onions are available year-round so I can do this method even in the dead of winter, as remember, the gas grill still functions even in the cold! For those who like to freeze produce, this freezes very well so grill a lot keep them so they’re ready for the winter days you don’t feel like lighting the grill. Just think what an onion soup will taste like when you wood-fire the onions first!
Tasting Notes: If using a charcoal grill, still use a two-zone cooking set up meaning charcoal on only one side of the grill. Be sure you only cook with hot coals, no flames. This type of grilling can have more challenges to steady temperature so make sure you check the onion pan more frequently.
There seems to be some legend out there that wood-fired cooking methods are all about the endless hours of tending food and fire that produce taste results that are only granted to a small percentage of committed cooks; nothing could be further from the truth. Ready for simple methods of wood flavor infusion that do not take stockpiles of wood and equipment so large, you start thinking about adding on to your house?
Wood-fired cooking includes the simplest methods of wood infusion like the current rage with hand-held food smokers or even the stovetop smoker. Kitchen gadgets that have opened the door to anyone who wants to explore the fragrant and flavorful bounty that awaits all foods and beverages. One thing that still is evolving is the concept of spices not for your food but for your equipment!
If you’ve read some of our previous articles on wood flavoring you’ll come to understand and appreciate that there is no set rule on wood-fired cooking. Oh, yes, there is plenty of science when it comes to cooking with fire or as I like to say when you combust to flavor, which is what you are accomplishing with wood for cooking. I feel more attention should be given to the actual wood products; rather than focusing on the ingredients to the foods being cooked.
Wood is an ingredient
First, wood to us IS an ingredient, one that still needs to be balanced with the other components to bring forth a food memory. As an ingredient, the easiest by far to manage for wood flavor infusion is sawdust or in our Company’s listing,Smokin’ Dust®. Compatible with all types of equipment, Smokin’ Dust®literally becomes a ‘spice’ for your equipment.
Thinking of island flavors of pineapple, coconut, and mango for a recipe? Why not add one or more of those flavorings through the wood product? Yes, using all-natural flavoring infused into ourSmokin’ Dust® is one of the quickest methods of getting the great flavor to a specific regional dish. With 15 flavor-infused options that are 100% all natural, designed for cooking, and infused in hardwood, as well as 8 natural hardwood flavors, we’ve given new meaning to the word ‘spice’ as ours can now apply to the wood product! Remember, applewood doesn’t smell or taste anything like an apple. Use our apple infused product, and you’ll experience hints of cinnamon, nutmeg, and the bite of an apple!
Why settle for a run-of-the-mill smoking sawdust product that you don’t know where it comes from? A softwood, swept from the floor, shoveled from the ground, or worse, taken from under an animal? Instead, get excited about the flavor opportunities awaiting you and your equipment when you use a smoking sawdust product from a real cooking wood company. Get excited about the opportunities out there to experiment with, whether for hot smoking, cold smoking,handheld food smoking,stovetop smoking, or even traditional LP and charcoal grilling. And get ready to experience the world through flavor aroma!
Dr. Smoke- “Smokin’ Dust is one of our most customized and versatile cooking wood product.” which is a spice for your equipment
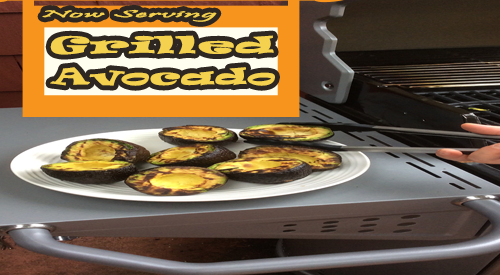
Wood grilled avocado is a fun way to add different flavor to this wonderful fruit.
WOOD FIRED GRILLED AVOCADO
Oh, the wonderful, healthy, creamy, flavorful avocado. With more potassium than a banana and 18 amino acids for daily intake, you can’t go wrong with this single seed fruit.
Did you ever think to grill this fabulous fruit with a little wood to give it even more flavor? We’ll show you just how easy grilled avocado can be on the gas grill using wood chunks for your smoke infusion.
Grilled Avocado with a Wood Fired Touch
Regardless of the brand of gas grill you have, you can add wood chunks to the grill for wood fired flavor. My grill has heat shields over the burners so I use that area to add one small wood chunk under the grill grate, directly on the heat shield. No, you won’t damage your grill, as the wood combusts to ash and basically blows away.
One chunk is all it will take to get great flavor into the avocados. I keep the burner that the wood chunk is located on set to medium as well as the burner next to that one on medium. Since I have 4 burners, 2 are on and 2 are off.
Once the grill is to 300° F, this technique will take less than 20 minutes.
Simple Preparation for Wood Fired Grilled Avocado
The only preparation needed for the avocados is to cut them in half and remove the seed. The avocados are placed flesh side down on the grate only on the side with the burners off. The heat captured within the grill will spread throughout the grilling area and cook the avocado while adding wood smoke vapor. Note, it’s important that you don’t attempt to move the avocados for at least 10 minutes otherwise you will find the avocado flesh will stick to the grate and you’ll lose much of the fruit’s flesh. Wait until some of the fat renders and chars making removal so simple.
Grilled Avocado- Prep To Finish In Less Than 20 Minutes
In less than 20 minutes you will have wonderfully wood flavored, charred flesh avocados ready for your favorite recipes. Think of using this fruit in smoothies, dips, on salads, as a creamy ingredient for sauces – remember, avocado can be used to substitute the amount of butter used in most recipes. We will take some of our avocado and make a wood fired guacamole first. Our recipe will post soon so stay tuned and don’t’ forget to send us your pics of wood fired avocado.
Did you get motivated to fire up the grill with wood? Send us a comment or your avocado fired pics and don’t forget to subscribe. Bringing you fun, innovative tips, techniques and recipes on all wood fired methods for foods, beverages, spices, herbs and so much more.
More Related reading on “What Wood for Smoking” and other great smoking and grilling tips and techniques
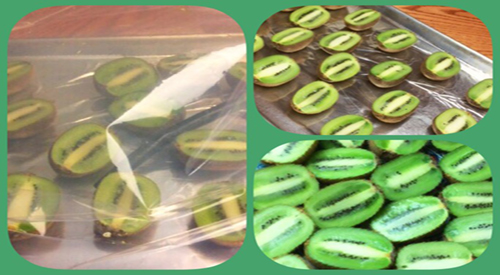
Kiwifruit gets smoky by adding a new twist to your kiwifruit by cold smoking it to enhance its wonderful sweet flavor.
KIWIFRUIT GETS SMOKY
Kiwifruit is now in season! It’s time to use this potassium, vitamin A, C & E enriched fruit in your favorite recipes. How about doing something to up the flavor level a bit?
Packed with more vitamin C than an orange and as much potassium as a banana, Kiwifruit, more commonly called kiwi, is also a fiber powerhouse. I’m going to take this creamy fruit favorite to a new flavor level by cold smoking it.
The Ease of Hand Held Food Smoking
To do this technique, you’ll need a handheld food smoker, SmokinLicious® Minuto® Smoking Wood Chips in size 6, 8 or 10, a lighter, a sheet pan, a food bag large enough to go over your sheet pan, and a cable tie. Then gather together the number of kiwifruits you’d like to infuse with smoke vapor, and have a knife and cutting board available.
Kiwifruit Gets Smoky by Letting the Smoke In
Simply cut your kiwifruit in half to allow the smoke vapor to penetrate the fruit flesh. As kiwifruit is covered by a brown, fuzzy skin, you will need some of the fruit’s meat exposed to get real smoke flavor incorporate. Otherwise, leaving them whole won’t bring much of a smokiness to the fruit meat.
What I love the most about cold smoking with a handheld food smoker like The Smoking Gun™ Smoker, is how fast this flavoring can be done to any food, beverage, liquid, spice or herb item. After cutting me kiwifruit in half to allow for maximum penetration of the smoke vapor, I place the cut halves on a sheet pan. I then slip a food bag over the sheet pan.
Oak Hardwood Species is abundant in Our rich harvest area for the best hardwood cooking woods in the world.
THE BOLDNESS OF OAK HARDWOOD SPECIES!
New York State is home to the most varieties of Oak anywhere in the world! Currently, there are 16 native to New York State alone, with many more varieties having been brought into the state. In Central Park alone, there are 18 species of oak represented. Comprised of two subgroups – white oaks and black oaks – there is one key distinction between these groups. White oaks produce acorns that are usually sweet while black oaks produce bitter acorns. So how does this translate when using Oak wood for smoking?
At SmokinLicious®, we try very hard not to make flavor descriptors of each hardwood we manufacture into cooking wood, as we hold to the belief that there are so many factors that contribute to the reveal of the underlying wood flavonoids (i.e. temperature the wood is exposed to, other ingredients used on the food cooked over oak, moisture level of the wood, etc.). However, we do have a scale to guide the user on the boldness of flavor. Oak is at the highest end of that scale. It is the boldest flavor we offer!
Knowing that oak is a powerful flavor, I must remind you that smoke particles do not penetrate completely into the meat. In general, for meats, smoke vapor only penetrates about a 1/8” meaning the “flavor” you will decipher from the oak is actually to the outside area of the meat. Certainly, if you cook a meat until it can be shredded, you will mix the outside flavor areas with the less wood flavored inner meat and get a good balance to the smoky flavor.
Hardwood- The Boldness of Oak Hardwood Species
As I’ve tried to stress, cooking foods with a specific hardwood is the choice of the cook. I am not one to say that you can never cook a specific food with a certain hardwood. Everyone’s palate is different and tolerates different levels of sweet, sour, bitter, and salty. I will, however, remind you that bold flavors need to be balanced and this can easily be done through the other ingredients incorporated with that food item or even on that food. This will allow you to use oak wood for smoking: cold smoking say beef jerky or game jerky, hot smoking lamb, goat or beef, grilling steaks of beef or pork, stove top smoking pungent flavors like onion and garlic, and handheld cold smoking say a robust cheese.
As always, very little quantity of wood is needed to bring forward the unique qualities of the wood and Oak, with its boldness, is not an exception. If you’re in the market for a very bold flavor, then go for the black oak varieties including Pin Oak, Scarlet Oak, and Red Oak. A step down from the black oaks, the white oaks include Chestnut Oak, White Oak, Swamp Oak, and Post Oak. Either choice will bring you hardwood offering that is strong in appearance, aroma, and flavor!
This is the year! You made a promise to yourself, family and friends that this outdoor cooking season, you were going to bring more flavor to meals cooked on the grill by incorporating smoking wood and grilling wood. All you need to know is, what are the options for setting up the grill for this type of cooking without purchasing a smoker?
We have the answer and lots of options to utilize your existing equipment!
LP/Gas Grills of All Types
There is a great deal of variation in LP/Gas Grilling equipment in terms of grilling surface space, the number of burners, BTU rating, etc. Know up front, that this will play into how frequently you need to replenish grilling or smoking wood or even to monitor the foods being smoked on the grill. Essentially, these tips will work on any brand/model that you may own.
How To Add Wood Chunks on Gas Grill
Heat diffusers are commonly found on newer models of grills. They are made of high heat tolerant metal and cover the actual burners of the unit. Their purpose is to ensure even heat distribution throughout the grill so both radiant and conductive heat is maximized.
Wood Chunks On The Diffusers
If you have a grill model that has heat diffusers (remember, they may go by other names like flavorizer bars, flame tamers, heat plates, burner shields, and heat distributors) then you’re ready to use smoking wood chunks on your unit! Yes, I said smoking chunks. This is by far the easiest method of getting the true smoke flavor to the foods being cooked. Plus, you can set up an indirect method of cooking using smoking chunks.
You will need 3-4 wood chunks sized to fit over your heat diffusers and under the grill grate when setting in place. A 2x2x3-inch size fits most units and these should have some measurable moisture level; at least 20% moisture is ideal meaning you won’t need to presoak the wood. If you have an old grill model before heat diffusers were standard, you can still use smoking wood chunks by placing them in a smoker box. These boxes will generally fit 3-4 chunks of the size referenced above but be sure to use a good quality box. My preference is cast iron. Insert the chunks into the smoker box and leave the lid off!
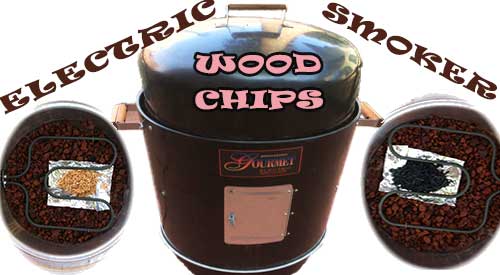
Without question, electric smokers are by far the easiest smokers to manage as they require no charcoal lighting, no constant checking of the fuel supply, and usually no messy ash pan. These are units that are designed to run on very little wood product, usually between 2-5 ounces because the actual ‘fuel’ is an electric coil. No gas, charcoal, or pellet.
We are going beyond the obvious and the traditional when it comes to items that you can smoke. It’s time to up your skills and menu items with the top things you would never think of to smoke.
Keep in mind, we are not just referring to hot smoking. We’re including the quick technique of handheld food smoking as well as stove top smoking in a pan.
Taste is aroma blog discusses how aroma affects our tasting sense.
TASTE IS AROMA
listen to our blog regarding wood chips for smoking
It is likely the most common question posed to us – how does the wood make the food taste? Although I have answered this question hundreds of times, it started me thinking about my answer. It was not complete. I was not explaining that taste IS aroma.
Flavor by Mother Nature
Our experiences with food revolve around our senses and of those senses 3 deal primary with food: taste, touch, and smell. Obviously, you would assume that the sense of taste is the absolute in food experience but you would be wrong. 10,000 plus different odors are relayed via our sense of smell which occurs through our nose and mouth. As much as 80% of what is referred to as taste is aroma.
Cooking smoke vapor flavors food
Now, apply this information to the fact that we use wood in cooking techniques that involve infusion of smoke vapor to foods and ingredients, and you will begin to understand where I am going with this. We have all had the experience of smelling a neighbor burning fallen leaves come Fall. It is not a pleasant aroma. Could you imagine someone putting food over a fire that contained leaves as fuel and then tasting the food cooked over that fuel source? Terms that come to mind include bitter, acrid, burnt, and pungent.
Taste Is Aroma- Overall Flavor is Dependent on a lot of Factors
I have my answer to the question “What kind of flavor does (insert wood type here) produce.” The overall flavor is dependent on a lot of factors. These include:
climate and soil of where the tree is grown: the more balanced the pH level of the soil and a location that has suitable precipitation throughout the year, are more favorable to a hardwood tree’s benefit as a cooking wood
bark or bark-free: this affects burn rate and flavor, and yes, it can fluctuate your temperature control
moisture level: the drier the wood the faster it goes through combustion and the more heat it produces. You need some level of moisture left in the wood to produce smoke
humidity of the cooking environment: dry cooking environments do not allow for smoke vapor to stick
type of dry rub and/or sauce/marinade used: wood needs to be viewed as an ingredient to the entire cooking experience so ALL the ingredients need to marry to produce a great flavor. The wood is just one flavor component
what you’re cooking (beef, turkey, pork, chicken, lamb, goat, etc.): maple used on beef will taste completely different than maple used with chicken. Plus, the type of meat/poultry also influences the flavor, so think generic versus farm raised and cage free versus free range. Just as the soil and climate affect the trees so too does the diet and climate affect the animal.
Taste Is Aroma- Flavor Guide
Although we offer a SmokinLicious® flavor guide with descriptors of the undertones the wood can produce, here is my best summary of the hardwoods we provide:
If you treat the wood as an ingredient you will come to appreciate all that it can offer. Now, you will be able to produce some spectacular tasting and aromatic dishes both during the cooking process and at its final stage!
Dr. Smoke- Aroma is key! Don’t forget that the wood type is just as important as what is being smoked when it comes to flavor!


 small twigs or small pieces of hardwood to create a tepee around the wood chips (we like our Smokinlicious® smoking
 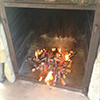 In your fire safe area, pile up a few handfuls of hardwood chips (you can use newspaper but I like to try to stay with wood in its natural state). Make a small tepee around the wood chips using small wood pieces (our single filet wood chunks work great) or twigs. Make a second tepee of larger wood pieces around the first one. You’ll see that you’re graduating from small wood pieces to larger as you build but you’re also ensuring good oxygen pockets to help feed the fire to the next level. This is what ensures even combustion and even coals. Now, light the wood chips at the center and allow everything to ignite. Don’t add any additional wood until you see the outside wood ablaze.
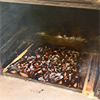 Once your coals are at the perfect temperature for the foods you want to cook, it’s all about cooking! Remember, you can set up different heat areas to cook different foods. That’s what makes the experience with wood cooking, specifically with coals, so exhilarating.
 Salt is a mineral found in crystalline form that is used as a seasoning for food. Simply put, salt brings out the flavor or natural essence of food. Salt choices draw out the natural juices in raw meat and dissolves with the liquid forming a brine that gets reabsorbed by the meat. This results in the meat’s ability to hold on to more of its own natural juices during cooking.
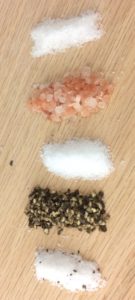 Table Salt: