During stay at home or Quarantine doesn't mean you should place your taste buds on hold!

During stay at home or Quarantine doesn’t mean you should place your taste buds on hold!

Listen to the audio of this blog

Stay at Home

You’ve committed to a stay at home or in today’s lingo- stay-cation. Lists of games to play, tasks to complete, books to read, and movies and shows to see have been compiled. Now its time to give some thought to the food that will sustain you during this time.

Don’t compromise taste because your afraid to make too much work out of cooking. Using the grill is a super easy way to keep your foods and meals highly flavorful. Let’s give you some ideas that will provide options for everyone to feel satisfied and pleasantly full.

The Breakdown

I think the easiest way to view meal preparation when you focus on the grill as your primary method of cooking is to breakdown foods by categories.

Fruits:

This group of food can make some of the best grilled items. Already sweet in flavor, grilling them produces more vibrant flavor as the heat caramelizes the natural sugars and produces a char to the outside of the fruit. When selecting fruits for the grill, be sure they are ripe but not over-ripened to where they present as soft, or they will have tendency to break apart on the grill. Keep the pieces of fruit large when placing on the grill to maintain as much cell structure as possible. Brush the fruit pieces lightly with a high heat oil like coconut, avocado, or grape seed. The key is to leave the pieces untouched for at least 3 minutes before flipping to get great char and flavor infusion. Perfect fruits for the grill: banana, avocado, apple, mango, peach, papaya, pineapple, peach, pear, plum, grapes, cranberry, eggplant, kiwi, raspberry, blackberry, blueberry, tomato.
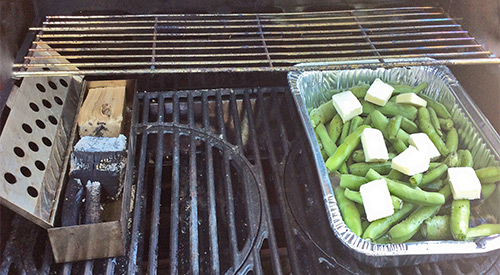
Vegetables:

You likely are already aware of popular vegetables to grill like corn on the cob, peppers, and onions, but there are so many more that pair perfectly with the grill. In fact, I would go as far as saying ANY vegetable is appropriate for the grill, you just need to control those that should be exposed to direct heat versus indirect. The easy method of determining heat level is the thicker the skin on the veggie, the more tolerant to direct heat. All vegetables can cook on the grill in less than 10 minutes so time really isn’t a factor. Always remember to avoid moving the vegetables on the grill until they have cooked for at least 3-4 minutes. For preparation to the vegetables, most require just quartering or slicing in half, with some going on whole like tomatoes and smaller mushrooms. Basting with high heat tolerant oils is also recommended.

Nuts and Seeds:

These are foods that react with a super boost in flavor when exposed to the heat of a grill and flavor of wood on the grill. Any seed or nut can be grilled by using a disposable foil pan or griddle pan designed for grilling. These items take about 15-20 minutes and should be stirred every 5-8 minutes to prevent scorching.

(more…)

Bagged boxed or canned foods can be cooked on any grill

Make the most of prepared foods during an emergency by using any type of grill!

Listen to the audio of this blog

Make the Most of Prepared Foods During an Emergency:

Bagged Boxed or Canned

If you have one or more grills at your home then likely, without even knowing it, you have prepped for emergency situations. I’ve been encouraged to see while social distancing is in place, people are reaching out to their grills to cook family meals. It is simply fabulous!

Don’t limit the use of this cooking equipment to the traditional items like animal proteins and thick-skinned vegetables like peppers, onions, and corn. Embrace the concept that nearly anything can be cooked on the grill.

Bagged Food Items

Common bagged food items that are considered perfect for storing as emergency food rations include: rice, dried pasta, dried beans, oats, quinoa, trail mix, dried fruits, candy, snack foods like chips and cookies, cornmeal, granola, and more.

Any of these items can be used in food preparation on the grill as long as you have cookware that can tolerate the heat of the grill or even use disposable foil pans or aluminum foil that you can mold into your own cookware.

Starting with common items like rice, dried pasta and beans, and quinoa, these items can be cooked in water or broth using cookware placed directly on the grill grate. Generally, direct heat works for these items, since you need to reach a boil and then simmer these items for a relatively long period before they are tender. Trail mix, oats and dried fruits work great as breakfast items to cook with milk or milk substitutes, again using a saucepan directly on the grill. Snack foods, candy, trail mix and more work well for making desserts on the grill. Cookie crumbs work for making tart and pie shells, crushed chips for crusting animal proteins, and candy for those special treats that may just include some type of chocolate candy and prepared phyllo dough sheets, which I always keep available in my freezer for spur of the moment needs.

(more…)

Our collage for makeing Spatchcock Smoked Turkey showing the breast bone removal

Spatchcock Smoked Turkey is perfect for even cooking! Moist and smokey what a delectable combination

Try this Spatchock Smoked Turkey Click To Tweet

Listen to the audio of this blog

Smoked Spatchcock Turkey

Often when faced with cooking a whole turkey, you find the challenge of ensuring every part of the bird is cooked to temperature. This can result in some extra work in ensuring that certain parts that cook faster don’t dry out or burn on the exterior. Think the wings and drumsticks. It’s a lot of work!

I’m going to introduce you to a method of cooking a turkey that will ensure every part cooks at the same rate and to the same doneness level without having to cover specific parts with foil. Spatchcocking a whole turkey meets that goal and by doing the cooking process on the gas grill with hardwood, you get the added benefit of a smoke flavor and oven room for preparing other dishes.

Order up a whole turkey, preferably under 24 lbs., and let’s meet in the kitchen to prepare the bird for smoking.

Does Fresh Make a Difference?

Our Fresh Turkey out of the box ready for us to do Spatchcock Smoked Turkey

#freshturkey

There is no question that I prefer a fresh turkey over frozen as the flavor is simply cleaner and the bird produces super moist meat compared to a frozen turkey. We are fortunate to have within 10 miles of our location, a fresh turkey farm that harvests turkeys once a year, just a couple of days ahead of Thanksgiving. My bird weighed in just under 22lbs. The organs and neck are removed from the cavity and the bird flipped breast side down to expose the backbone. This is where we start our spatchcock process. Get sharp cutting shears ready as we prepare to remove the backbone of our turkey.

Tasting Notes: If fresh whole turkey is not available, you may substitute frozen whole turkey. Just be sure it is completely defrosted and pat dried before starting this recipe.

Flatten and Rub for a Perfect Spatchcock Smoked Turkey

I won’t lie to you. Removing the backbone of a fresh turkey can be a bit of work, but it is so worth it. Start on one side of the backbone, insert sharp kitchen shears, and start to snip away. You’ll draw the shears along the edge of the backbone, releasing the bone from the meat. Done correctly, the spine will come out in one piece.

We have cut and completely removed the breast bone, which will allow us to press down and flatten the turkey

#spatchock

With the backbone removed it’s time for the final preparation to the turkey. Flip the turkey back so the breast is facing up. Time to break the breastbone so the turkey will lay flat on the cooking sheet pan. This will take both hands and a lot of force. Position your hands across the breast and push down with all your force until you hear the breast plate break. Now the turkey should be able to lay flat on a sheet pan equipped with a rack for rendering all the juice and allowing even heat distribution around the entire bird. The rack is key to use so heat distributes evenly. The turkey is now ready for a rub with your favorite seasonings, herbs, and spices.

Using your hands to push down and flatten the Turkey on the cooking sheet allows for an even cook!

#spatchocking

I’m using a simple herb rub that includes fresh sage, oregano, thyme, crushed red pepper, black pepper, marjoram, basil and cumin. I place my ground rub all over the skin of the bird and on the exposed meat side, reaching under the breast skin as well. Now cover with plastic wrap and refrigerate overnight. All this work can be done the night prior to grilling ensuring all that is left to do, is the simple two-zone cooking. Remember, two-zone cooking involves turning only half the burners on and placing a metal smoker box of wood chunks on the hot grate or directly on the heat shield of the hot burners. Be sure you have the box and hardwood at the ready for this step.

With our prepared spatchcock turkey readied, the sheet pan is added to the grill on the no heat side and the lid is closed. I leave this to cook on its own for about two hours before returning to rotate the pan, checking the smoker box of wood chunks I’m using on the lit side of the grill for the great smoke flavor. Remember, the heat from the burners that are lit will radiate throughout the entire grill, grill-roasting the turkey while the heat stimulates the release of the smoke vapor from the wood.

We use our smoker box with Double Filet Wood chunks to add the smoke while doing a two zone cooking method!

#twozonecooking #woodchunks#smokerbox

Tasting Notes: If you prefer, you can cook the turkey directly on the grill grate. Just be sure to place a water pan under the grate to collect all the juices.

Ready in No Time

My nearly 22 lb. fresh turkey takes about 3-3/4 hours to reach a 165°F internal temperature. In total, I use about 8 double filet wood chunks for the entire process. The best part, I can do other things while the turkey cooks, then rest it for about 20 minutes before carving. Don’t forget about all the beautiful juice it produces in the pan as well. Make gravy, use it as au jus, or save it for producing stock. Spatchcock fresh turkey – the easiest method of no-fuss grilling and smoking of a turkey!

What’s your favorite spatchcock turkey recipe? Leave us a comment to opine and subscribe to get all our postings on tips, techniques and recipes. Bringing innovation to wood fired cooking with recipes, techniques and the science behind the fire, smoke, and flavor. That’s SmokinLicious®.

Nice golden brown color to the bird, just cut into it for the best moist meat!

#spatchcocksmokedturkey


Love this article? Then please, share it!

SmokinLicious® Products used in this technique:

Our hand split double filet smoker wood chunks

#woodchunks

Wood Chunks- Double Filet

More related reading on Spatchcock Smoked Turkey and other Sptachcocking itmes see our smoking & Grilling tips and technique see our directory on previous blogs!

More related reading on Spatchcock Smoked Turkey and other Sptachcocking itmes see our smoking & Grilling tips and technique see our directory on previous blogs!

More blog topics you might enjoy:

-SPATCHCOCK CHICKEN IS THE WAY TO MOISTURE & HARDWOOD FOR FLAVOR

-SMOKE A TURKEY- LEARN HOW

-THE NOT-SO-SMOKEY SMOKED TURKEY

-WHY TWO-ZONE COOKING METHOD LET’S YOU WALK AWAY FROM THE GRILL

Dr. Smoke- Great moist smokey meat from our Spatchcock Smoked Turkey- awesome way to cook the "bird"

Dr. Smoke- Great moist smokey meat from our Spatchcock Smoked Turkey- awesome way to cook the “bird”

We discuss how long do wood chips last in an electric smoker!

We discuss how long do wood chips last in an electric smoker!

How long do wood chips last in an electric smoker Click To Tweet

Listen to the audio of this blog


Without question, electric smokers are by far the easiest smokers to manage as they require no charcoal lighting, no constant checking of the fuel supply, and usually no messy ash pan. These are units that are designed to run on very little wood product, usually between 2-5 ounces because the actual ‘fuel’ is an electric coil. No gas, charcoal, or pellet.

(more…)

Let's stop the dry smoked meats effect with our 9 easy steps!

Let’s stop the dry smoked meats effect with our 9 easy steps!

WHY IS MY BARBECUE MEAT DRY?? Click To Tweet


Listen to the audio of this blog


You thought you timed the meat perfectly on your smoker or grill. When it came time to cut it, all you found was a gray, dry former piece of meat staring back at you.

What went wrong?

Don’t fall into your old habits when it comes to outdoor cooking, whether you’re using a traditional wood or electric smoker, charcoal grill or gas grill. Learn some easy tips to keep your foods juicy and enticing this outdoor cooking season by preventing the unwanted occurrence of dry smoked meats.

(more…)

Our Grill drawing for breaking out on your staycation

Including the grill in staycation plans is a flavor rich must this year!

Listen to the audio of this blog

Including the Grill in Staycation Plans:

The Grill

The reports are in and all point to one common theory: people are likely to cancel previous plans to vacation away, especially those considering foreign travel, and instead opt for a staycation.

What does this mean for the economy? Of course, there will be negatives with this decision not to travel but one potential positive is the soar in potential grill sales as people begin to ponder ways to keep home cooking interesting.

Options of Including the Grill in Staycation Plans

Likely the first assessment for most considering a staycation is what do we do for food. People often have dining out plans built into their weekly schedule but due to concerns with visiting populated locations like a restaurant, food truck, or even street vendor, these locales will likely be one of the first voluntary bans. That means, cooking at home just moved to the front of the line. Cooking on the stove top or in the oven are certainly options, but given you want to keep your body from getting bored you’ll likely want to branch out to the outdoors and start grilling, especially if the weather makes that enticing.

Here’s where the lesson needs to be learned. Don’t just settle for cooking direct heat method like you do with hamburgers, hot dogs and sausages. Learn how to grill with indirect heat and you’ll be in great position to put a variety of foods including vegetables, animal proteins, and even fruits and nuts on the grill.

The starting point, however, is to assess your current outdoor cooking equipment and decide the following:

► Is the equipment in good working order to be used frequently?

► Are there any components of the grill that need replacing? For example, the grill grates, heat shields, ignitors, wheels on a portable unit, charcoal pan, water pan, etc.

► Is the current equipment of adequate size to feed your family all at once?

► Is the equipment easy to operate meaning it won’t burdened you with constant supervision?

► Does the equipment have an option for a dedicated fuel set up like LP gas conversion to natural gas which will allow you full use without having to worry about filling LP tanks?

► If you want to up the flavor of your grill foods, can you easily add wood to the unit?

If you’re in the market for a new grilling unit, assess the frequency of its use and what you want to be able to cook on it before making the purchase. The more frequent use the higher quality the materials that make up the grill need to be, to keep the grill functional for a very long time.

In the end, you not only will have piece of mind in knowing you can feed your family great tasting foods, but you’ll likely have a great opportunity to bond in a great outdoor environment.

Do you plan to take a staycation? Leave us a comment and subscribe to get our latest tips, techniques, recipes and the science behind the fire and smoke, for all live fire cooking methods. That’s SmokinLicious!

SmokinLicious® Products:

Charwood

Wood Chunks- Double & Single Filet

Wood Chips- Grande Sapore®, Minuto® & Piccolo®


More related reading on including the grill in staycation plans and for more smoking & Grilling tips and technique see our directory on previous blogs!

More related reading on including the grill in staycation plans and for more smoking & Grilling tips and technique see our directory on previous blogs!

Related reading:


-HOW TO KEEP FOOD INTERESTING, PRESERVED & SAFE DURING QUARANTINE

-Thermal Heating Process is Why You Shouldn’t Be Concerned About Receiving a SmokinLicious® Package

-OUR AIR HANDLING PROCESSES PAY OFF IN THE BATTLE WITH COVID-19

Dr. Smoke-

Dr. Smoke- don’t let your staycation this year affect your meals. Break out the Grill for great tasting meals

The Water Pan in Smoker explained for grilling and smoking techniquies

The Water Pan in Smoker explained for grilling and smoking techniques!

THE WATER PAN IN SMOKER EXPLAINED FOR GRILLING & SMOKING Click To Tweet

Listen to the audio of this blog


If you’ve purchased a smoker, you’re likely familiar with the term “water pan”. If, however, you’re more of an LP/Gas Grill person, than this term is likely one that escapes your knowledge.

Water pans are a means of introducing valuable moisture into the cooking environment which has immense value when grilling and smoking. Let me explain each of the pros of learning and using a water pan for your outdoor cooking, no matter the type of equipment you’re cooking on.

Water Pan Pro #1

Temperature control. This is the ultimate need when you grill or smoker, especially when you smoke. Maintaining a stable temperature that you’ve predetermined. When the day is scorching hot and the equipment is made of metal, you will experience a challenge with temperature control. Introduce a water pan, and your battle can be won.

A water pan goes above the heat source. If using a charcoal grill or charcoal/wood smoker, this pan would be placed above the coal area. Have an electric unit and you’ll find the pan over the electric heating element. If you want to introduce a water pan on an LP/Gas Grill, this would be placed over the lit burners. Many vertical smokers come with a water pan.

Water Pan Pro #2

Water cannot go above the boiling point which is 212°F. Additionally, evaporative cooling also takes place as the water is exposed to heat.

Water Pan Pro #3

A water pan can become the number one tool when doing direct heat cooking over an open flame. Why? It acts as a repellent for the flame giving your foods a chance to survive without becoming a blackened, dried out, former piece of food.

Water Pan Pro #4

Are you having trouble with hot spots in your equipment? Well, a water pan will even them out. Now, the temperature you desire can essentially be locked in just by using a water pan.

Water Pan Pro #5

Humidity that develops from the use of a water pan keeps the surface of the meat moist, which in turn, attracts smoke vapor, which in turn, produces great flavor. The water vapor mixes with the combustible gases which are emitted from the burning material and add to the overall flavor. Yes, water is a passageway to all things flavorful!

What Goes in the Water Pan

It’s called a water pan for a reason. It is designed to hold water, specifically hot water to keep the cooker from wasting energy on heating cold water put in the pan. Here’s a tip when you fill the water pan: use a teapot to fill the pan while it’s in place so you don’t take the chance of spilling hot water on surfaces or you. Remember, water evaporates while other liquids don’t evaporate.

Don’t Make the Water Pan a Drip Pan

Here’s the thing with a drip pan. Due to its location directly over the heat source, when used on vertical units it often serves double duty as a drip pan. Don’t do that! Here’s why. The rendered fat drippings can produce an oil slick on the surface of the water which will prevent water evaporation.

Make Cleaning a Snap

Here’s a couple of tips when using a water pan. If your unit comes with a water pan, line it in aluminum foil which will allow you to simply pull the foil off and preserve the condition of the original pan.

If you’re using a unit that has no water pan but want to introduce one, simply purchase a disposable foil pan. You will want to purchase one that is compatible in size to the unit your using, that will fit comfortably over the heat source, and that can hold enough water to prevent you from having to make refill trips every 15 minutes.

Purchase products:

Wood Chips- Grande Sapore®, Minuto® & Piccolo®

Wood Chunks- Single & Double Filet

More Related reading on water pan in smoker, see our links for related readings

More Related reading on water pan in smoker, see our links for related readings

Additional reading

-PREVENTING DRY BBQ IN YOUR SMOKER

-CAN HARDWOOD BE TOO DRY FOR COOKING?

-TURNING YOUR CHARCOAL GRILL INTO A SMOKER

-TURN YOUR LP/GAS GRILL INTO A SMOKER

www.barbecue-smoker-recipes.com

Dr. Smoke- The water pan in smoker explained is essential for moist results in grilling and smoking.

Dr. Smoke- The water pan in smoker explained is essential for moist results in grilling and smoking.

Our Readers Are Asking…

What does water pan do in a smoker?

A water pan induces moisture directly into your smoker as an ally for the indirect dispersion of heat. Never use your water pan as a drip pan. Remember- drip pans = a collection unit for residual or run off grease from the cooking process; a water pan = water for moisturizing foods.

the technique of adding wood chips over a charcoal fire for flavor

Adding grill wood chips to charcoal brings added flavor to any cooking category

HOW TO USE CHARCOAL WITH WOOD IN COOKING Click To Tweet

Listen to the audio of this blog


The questions are quite frequent: “Since (the equipment) uses lump charcoal, do you need to add wood for smoke flavor?” “Do wood chips or chunks work best if they are needed or desired?” “Generally, how much lump charcoal does equipment use for 10 hours of smoke?”

Learn Adding Charcoal with Wood

(more…)

Our coals showing their hot glow and ready for direct wood ember cooking!

Our coals showing their hot glow and ready for direct wood ember cooking!

THE GLOW OF WOOD EMBER COOKING!

So what exactly is wood ember cooking and why is it suddenly gaining attention as a method of cooking? Well, first, it’s most certainly not a new cooking concept. Cooking over a fire and hot coals have been around for thousands of years. Recently, some Chefs and well-known restaurants have taken to returning to this method of cooking because they know where great flavor can come from and they know how to manage the heat from hot wood embers.

An ember is a glowing, hot coal made of greatly heated wood, coal or other carbon-based material that remain after a fire. The heat radiated from hot embers can be as hot as the fire which created them. You can see this first hand, by placing new wood pieces on hot embers and watching a full fire develop. An ember is usually formed when a fire has only partially burnt a piece of fuel and there is still usable chemical energy in that piece of fuel. It continues to stay hot and does not lose its thermal energy quickly because combustion is still happening at a low level. The small yellow, orange, and red lights are often seen among the embers are actually combustions. There just is not enough combustion happening at one time to create a flame. Once the embers are completely ‘burned through’, they are not carbon as is commonly believed (carbon burns, and is not normally left behind), but rather various other oxidized minerals like calcium and phosphorus. At that point, they are commonly called ashes. But why cook on the embers versus over a live fire? Because embers radiate a more constant form of heat, as opposed to an open fire which is constantly changing along with the heat it radiates (think water trapped within the wood and you’ll understand why there is heat fluctuation).

Ember cooking techniques include placing thickly skinned food items directly into the embers (i.e. garlic, onion, peppers, eggplant, steaks, etc.), placing a cast iron skillet into the embers that can hold any food items from vegetables, meats, poultry, fish – really anything. The results produced from this method are super moist, super flavorful, and the aromas are exceptional.

Peppers being cooked over wood embers

Sweet Peppers over direct wood ember cooking


Dr. Smoke- You don't need a flashy grill, a simple fireplace with enough room, just like Asado, you can do direct wood ember cooking.

Dr. Smoke- You don’t need a flashy grill, a simple fireplace with enough room, just like Asado, you can do direct wood ember cooking


Top charcoal grilling tools

Top charcoal grilling tools

TOP Top charcoal grilling tools Click To Tweet

(more…)

Our Old Hibachi Wood Grill after the spring cleaning

Our Old Hibachi Wood Grill after the spring cleaning

DOING THE HIBACHI WOOD GRILL WAY! Click To Tweet

Everyone starts their grilling career on this convenient, inexpensive, small piece of equipment. But do we do it correctly? Let’s review the basics.


First, this is for grilling over an open fire; it needs high heat to cook. It has a low (height) fire pan and generally no hood or lid. Great high heat cooker/grill – not a smoker.

Lesson #1 Hibachi Wood Grill:-plan what you cook properly!

Now, let’s review how to set up the fire. The region that gave the hibachi its popularity is the Far East which has access to a type of charcoal called “bichiton”. This is a very dense, heavy charcoal made from oak that is direct fired to a high carbonization level. This charcoal produces an extremely high heat; 3-4 times the heat level of an American charcoal!

Can’t locate “bichiton” charcoal or don’t want the expense if you find it? Well, you can use SmokinLious® products to get close to the results. Let’s begin with charcoal – North America produces lump charcoal pieces that are too large for the small Hibachi. So take 2-3 pieces(depending on size), put them in a small paper bag (lunch bag size) and press with your hands to break them into smaller “thumb” size pieces (or you can use a meat mallet). Then pour into the firebox. If the firebox is not full –repeat until you fill it. If you don’t have a small torch available, put some paper under the charcoal, then ignite. Or, you can place the original charcoal pieces in small paper bags, then break the pieces apart, and place the bag in the firebox for lighting.

SmokinLicious® wood chips are crushed from the center of hardwood

Once the charcoal burns down (gray in color), start adding Grande Sapore® wood chips as this will provide for immediate heat and eventually, some flavoring to the food. Once the charcoal/chip combo’s flames settle down, you can begin cooking! Remember, hibachis are traditionally used for thin meats so adjust your cook time to what you’re cooking.

What I like about hibachi cooking is the ease of adding more wood chips when more fuel is needed!

Once you master the fire set up, you will enjoy some wonderful food and some really fun cooking the Hibachi way. Think Korean BBQ! Yum!

(more…)

Diagram showing the importance of smoker air flow.

Diagram showing the importance of smoker air flow.

smoker air flow is your temperature control Click To Tweet

Listen to the audio of this blog

SMOKER AIR FLOW IS YOUR TEMPERATURE CONTROL

How do you keep a charcoal grill at 200°F? How do you cool down a charcoal grill? Do you keep the vents open all the time?

When it comes to smoker air flow, here are a few common questions posed for learning all about the importance of air flow in controlling the temperature of a grill or smoker. This can be a challenge specifically for charcoal/wood units as they rely on the human hand to determine when to add fuel as opposed to a gas/LP unit that has continual, regulated flow.

You might assume that the only combustible material used in these units is charcoal or wood but there is another one. Oxygen.

I’m going to provide my top tips on gaining control of temperature by instructing you on smoker air flow or oxygen regulation in specific styles of charcoal/wood burning equipment.

Intake and Outtake of smoker air flow

For many of the charcoal/wood using units, they are built with an intake and an outtake vent. Let’s make sure you understand what these vents are and what the purpose of each is.

Intake Vent: It has one job – bring in oxygen to control the heat of the fire. If you need to raise the temperature of your unit, open the intake vent. Too much heat, close the intake vent which starves the fire for oxygen. Note: if you close the intake vent entirely while keeping the outtake open, you will still starve the fire and put it out.

Here’s the trick – each unit will have a “sweet spot” for the perfect balance of oxygen flow. Find that spot, and you can maintain a temperature easily in your equipment. But, I’m getting a little ahead of myself. Let’s discuss the opposing vent.

Outtake Vent: This goes by different names (chimney, flue, outtake, vent) but has the same purpose regardless of what you call it; vent out the gases from the combustible material and pull in oxygen from the intake vent which is commonly know as draft. Remember a charcoal/wood fire produces gases which need to be vented. If they aren’t properly vented, they will smother the fire.

When learning how to regulate your equipment for the desired temperature setting, always start with the outtake vent fully open. This allows you to manipulate only the intake vent until you reach the desired temperature. That will help you learn where the sweet spot is on your equipment.

When You Never Find the Sweet Spot for Smoker Air Flow

There are times when no matter how you play with the intake vent, you never seem to get the temperature to hold. What now?

Time to look for leaks in your equipment. If an access door or lid are bleeding smoke, then you know where the extra oxygen is coming from. That will affect the draft between the intake and outtake vent and result in fluctuating temperature that cannot be controlled. Best course of action is to try to seal the leaks with food grade silicone or other materials suitable for high heat appliances.

The Shape of the Equipment

In my opinion, the vertical-style equipment models tend to be much easier to get airflow/temperature control. Horizontal units also referred to as off-set smokers and grills, specifically the inexpensive models, tend to have poor design in the vent placements as well as poor insulation that results in heavy leakage.

If you insist on purchasing a horizontal unit, read reviews and ask questions about how the unit is insulated. Get specific with the materials used, quality of the metal parts, etc.

Chef Bert and Tom using a chimney starter for their grilling needs.

Other Tips for Smoker Air Flow & Temperature Control

Always try to light your initial fuel product, whether briquets, lump hardwood charcoal, or charcoal in a chimney starter so you can control the quantity with every cook. Use the chimney to add hot coals to the unit when you need to increase temperature. Although you can have unlit charcoal in your charcoal area so it will ignite as the lit produce makes contact, this isn’t always a guarantee that you won’t produce some temperature variance. The best chance of getting the temperature regulated is by adding hot coals as needed, even if this may be every hour or so.


To summarize, learn to control temperature by using the same quantity and type of material for the fuel, lit it with a chimney starter, only add hot coals to increase the temperature, and always have the exhaust vent open at least ½ way when cooking. Remember the number one thing is Temperature control is all in the air flow and you will have tasty grilling results!

Our Readers Are Asking..

When should I add more wood to my smoker to prevent a bitter flavor?

There are a few possible causes for bitter smoked food outcome and easy to fix:

#1 Outtake vent is to tight – open it a bit more;

#2 Wood chunks are too wet. Don’t pre-soak the chunks. Put them on the charcoal dry;

#3 Using too much wood at a time. It only takes 3–4 chunks to infuse smoke flavor;

#4 Not using an ideal hardwood. Stick to common hardwoods like cherry, maple, oak hickory, pecan, ash, alder, beech. Never use softwoods like pine, spruce, cedar, etc;

#5 Use a water pan to keep a good balance of heat, vapor, and moisture.

SmokinLicious® Products Used in this Blog:

Charwood

Wood Chunks- Double & Single Filet

Wood Chips- Grande Sapore®, Minuto® & Piccolo®

More Related reading about smoker air flow is your temperature control an other cooking subjects.

More Related reading about smoker air flow is your temperature control an other cooking subjects.


Related readings

WHAT YOU SHOULD KNOW ABOUT THE WATER PAN IN GRILLING & SMOKING

-HOW TO PREVENT BARBECUE MEAT FROM BEING TOO DRY??

-WHAT TO DO IF MY WOOD CHIPS WON’T SMOKE??

-WHY CHAR-WOOD IS THE BETTER OPTION OVER CHARCOAL

Dr. Smoke for best results in your grilling and smoking enjoyment follow smoker air flow is your temperature control guide.

Dr. Smoke for best results in your grilling and smoking enjoyment follow smoker air flow is your temperature control guide.

How to keep food interesting

How to keep food interesting during the quarantine

Listen to the audio of this blog

You may be one of the unlucky families faced with the task of social distancing or voluntary/involuntary quarantine. Without question, this will test the limits of each family member’s patience, flexibility, and cooperation.

Not only are you responsible for ensuring everyone’s safety, you’re tasked with keeping them entertained and fed. Right now, with internet and utilities intact, you have the option to stream programs, movies, videos, etc., as well as use electrical and gas appliances. This helps to keep our sanity. But have you paused to plan for when those items become interrupted or permanently halted?

I’m going to list for you some ways of how to keep food interesting and ensuring that you can remain comfortably fed while also enjoying foods that you consume when you’re not quarantined

A Few Tips on How to Keep Food Interesting:

(more…)

The SmokinLicious® culinary crew's two-zone cooking method set up to smoke Fava Beans on the Gas grill with Wood chunks!

The SmokinLicious® culinary crew’s two-zone cooking method set up to smoke Fava Beans on the Gas grill with Wood chunks!

WHY TWO-ZONE COOKING METHOD LET’S YOU WALK AWAY FROM THE GRILL

listen to our blog

listen to our blog


We all know that the key to easy and successful outdoor cooking is to control the temperature. I also believe that outdoor cooking should not hold you hostage at the grill. That’s why everyone should learn the two-zone cooking method for grilling.

Let’s cover what type of cooking you can do by this method, why it’s so successful, and how to set up the zones.

Two Zone Cooking Method- Why it is Best

 smoker box and single filet wood chunks


Two-zone cooking can be done on any type of grill no matter the fuel source. What is two-zone cooking? Using the fuel source on only half the grill while the other half holds the food. Although you may use the unlit side of the grill for most of the cooking, you have the benefit of finishing crispy skins of items or quick cooking thinner cuts of meats on the direct heat side.

Two-zone cooking is also called direct and indirect cooking. The indirect side uses indirect convection heat to cook the food which means the heat generated by the lit side radiates into the material of the equipment and produces heat (convection heat) on the unlit side. The direct side produces the heat within the unit and can be used when quick cooking is needed or when a food that has been cooked on the indirect side needs crisping, additional coloring, or some char.

Two Zone Cooking Method- The Set Up

setting up the smoker box on the grill

The primary reason you want to set up two-zone cooking is most of the grill cooking does not require direct heat. When you consistently cook foods, especially meats, over direct heat, you easily can have dried, stiff, flavorless results. This is due to the components of meat reacting at different temperatures that with direct cooking occur too fast to react.

I will tell you that you need a grilling area that is large enough to establish two zones. I judge the space needed with a rectangular, disposable foil pan. If the pan can fit on half the grill area without issue, then you have plenty of room for a two-zone setup. When using a gas grill, this means lighting the burners on one half of the grill. If you don’t have an even number of burners, then decide how many are to be turned on and how many left off. With a charcoal grill, placing the hot coals on only half the charcoal area. On an electric unit, if you can manipulate the heating element, isolate the element to one side of the unit. The temperature that works ideally for two-zone cooking is 225°F. Of course, I always add wood chunks to give a smoky flavor to the foods. Remember, the hardwood goes on the direct side of the grill or lit burner or hot coals.

Chef Bert & Tom explaining the two zone cooking method

#chefbertandtom

Note that you can also use a water pan using two zones. This can be placed on either side of the grill depending on when you need the direct heat side. Keep in mind, when doing meats, it’s great to place a pan under the meat with vegetables (onions, potatoes, celery, peppers, etc.) and a small amount of liquid that can collect the meat renderings. You can also place pans of beans to catch those drippings. Anything is fair game.

For those times when you don’t want to add any additional foods, you can simply lay a thin foil pan under the grill grate of the indirect side or a sheet of foil. That will collect any fat drippings.

Cook Anything!

Smoking Tomatoes on the gas grill with the two-zone cooking method


Since radiant heat is what you are cooking with when foods are placed on the indirect side, you can cook anything. I love doing tarts and cakes via this method, especially during the hot months when you don’t want to lite your indoor oven. In fact, those are the times that I cook an entire meal using a two-zone setup.

You can also cook multiple items using both direct and indirect heat. A long cooking meat goes on the indirect side, is cooked to temperature and held there, while a side dish is cooked on direct heat. Don’t forget, if the cookware you use is high heat tolerant, you can use cookware as well. This is how I can make cakes, tarts, and bread on the grill. You need to view this equipment like an oven as that is essentially what it is!

Two Zone Cooking Method- Use Like an Oven & Walk Away

I’m going, to be honest. Although it’s true that you can produce more moist foods using a two-zone method the real reason I love this method of cooking is I can walk away from the grill. This is particularly true when using a gas grill which holds the temperature steady, which for me, is 250°F for long cook meats and regular baking temperatures for all my cookies, cakes, tarts, bread. Remember, charcoal grills will still require you to refuel so the temperature can fluctuate more if you’re not careful. Keeping an extra chimney starter of charcoal going will solve that issue.

What is a two zone fire? You may ask…

A two zone fire is also called two-zone cooking method can be used to grill or smoke any type of food on any grill (smoker, gas, charcoal, wood-fired or electric)! Setting up a two-zone cooking method is very easy- have a hotter side on one half of the grill and a lower or no setting on the other half. A two zone fire gives the cook or chef “a stylized or finessed” way to grill without ruining great food flavors by over cooking. It is especially the best way to cook meats and vegetables. Keep in mind that grills radiate and transfer heat, so it’s really not necessary to crank up every burner or heat source to a temp equivalent to the Sun! It’s as simple as that!

As a final note, even though two-zone cooking allows you more time away from the grill, you still need a good digital thermometer to monitor the temperature of the food. Invest in an easy read one and you’ll really enjoy this new way of grilling and smoking.

SmokinLicious products used in this blog:

Wood Chunks- Double & Single FiletVisit our store to buy products

More Related reading on great smoking and grilling tips and techniques

More Related reading on #twozonecooking method and other food items to prepare

Additional reading:

-EASY GRILL ROASTED TOMATOES

-ODE TO THE GRILLED FAVA BEAN

-WOOD ROASTED ONIONS TO DIE FOR!


Dr. Smoke- The two-zone cooking method on the gas grill is a great time saver for the busy Chef trying to prepare other parts of the meal menu!

Dr. Smoke- The two-zone cooking method on the gas grill is a great time saver for the busy Chef trying to prepare other parts of the meal menu!

Try our technique on Smokey Sweet Potatoes for a great addition to your BBQ!

Try our technique on Smokey Sweet Potatoes for a great addition to your BBQ!

Try Smokey Sweet Potatoes for your BBQ Click To Tweet

Listen to the audio of this blog


We introduced you to smoked potatoes some time ago giving you an easy method of smoking cubed potatoes . Now, we look at sweet potato, a very popular root vegetable that does particularly well on the grill. This time, we’ll smoke the potatoes whole to allow for versatility for recipes.

Get 5 or 6 sweet potatoes selected, preferably of equal size, and let’s get to the grill! Oh, and don’t forget how great it is to grow you own sweet potatoes. Check out this guide to motivate you!

Choose Your Equipment for Smokey Sweet Potatoes

I’m going to use two pieces of equipment today to demonstrate how easily it is to work with what you own to add a smoke component.

For my gas grill, I’ll be using a smoker box equipped with 3-4 wood chunks in double filet size. For the charcoal grill, I’m incorporating both lump charcoal and briquet for the fuel and adding double filet wood chunks for flavor. My charcoal grill is a traditional kettle grill. Both these units are set up for two-zone cooking which means the fuel is on one side – in the case of the gas grill, burners are lit on one side only, for the charcoal grill, charcoal is banked to one side of the grill, using both lit and unlit coals to sustain the heat level. All cooking will be done on the side that does not have any direct heat.

Our Smokinlicious wood chunks on the coals providing great smokey flavor for these smokey Sweet Potatoes

#woodchunks

With a target cooking temperature of 325-350°F, these sweet potatoes will cook up and get smoky in no time!

Tasting Notes: Preparation of the sweet potatoes prior to smoking is simple. Wash the potatoes well, pat dry, and then trim off the two ends. Using a knife, pierce the ends one time and the sides several times to provide injection areas for the smoke vapor. This will ensure an even smoke flavor.

Smokey Sweet Potatoes- No Work Grilling & Smoking

(more…)

« Previous PageNext Page »