There is no question, North Americans love maple trees! Although we don’t have as many as the continent of Asia, we sure have a good share with some 12 varieties available. Plus, the Sugar Maple tree is the official tree of New York State!
Maple is a very popular hardwood for wood-fired cooking, especially hot smoking. We are blessed at SmokinLicious® to have in our harvest Sweet Sugar Maple hardwood. This extremely versatile wood can be used to smoke everything from eggs to brisket. It is a very even tempered wood so it works with spicy rubs as well as fruity sauces.
Introducing to you Peggy Hatfield, the Bella Cupcake Couture’s resident dessert couturier, and baker. Peggy became passionate about baking when she was 9 years old. She served freshly- baked treats in her small town in Alabama for 28 years before her home bakery and café was closed. But with the Bella Cupcake Couture website, she was able to share her expert reviews on the best baking tools, equipment, accessories, and the latest trends, including the know-how of baking. Bella Cupcake Couture is pleased to present to you the expert baker’s how-to guides, expert tips, and hacks for baking and dessert making.
While there are other techniques in cooking, baking is considered one of the most critical types. Baking requires precision and dedication to the entire process. If you forgot one or add too many ingredients, you can ruin the entire dish. Also, cooking a baked item for longer than the required time will also result in a big problem. That is why, in baking, you need to have lots of patience to succeed with your product.
Bundt Cake- Making A Cake
At some point, people tend to become excited when removing a just baked cake, forgetting to be more careful after the baking process is complete. The last part of the baking, which is removing your cake from the pan, requires the same level of care as was used in mixing the batter. This article provides the key tips in keeping a bundt cake from sticking to your pan.
Bundt Cake- Prevent from Sticking
The more careful you are in the cooking part, the more cautious you need to be removing your cake from the pan. It is frustrating when you spend your time, effort, and money , then all of a sudden, your cake decides to remain stuck in your pan, ruining your efforts.
Hey! Don’t worry because here are the effective ways to prevent your bundt cake from sticking.
Bundt Cake- Use a Simple and Nonstick Heavy Bundt Cake Pan
This step is one of the highly recommended ways on how you can prevent a cake from sticking. If you are wondering about its efficiency, you can look for reviews online to have an idea on the brand of bundt cake pan with the best value and rating for your purchase.
To maintain the pan’s efficiency, you should put extra care into cleaning it. Avoid using strong dish washing liquid and abrasive sponges because these can cause damage to the pan’s coating. The most efficient way to take care of your nonstick pan is to wash with mild soap, dry it with a soft towel, and avoid using any metal cooking tools or abrasive brushes.
Bundt Cake- Use Grease
Take note that using just any grease can also affect the quality of your nonstick pan. Nonstick cooking sprays contain chemicals that can degrade your pan’s nonstick coating. Butter may affect the quality of your cake due to the milk properties which can bind your cake to the pan. One of the highly recommended types of grease that proves best for baking is melted shortening.
Bundt Cake- Loosen the Edges
You cannot and should not forcefully remove your cake from a pan. You need to slowly and carefully loosen the edges and let the cake sit for 5 minutes before turning it upside down on a cooling rack. The use of a plastic spatula is a must to avoid scratching your nonstick pan and cutting into your cake.
Bundt Cake- Get Your Cake Upside Down
Once the pan is upside down on a cooling rack, let it sit for another five minutes before lifting from the cake completely.
Final Notes
Removing the cake from your baking pan is critical to the final result. Following our simple steps above will ensure a perfect bundt cake. Making the investment in high-quality baking equipment adds insurance for the best product results. If it happens that your cake still sticks in your pan, don’t give up! Try and try again until you flawlessly achieve the perfection of your cake.
More Related reading on baking in a smoker bundt cake and more!
Our tips can help with your spring season for grilling plans!
SPRING SEASON FOR GRILLING!
Spring is finally here and that means it’s time to prep the grill for your Spring Season for Grilling! Yup, the winter blahs are gone and it’s time to fire up the grill, BBQ, the Barbie, the Brac, or whatever suitable name you use to call your equipment on your specific continent.
No, there is no way around it! First, comes the dreaded cleaning of your unit. Whether it’s less than $30 or over $3,000, all equipment needs some cleaning attention once in a while. What better time than Spring to roll up your sleeves and get everything ready.
Remember, a grill or smoker is an oven that has been seasoned over time with all that cooking so a little soap and water is generally all that is needed to do a nice cleanup. You simply want to clean the unit of dirt and dust, so gently clean being careful not to rub out the “seasoning” of the unit!
Of course, there are those times when you failed to provide suitable attention to your equipment and a bunch of soot, grease, and all kinds of other nasty things developed on the equipment. When you’re faced with that situation, then consideration has to be made to a good degreaser or oven cleaner! Once the unit has been put back into good clean order, get ready to season it again. That’s right, all the harder cleaning agent to the seasoning right out of the unit. Actually, this the perfect time to use all the leftover charcoal, wood chunks/chips from last year! Start a fire and let burn/smoke in the unit to “season”. You’re not cooking now so there is no need to worry about moisture levels, water pans, etc. – just generate the smoke and heat, and re-season your unit. Don’t forget to add a little oil (vegetable, coconut, whatever handles higher heat levels) to the grilling grates to get them all ready.
Own an LP/gas grill? You can do the same process by taking a chunk and lighting it on the grill, or take a disposable foil pan or tin foil and put some wood chips in. Then lite with a match or lighter (not with the unit’s burners), close the lid and capture the smoke/heat!
Now you’re ready for new SmokinLicious® culinary quality wood products and what will promise to be a great Spring Season for Grilling!
Bon-Bar-B-Q!
Dr. Smoke has tips for your Spring Season for Grilling plans.
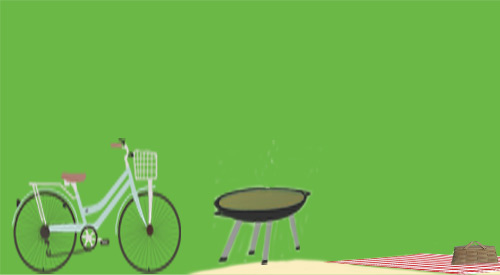
Every summer, many people put aside their work, daily stresses and responsibilities and escape on a vacation somewhere far away from reality. It may be a secluded retreat in the mountains, a camping trip with the kids, an arranged tour in another country, an Alaskan cruise, or days relaxing at an exotic beach or resort.
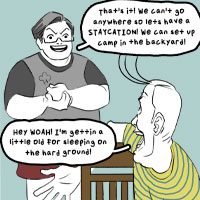
However, with the current pandemic including social distancing and travel restrictions, along with financial constraints for many, those plans may have to be temporarily shelved. But the desire to escape reality – for just a bit – is very much alive. So, with many people remaining in their homes, how can that off-work journey happen? We have some tips for making the best of the situation and creating cherished vacation memories without ever leaving home. It’s called a staycation.
What’s a Staycation?
A staycation is, quite simply, a vacation at home. How realistic, how exciting, or how relaxing you make it is up to you. Theme it up for a more authentic “away-from-home” experience.
What makes a great staycation? Well, that depends on what you consider a vacation. Some people want adventure, while others like relaxing with a drink in their hand. Still others use vacation time to unwind by tackling DIY projects such as renovations. So, what would you enjoy doing if you could craft your own staycation? (Which, by the way, you can.)
Commit To the Best Staycation Ever!
Once you’ve decided to schedule a staycation – whatever it ends up being – commit to it. Mark it on your calendar. Plan for it. Make concrete plans. If you’re working, ask for those days off of work. Don’t just say you’re going to have a vacation and spend the weekend lounging on the sofa, noshing on Cheetos and surfing the internet, unless a week of rest is the staycation you’ve planned.
Whenever you’re going for vacation in your home – especially in these times when so many of us are working from home – try to unplug so your mind’s not on work and responsibilities. Set your work email to the “out of office” setting and write an auto-reply message. Then, don’t check your work emails unless absolutely necessary. Consider NOT telling your boss that you’re vacationing at home. Turn your cell phone off or on silent and set a small window of time each day to check for messages.
Skip the news. The idea is to get away from stress, away from reality. Just concentrate on your vacation experience. The news cycle can wait for a week. Really, it can. This is the time to be good to yourself.
Best Staycation Ever! – Don’t Neglect to Prepare
Prepare for your staycation much like you’d prep for any other vacation. Create your itinerary. Decide what kind of activities you would like to do each day of your vacation. What kind of staycation would you like? Cultural learning, straight-up fun, pampering, relaxing? Write your vacation goals down, and then make a game plan. Don’t want to cook while on vacation? Gather menus from local restaurants that deliver and have them on hand. You could even incorporate different restaurants into the theme of your vacation.
Before your official vacation start time, do all the necessary prep work. Complete all chores in advance. Wash the dishes, dust, pay the bills, scrub the toilets, empty the trash. Do the laundry BEFORE your staycation begins. You don’t really want to be sorting and folding while on vacation, do you?
Best Staycation Ever- Set the Mood for Your Staycation
Many people have saved money in anticipation of an annual vacation to pay for things like hotel rooms, meals, plane tickets and a rental car. Why not channel some of those funds into your at-home vacation paradise?
Create your staycation space – really, truly, set up a space that exudes the theme of your vacation. Move the furniture, change the lighting, order pillows, fairy lights or scented candles – whatever your theme is, run with it. Look at magazines or online trip websites for inspiration. Think about the destination you want. Paradise under the palms? Set up a piña colada or margarita station at home. Roll up the rugs and go barefoot like you’re on the beach. Set up a hammock between backyard trees or on your back porch.
Dreaming of a mountain retreat? Set out pine-scented candles and decorate the room with cottage home decor. Plan for any purchases you’ll need for your staycation. Does your week require some relaxing pillows, aromatherapy candles, a tent or hammock? Dreaming of an overseas vacation? Hit the international foods section of your grocery and stock up on items from that region to set the mood. Planning a spa retreat week? Buy a set of high-thread-count sheets, a couple of luxurious pillows, scented bath salts, essential oils, and a super-soft robe.
To make your staycation ambiance even more realistic, you can make a vacation soundtrack with music that reminds you of that particular place, or perhaps a past favorite vacation that you’d like to recreate. Going to the beach in your mind? Ramp up some Jimmy Buffet music. Missing that trip to Brazil this summer? Make your own compilation of Brazilian favorites including the likes of Roberto Carlos or Anitta. Or queue up some internet music mixes.
Think about your favorite luxury hotel amenities and try to replicate some of those special touches at your own staycation. Love peppermints or chocolates on your pillows? Do it. How about a fruit basket, or a water pitcher of cold spring water infused with the subtle flavor and inviting look of cut fruit? Make it happen. This is all about helping you feel like you’re somewhere else.
Best Staycation Ever- Self-Care Weekend
How about a pampering week, helping you release all the stress that’s built up this year? Consider a self-care “getaway” with a spa day, a YouTube yoga session, or a self-manicure. Start a journal of self-discovery. Draw a warm bubble bath, adding some calming essential oils like lavender or chamomile. Slip into the welcoming suds as you relax your mind and body. Soft music and candles invite you to soak away the stress. Then, wrap yourself up in the soft hug of a luxurious robe. This vacation is all about being good to yourself.
Best Staycation Ever- Retail Therapy Weekend
If you have money saved up that you won’t spend on a vacation this summer and miss shopping, you may want to arrange a retail therapy staycation. Curl up on the sofa with a glass of wine and start online shopping. You could budget what you had already set aside for your anticipated actual vacation, and spend some of that money, or just “window-shop” and dream from the comfort of your favorite recliner.
Best Staycation Ever- Plan Future Vacations
You can’t travel much right now, but the future is wide open. You’ve been staring at your walls for quite a while now, longing to escape. Why not start that escape, at least in your mind? Begin planning your post-pandemic road trip (or plane trip). There’s no time like the present to ponder where you’d like to visit – start with the continent or country, and narrow it down from there. Search online for destinations, hotels and fun activities. Jot them down and start planning for next year.
Look online for interesting destinations and then start searching for places you can stay, like at hotels or bed and breakfast inns. What kind of activities can you participate in while there? Take notes, plan your budget, and work out the details so when it’s time to fly the pandemic coop, you’ll have all your ducks in a row for your next adventure.
Best Staycation Ever- Cook a Fancy Dinner
The internet is filled with how-to-cook videos. Zero in on one and cook that meal and impress your spouse or family. See if you can find fanciful foods that fit into the theme of your staycation. Or, ask your family to pamper you and cook (including doing the dishes.). You can also sign up for delivered meal preparation kits. These kits arrive at your doorstep with all of the ingredients, already prepped, along with step-by-step directions. You’ll feel like a professional chef in no time.
Chill
You may be someone who just needs to chill for a vacation. Vacations don’t always have to be about excitement and activity. Sometimes, you just need peace and quiet to de-stress from life.
Create your zen vacation in a quiet place of your home – make it off limits to the children (perhaps you have someone who can take care of them). Then, unplug your clocks or put them in the closet so you can’t see them. Turn off your phone, put on earphones (if there’s house noise you can’t block out) and just…chill.
Fun for the Whole Family on the Best Staycation Ever
If you’re quarantining with your family and yearning for a vacation, build a staycation with a family-friendly theme or activities. Although you have been in each other’s space for months, there are ways you can spend quality, vacation-esque time as a family and build beautiful bonds.
Best Staycation Ever- Camping Out
Go camping for your staycation – for a night, a week, or somewhere in between – you choose. Set up a tent in the backyard, complete with sleeping bags and camp lights. Don’t forget the mosquito repellent or citronella candles. Pack up snacks in bags for a more authentic experience, and string lights in the trees or at the top of the tent for some extra ambiance.
Snag a couple of bags of ice from the store and fill a cooler with food and drinks to keep with the campout theme. Cook your meals on a grill or have a fire pit if regulations allow. Roast marshmallows or craft s’mores. Tell stories around the fire. Stay up too late and laugh too much.
If your idea of camping is closer to glamping, or you don’t have a backyard, then move things indoors. Set up a tent or have your kids create a tent by hanging sheets and other fabrics in clever ways. Unleash your children’s creativity with tent-making – they know how to make the best tents and forts. Set up your indoor camping ambiance with flashlights and flameless candles for light sources. Eat from paper plates and make s’mores in the microwave. Search for a campfire video to play on your TV.
Have a family costume night or a themed party during your staycation. Challenge your kids to dress up as their favorite movie character, singer, or superhero, using clothes, props and supplies already in your home.
Love watching movies? Build a staycation around that. Have a themed movie marathon. Each family member picks a movie that you all watch, or you could categorize movies, like comedies, animation, action or another genre. Don’t forget the popcorn. Plan ahead and surprise your “movie audience” with their favorite movie theater candy and sodas.
Music or Karaoke Party
Use some of the money you would have spent on lodging, meals, attraction fees and more – and buy a karaoke machine. You may find your family singing until they’re all hoarse and falling down in laughter. Learn a new song on an instrument you play, and hold a “recital” in your living room. If more than one member of your family plays an instrument, work on a performance together.
Virtual Travel and Games
You could also spend the summer vacation money on virtual reality headsets. This marvelous technology is a fantastic way to virtually leave your house and go on vacations together, using 3D travel apps. Want to walk the streets of Paris? Climb mountains in the Himalayas? You’re only a VR headset away.
Backyard Water Game Day for best Staycation ever
Beat the summer heat on your staycation with a day of water games in your backyard. Ask your kids to plan games and gather the necessary accessories like water hoses, kiddie pools, sprinklers, soaking guns, water slides, water balloons (be sure to pick up the broken balloon pieces) and plenty of sunblock. You can go all out renting an inflatable water play set, or you can keep it budget-friendly. Bring on the popsicles and laughter.
Night in for the Parents
Parents may just need a vacation from their kids. Try to set up a cozy, romantic room or patio area for your loved one. Group candles around your backyard. Flameless candles4 are great and there’s no fire hazard. Set up a hammock or pillows or some other way to relax. Chill a bottle of wine, soda or whatever happens to be your favorite beverage. Make up a cheese tray. It can be fancy, or it can be laid-back. Pour a bag of chips into a bowl if that’s your style. Set some mood music, relax and kick back.
Best Staycation Ever- Learning Vacation
Many people love to travel to new locations and learn about culture, architecture, art, languages, food, and more. The opportunity to learn something new during your staycation is limited only by your imagination.
Because of the pandemic, many museums now offer free virtual tours. Spend days in the Louvre, or take an interactive tour of Mark Twain’s house. Visit zoos virtually, or set up Zoom meetings with friends or relatives in different countries so you can practice conversing in a foreign language.
Travel the world for free using your local library card. Libraries have a wealth of e-books available to download from the library’s website onto your own device. Just pick them out and download, prop your feet up and escape into a mystery, thriller, romance, fantasy, or whatever genre you enjoy. Have your favorite beverage and snacks near your reading haven.
Take an online class on cooking, digital art, sewing, or something that intrigues you. This is your staycation. If your goal is to spend more time outdoors, consider starting a new flower or vegetable garden or a compost pile. Set up a rain barrel water collection system, making use of the rainwater rolling off your roof.
You can even make it a learning vacation for your pet. Learn how to teach your pet tricks or a new skill, like sniffing out smells. Or, just chill with your cuddly cat on your lap. For some, that’s a heavenly vacation.
For those who would rather “do” than chill, spend your staycation time learning a new craft. Clear out your schedule and spend that time really digging into whatever it is you want to learn. Use budgeted summer vacation money to order acrylic or oil paints, modeling clay, mosaics or stained glass supplies, whatever strikes your fancy, and learn a new skill you’ll maintain long after your staycation is over.
Renovate a Space in Your Home
For those who need to be active during vacations, think about a renovation vacation. Since you’ve been home so much the last two months, no doubt you’ve zeroed in on a corner or a room of your house that’s begging for an update or a redo. Repaint the kitchen and add a backsplash or replace the flooring. Update your bedroom, adding new curtains or blinds. Turn that depressing basement into a new game room, guest room or home office. Browse among the DIY articles from professionals for inspiration and guidance.
Whatever your stay-at-home vacation fantasy is, try to make it happen. This pandemic won’t last forever, and the vacation you take this summer, at your own home, may just spark some of the best memories ever. Don’t forget to take photos!
Poor Tom! He, like many other grill and smoker enthusiasts out there, never learned the value of a water pan. By providing moisture to the grilling area, you can avoid drying out your meats and poultry and never have someone mistake your food for a rock!
Usted probablemente está pensando en muchos más huéspedes potenciales para el covid-19 en un esfuerzo para mantener a todos los importantes para usted seguro y saludable. Sin duda, todo lo que toca tiene el potencial de ser huésped para el virus que se está propagando tan rápidamente por todo el mundo. Es sin duda, un momento de miedo. Es posible que usted no sepa que SmokinLicious® siempre se ha comprometido a proteger a nuestros clientes de la transferencia de contaminantes potenciales.
No cualquier proveedor de madera
En nuestro artículo publicó anteriormente titulado “Términos clarificar utilizados para la venta de madera para ahumar y asar,” https://www.smokinlicious.com/blog/smoking-grilling-wood-selling-terms-demystified/ intentamos explicar lo que las diferentes palabras utilizadas para describir la preparación de la madera vendida para asar a la parrilla y ahumar realmente significaba. El punto importante para tomar de este artículo es que esas “etiquetas” diversas no se relacionan con lo que puede asegurar de que la bacteria y los agentes virales no sobrevivan si se agarran a la madera para actuar como huésped para los dos. Al final, somos el único proveedor actual que no sólo vende madera dura con el fin de cocinar, sino que utiliza un proceso de tratamiento térmico que está en un nivel para garantizar que ninguno agente microbiano ni viral pueda aferrarse a la madera e infectar al usuario.
Aunque utilizamos un nivel de calor intenso de 75 oC/167 oF, desarrollamos un método para garantizar que la madera no se seca al punto de leña, algo con lo que nunca queremos ser comparados.
Sabemos que algunas esporas fúngicas sólo mueren a 60 oC/140 oF, esporas de moho a 56 oC/133 oF y listeria a 74 oC/165,2 oF. Aunque no hay datos confirmados sobre el nivel de calor que matar covid-19, si sabemos que la luz del sol hace que el agente viral sólo sobreviva unas horas, dada la intensidad de los rayos ultravioleta. Esto sugiere que el calor tenga un papel importante en la reducción de la supervivencia del virus.
La normativa vigente para la madera simplemente no garantiza la seguridad. Nuestros esfuerzos refuerzan que la bacteria potencialmente mortal no puede entrar en nuestra cadena alimentaria. Puede manejar nuestros envases y cocinar con nuestros productos sabiendo que hemos hecho nuestra parte para garantizar que no haya transferencia de bacterias ni agentes infecciosos.
¿Puede su leña local u otro proveedor de madera hacer la misma afirmación? SmokinLicious® – la marca pura, limpia y segura para cocinar.
¿Planea asar a la parrilla o ahumar más en casa con el susto reciente de covid-19? Déjanos un comentario y suscríbelo para obtener nuestros últimos consejos, técnicas, recetas y la ciencia detrás del fuego y el humo, para todos los métodos de cocción contra incendios en vivo. ¡Eso es SmokinLicious!
Además de nuestro blog sobre seguridad de la madera, aquí hay una lista de lectura relacionada sobre este importante tema.
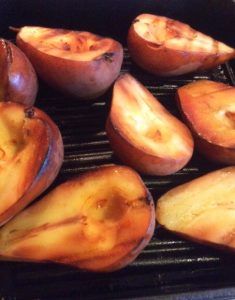
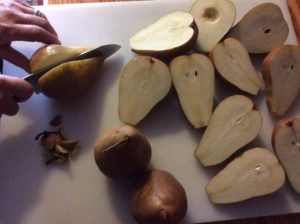
Pears, pears, everywhere! Why not try your hand with this easy method for smoked pears Depending on where you’re located, you’ll have at least a few varieties of pears to select from. Rather than just enjoy these as a raw fruit, try something truly unique that will give them a kiss of wood flavoring?
Stovetop smoking is so easy and a great way to still enjoy wood-fired flavorings during the winter months, when you may not want to venture out to the grill or smoker. I’ll be highlighting Bosc pears in today’s technique. To do this technique you will need:
Fresh pears – 4 will likely fill the smoker pan one time
A Chef’s knife, paring knife, and cutting board
A cooling rack
Pears cut in half
PREPARING THE SMOKED PEARS
When I purchased my Bosc pears, I made sure that they were firm to the touch so that I would have some longevity to their use in recipes for a while. Carefully, wash each pear and then pat dry with a paper towel. I then slice each pear in half, removing the stem tip. This will give me a flat surface to smoke and cook my pears since I am using a stovetop grill pan with my process. That will allow me to form some great grill marks on the pears while they cook. The benefit to using halves of pear is I can feature larger pear cuts in a salad or dessert, highlighting the golden smoked color.
Once the pears are halved and the stems removed, I will core out the seeds and hard seed membrane with a small paring knife. Once that step is complete, I start the heat under my stovetop smoking pan.
Over the past several months, you have learned how your own hands can play host to transmitting the virus known as COVID-19. Once transmitted, the virus can potentially live on surfaces for up to several days.
Of course, there are factors that determine how attracted the virus is to the surface. Porous surfaces like those of cardboard and wood are not very attractive to the virus. It prefers smooth surfaces.
But there is still so much we do not know. SmokinLicious® continues to prioritize limiting human contact with our product manufacture and packaging. Our position is, we do not know enough to stop being diligent in our efforts.
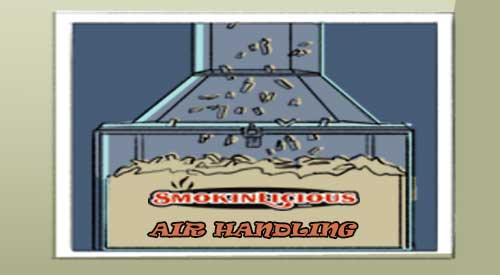
Time to revisit our cartoon friends! Tom and Bert recently discussed the SmokinLicious® air collection process for wood chips.
Why Air Collected Packaging is Better!
Tom asks a great question, as often, we do not think about the wood we cook with. How is it bulk stored, what has it been exposed to, how much dust is in the product? Remember, dust slows combustion and can cause equipment failures. This is the main reason why SmokinLicious® designed a process for screening our wood chips to eliminate as much dust as possible. That is just step #2 in the process after producing the chips from larger pieces of wood.
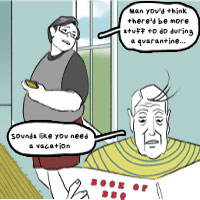
It has been months since the new normal occurred. You thought working from home would be brief but it is now clear this situation has no end. Reality has set in that you are working, educating, entertaining, eating and sleeping from home.
One benefit is you no longer are commuting. For those that use mass transit like a subway, bus line or rail line to get to work now find they have more time to devote to family and meals. For those that have had to drive to work now have freedom to cruise online recipes and those old cookbooks. This is your opportunity to make the most of those meals while not making cooking a chore.
Let me tell you a story about my neighbor, Tom, we can all relate to.
A few years ago, Tom, a semi-trained Chef, wanted to smoke some food. So like all newbies, Tom went off to a box store, picked out a smoker ( offset), loaded a big bag of charcoal, a big plastic bag of wood chunks; next stop was at the butcher for three racks of ribs! Arriving at home he assembled the smoker, filled up the firebox with charcoal and wood, put on the rack of ribs and cooked them for hours. Finally, before dusk, he presented his charred masterpiece to the family!
Oh, he claimed to love the over-smoked taste! Politely and begrudgingly, the family told him how good the ribs tasted! Well, the smoker never was used again, went to the garage sale, the massive amount of wood went to the campfire, the charcoal lasted the summer for the kettle grill! The moral here is “wait to take on the rib”! Dr. Smoke doesn’t want this to happen to you! So, here are some suggested tips to follow!
First, go purchase the smoker/grill of your choice; next purchase a bag of quality hardwood charcoal; go home and assemble the unit. Then take some vegetable/olive oil and coat the grill! This is what is called seasoning.
Burn #1: start a charcoal fire in the unit or firebox and let it bring the unit up to temperature (250 degrees F)- do not put any food in the unit! Then let it cool down overnight!
Burn #2: start a charcoal fire in the unit or firebox, bring to around 200 to 225 degrees F. then put on some pork or beef hot dogs in the unit, then time the cook, sample the dogs for flavor, watch for hot spots and learn how to smoke- this is not charring. Learn the smoking process in your unit!
Burn #3: start a charcoal fire in the unit or firebox, bring to around 200-225 degrees F, then put on some chicken legs or thighs. No chicken breast-you need something with a bone. Time the cooking and taste the product!
Now order a SMALL number of wood chunks or chips from SmokinLicious®.
Burn #4: do the same as burn #3 only reduce the amount of charcoal and add SmokinLicious® chunks/chips to produce the smoke. Again time the cook, taste the results. Chicken is like a sponge it will absorb a lot of smoke so be careful when adding the quantity of wood.
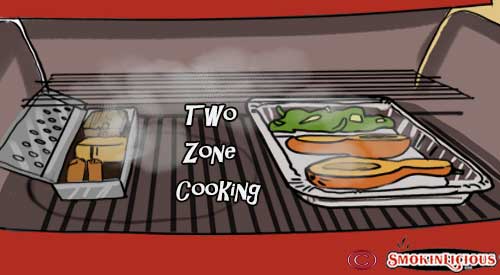
We have all been in Tom’s position. We love grilling and smoking but prefer the warmer weather. For those of us in 4 season climates with below zero temperatures in winter and lots of snow, it seems too hard to continuing grilling! But just as Bert remarks, you do not have to give up cooking outdoors just because of the weather.
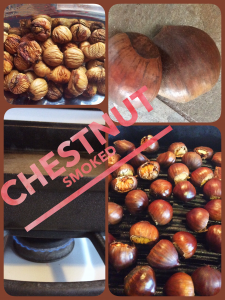
Collage of Smoked Chestnuts go on a Stovetop Smoker
SMOKED CHESTNUTS ON A STOVETOP SMOKER!
Depending on where your located, chestnuts may only be available for a short period each year, usually around the holidays. Mostly pan roasted in the oven, why not do something unique with this prized fruit and smoke them! In addition to the chestnuts, you’ll need a stovetop smoker, purchased or you can make your own with tools likely in your kitchen. You can see our writing on the “The Kitchen Find” which will guide you on what is needed.
about 2 hours of time. Be sure you also have a hood vent where you will be using the stovetop smoker in order to maintain a smoke-free kitchen.
You will find chestnuts available prepackaged or in bulk when in season. Although the packaged product will include a directive to cut an X in the flat surface of each nut, I grew up in a household where we always cut off the stem side. This is the small, dark cap side to the chestnut. The chestnut has a cap and a pointed end giving it a bloated teardrop look. I have found that when smoking, I get better control of the smoke infusion with a fresh cut to one end. Keep in mind, not all the chestnuts purchased will likely be viable as often mold will take hold of some of the chestnuts which you won’t see until you cut into them. As the chestnuts age, they can develop a fuzzy mold on the outside which will tell you not to waste your time cutting that one open! Simply discard!
Generally, chestnuts have a flat side and a rounded side.
To prepare them:
lay the chestnut on the cutting board with the flat side down. Place your knife blade over the small dark cap, and slice off in one motion. This will reveal the chestnut meat inside which will have a yellow-white hue. Once the cap is off, you’ll be able to tell if any mold has set in as it will have a marked gray/black appearance. If any mold is noted, discard the chestnut as it won’t cook tender. If the majority is free of mold, go ahead and keep it for the smoking/cooking process.
To do stovetop smoking, there are 4 parts needed:
a pan to hold the heat and wood chips
a drip pan to prevent rendered fat and juices from entering the wood. Generally, you only need the drip pan when you actually have a food item that will produce juices or fat drippings.
a grill pan
a lid.
Note: Smoked chestnuts will not produce any drippings though they do have a percentage of water that will be released as steam into the lid of the pan. Just be sure when you open the lid that you keep any collected water from dripping back into the cooking grate.
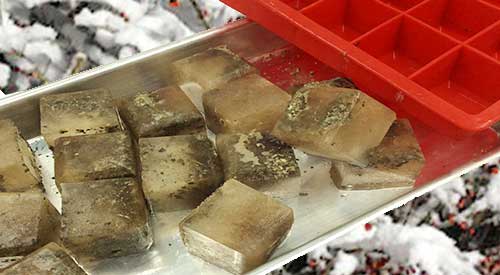
Our Fresh Herbs smoked and Iced ready to bring great flavors to our winter soups!
HERBS SMOKED AND ICED MAKE THE PERFECT WINTER FLAVOR CUBE
#smokinlicious
Here’s the perfect way to keep great flavors on hand for when you need them. I’m going to show you how to make smoked herb flavor cubes which consist of our previously smoked fresh herbs and, in my case, bone broth. Whether you smoke all the components of these flavorful cubes or not is up to you. I happen to like the combination of smoked bone broth and smoked herbs for some of my soups, sauces, and glazes. These are the perfect little flavor gems for all your recipes and the prefrozen cubes make adding so simple.
Herbs Smoked & Iced- Tools
#flavorcubes
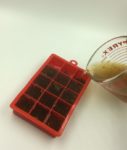
Here is all you need to make these flavorful cubes . Silicone ice cube trays, your choice of herbs and spices, as well as broth or stock. It will take about one quart of broth to make 40 flavor cubes.
To make portioning the cubes a snap, I use a measuring cup for the liquid. As I previously smoked my herbs and placed them in spice jars, I can portion out the herbs directly from the jars. Today, I’m using smoked parsley and oregano dust for infused broth cubes. These are two of my more popular blends for sauces, soups, and extra flavor to vegetables. Be sure your broth or stock is well strained before adding to the cube trays.
Tasting Notes: Don’t forget about fruits as well. These make perfect flavor cubes and can be cold smoked using a handheld food smoker .
Herbs Smoked & Iced- 1-2-3 And Done!
The best part of making flavor cubes is the freezer does most of the work. I simply place previously smoked herbs of my choice into the bottom of the silicone tray compartments and pour in the broth. I like to put my cube trays on mini sheet pans for easy placement and removal from the freezer. Just be sure to label the trays so when you go to un-mold, everything will be easy to identify. That’s it! How easy is that??
Tasting Notes:You do not have to use silicone cube trays but I prefer these to metal or plastic. I find they don’t taint the flavor of the cubes and they are extremely easy to release.
A New Umami
#smokedherbs
After adding smoked herbs to silicone ice trays and pouring in smoked bone broth, these flavor cubes just take hours of freezer time to set and then they are ready for use. I like to un-mold mine and place in storage bags that allow me to reach in, grab what I need, and reseal the rest. The depth of flavor these little cubes add to soup and sauces, whether for meats and poultry or vegetables, is fabulous.
Don’t forget to experiment with a variety of tastes and don’t feel you are restricted to just one herb or spice per cube. Make flavor blends like Indian flavor cubes with curry, ginger, allspice, and cumin. Or an Italian blend with oregano, basil, marjoram, thyme and rosemary. Or, combine fruit and spices for cocktail-like blends. There are no rules to the combinations you can use so find the flavors you love and flavor cube away!
We’ve all had those moments when the food comes off the smoker or grill and we wonder, What went wrong??
Sometimes the event is so bad you want to swear off outdoor cooking for good because of committing common smoking & grilling mistakes. I’m here to ask you to step away from the ledge and think about whether you do any of the following things. The more items on the list you engage in, the more likely you can benefit from my suggestions.
SMOKING & GRILLING MISTAKES:
#1 Resting Meat
This tends to be the common practice for roasts and steaks/chops. You’ve managed to get a nice crisp skin to the roast or steak and then you let it sit or rest, thinking it will make the outcome juicier. You end up with a soft skin, a wet outside, and waxy fat. These are meat cuts that don’t require resting. In fact, they will rest enough on your dinner plate so they are best served hot of the grill or smoker, without a rest period.
#2 Using Too Much Wood
You know that charcoal and gas are the fuels used to reach and maintain temperature while you’re cooking, and that hardwood is what flavors your food. You want to ensure there is adequate smoke flavor so you add 10 pieces of wood chunks to the hot coals when you start cooking. Then after the first hour, you add another 6 pieces of wood. STOP! That is way too much and simply put, a waste of a tree. On average it takes just 6 ounces of wood to start flavoring meat. My rule of thumb is to add 3-4 wood pieces for a full chimney of charcoal plus a couple of pounds of unlit. Only when those pieces are fully combusted (black and ashy) do I add a couple more pieces. Depending on what and how long I’m cooking, I may only use 6 pieces total.
#3 You Soaked Your Smoking/Grilling Wood
I know this is one of the biggest controversies out there when it comes to smoking with wood. To soak or not. I take the stand that you should never soak the wood as adding water will only fluctuate your cooking temperature and take more energy away from the fire to steam the water from the wood. Remember, the wood cannot start to combust until the excess water has been vaporized. Work with a wood that has at least 20% moisture for the best flavor.
#4 Room Temperature Meat
It is well documented that when you want to attract smoke vapor from burning wood, colder temperatures are like a magnet. Don’t take the meat out of the refrigerator until right before you’re ready to place it on the grill. In addition to attracting smoke vapor, colder temperature meats will warm up faster in your equipment than if you left them out on the kitchen counter.
#5 Searing to Lock in Juices
This is the one item even well-known restaurants can get wrong. Searing meats before finish cooking does not lock in the juices. What it does do is brown the outside of the meat and firm up the outer surface, giving a distinct pleasant flavor. The meat fibers do not get sealed by this method or produce any additional juiciness to the meat.
#6 Marinating Overnight or Longer
As marinades tend to contain oil and meat is made up mostly of water, the two tend to compete against each other. Here’s the thing with marinades. Marinating for long periods of time do not allow the marinade to penetrate any deeper than if you marinate for just one hour. In fact, you have an increased risk of breaking down the meat fibers too far with a marinade, producing a soggy outer layer. Stick to short marinade times and understand most of that flavor will penetrate only to the outside layer.
#7 Don’t Trim the Fat Cap
Just like meat being made up of mostly water, fat is made up of oil. Again, water and oil don’t mix. Leaving a fat cap on meat only allows it to melt and drip into the equipment you’re using. This can produce some additional flavors to the meat but allow too many drippings into the fire area, and you’ll cause flare ups that will deposit soot onto your meat. Don’t forget, most of us have a habit of trimming fat off meat before we consume it.
It is one of our top questions. Wood storage. Where to store wood, how to store wood, temperature ideal for storing wood, shelf life of stored wood. If you are an avid follower of our readings, you are likely familiar with our two cartoon characters, Tom and Bert. Thru these characters, SmokinLicious® has been able to guide millions of home grilling and smoking enthusiasts on techniques and tips to make every wood-fired cooking event a success.