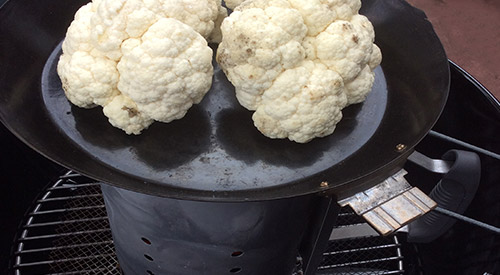
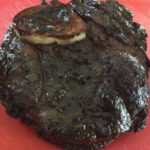
We are cooking on a chimney starter with a grill pan to nicely char our head of Cauliflower for this recipe!
COAL FIRE CAULIFLOWER BY COOKING ON A CHIMNEY STARTER
listen to our blog
A cousin to broccoli, #cauliflower is one of those vegetables that can be eaten raw or cooked and converted to so many different textures. Best yet, cauliflower is one of those super cancer-fighting foods as it contains sulforaphane known to kill cancer stem cells.
I’ll be taking my head of cauliflower and introducing it to hot coals, first, direct heat using a #chimneystarter for the actual cooking and then directly on the hot coals to give it the perfect “meat” char. No matter what color you enjoy – white, yellow, purple – grab a head and get your chimney starter ready, as I show you how to use a chimney starter as an actual grill.
Cooking on a Chimney Starter: Why a Chimney Starter?
There are times when you really don’t need to fire up a full charcoal area of coals on the charcoal grill. I have the perfect solution when you’re doing just a small quantity of a food, like our head of cauliflower. Use your chimney starter
To start, I place a mesh screen on the charcoal grill grate to help retain the small, hot coals for cooking. I have a collection of micro charcoal pieces that work perfectly for this type of cooking.
After lighting a Firestarter, I place the charcoal filled chimney starter on top of the Firestarter and allow the coals to burn down to hot embers. Hot embers are what I will be using to cook my fresh cauliflower, first, directly on the chimney starter, then on the mesh screen once I dump the hot embers from the chimney starter.
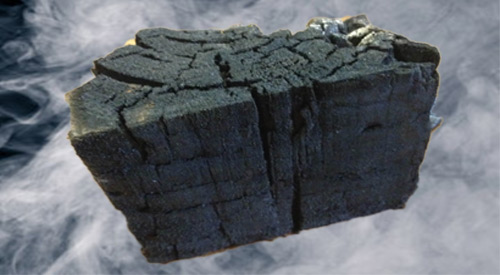
Our Char-wood is produced by Direct firing our North American hardwood blocks until the right amount of Carbonization is achieved!
WHY CHAR-WOOD IS THE BETTER OPTION OVER CHARCOAL
SUMMARY:
Binchotan charcoal is made from the Japanese direct fire method of making charcoal with Kiln! Japanese charcoal making has been around for centuries and burns longer than lump hardwood charcoal! We have replicated their process and make our Char-wood from our North American hardwood blocks! Carbonization is key to Char!
listen to our blog
Frankly, the term “charwood” may be a new one for you. Although its function is like charcoal, the benefits clearly outweigh those of charcoal. Let’s examine the key reasons why charwood may be the better option for outdoor cooking over standard charcoal.
Char-wood- Carbonization
Hopefully, if you’ve been engaging in outdoor grilling and/or smoking for some time. You’ve understood the need for a fuel material that burns evenly and hot. You’ve likely also heard the controversy that’s brewed for years about what is the best product to use for the fuel. Products range from briquets, lump hardwood charcoal, specialty wood charcoal, and compressed woods like pellets and compressed wood blocks. The key is to understand that some of these products could contain binding agents as well as accelerants to make for easy lighting.
Carbonization is the conversion of an organic matter into carbon. Carbon is an element that forms when the organic matter is heated to a high level without oxygen, burning off the volatile gases, leaving the pure carbon behind. Although commercial material production, whether briquet, hardwood charcoal, or standard charcoal have different percentages of carbonization in the outcome, most are above 90%. That high level of carbonization is what allows for heat to be produced for outdoor cooking.
Flavor
When you use straight charcoal briquets, you are getting heat only with no flavor as that is a fully carbonized or charred product. Many prefer to use briquets because they are uniform in size and give the same outcome every time they are used. Fill a chimney starter with briquets, and you’ll have the same number of briquets fit in the chimney every time.
When you use lump hardwood charcoal, you will get variation in sizing from small, chip-like pieces to half-log size pieces. Here’s information you need to know. Although the label may read “hardwood”, there is no information on where that hardwood derived from. Often, manufacturers of lump hardwood charcoal produce their product from recycled materials such as old pallets, lumber scraps from flooring, cabinet, and furniture makers. They may take in scraps from lumber mills. When this material is carbonized, it will do so at various levels due to the variation in material sizing.
That means when you cook with it or for that matter when you lite it, expect great variation from use to use due to all the inconsistency in sizing. The inconsistency will produce a lower percentage of carbonized material than briquets. So know you may get some minimal flavor from lump hardwood due to poorly carbonized larger pieces of product. This is the reason there is more ash production with lump hardwood charcoals.
Specialty charcoals, generally made in other countries, are a particularly hard substance, light in weight product, that can be a challenge to lite. Once they are ignited, however, they produce a lot of heat – often more than the standard briquet. Very little ash is produced and there is no flavor from this product.
Char-wood- Benefits
When SmokinLicious® made the decision to manufacture a charwood product, we researched extensively why the Japanese binchotan charcoal, also called white charcoal, was so popular and expensive. We found that though it could be a challenge to lite, it burned extremely hot, clean, leaving little to no ash, produced no smoke and no flavor. We produced a similar set up to the Japanese direct-fire method with our charwood production. Instead of using miniature branches, we use consistently sized wood blocks. Unlike the binchotan, we do not do a complete carbonization. The result is you get the ease of lighting like a lump hardwood charcoal, the flavor of premium hardwood. Plus, the reduced ash production of a briquet, and reduced smoke output than burning wood alone. We see this as the best of all the options out there.
Now, instead of viewing your charcoal as just a heat generator, when you use SmokinLicious® charwood you have one product that can be used as fuel for temperature while the reduced carbonized center portion produces the flavor. A premium product that gives premium results!
What is Japanese charcoal?
Binchotan charcoal is made from the Japanese direct fire method of making charcoal with a kiln that has been around for centuries. Japanese charcoal is very expensive and burns longer than lump hardwood charcoal!
Is charcoal made from wood?
Charcoal briquets and lump charcoal are made from recycled materials such as old pallets, lumber scraps from flooring, cabinet, and furniture makers. Some charcoal products may contain binding agents as well as accelerants to make for easy lighting.
Is wood better than charcoal?
Cooking wood can offer an ease of lighting and flavor to your foods while its fuel performance is more consistent than that of many carbonized charcoal products. Plus, wood produces less ash than lump charcoal or briquettes.
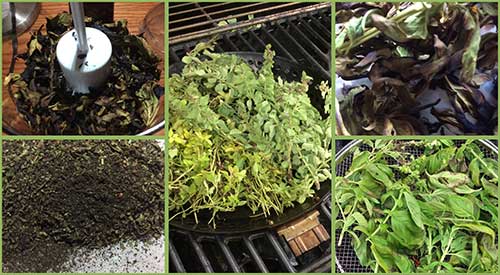
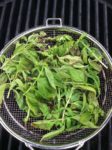
Our preparation of smoked herbs, from picking, smoking and grinding to make smoked herb dust. Adding great flavor to dishes.
SMOKED HERBS FLAVORS WITH SMOKED HERB DUST
Don’t make the mistake of thinking fresh herbs are to be used in dishes as, well, fresh only. Although you may have dried your fresh herb harvest before, we are bringing another alternative to you, smoked herbs.
We hot smoke the fresh herbs on the grill then turn them into a dust for use in all types of dishes. The smoking process will bring a depth of flavor that you’ve likely never experienced before. Go to the herb garden and pick your favorite varieties and let’s get making smoked herb dust!
Smoke Vapor Infusion
One thing about this smoked herb technique is you can do the smoke infusion by a variety of equipment methods.
For those with a gas grill, add wood chunks either directly to the heat shields on one side of the grill or add wood chunks to a metal smoker box that can be placed on the heat shields or the grill grate. For charcoal grill owners, light your charcoal and allow to reduce to hot coals only. Add a piece or two of hardwood chunks or a handful of hardwood chips to the hot coals. If possible, push the hot coals to one side of the grill. For both grill types, you want to use a two-zone cooking method so the herbs don’t catch fire.
For those that don’t own grilling equipment or who simply don’t want to bother lighting up the grill, you can use a handheld food smoker. Simply place micro wood chips in the bowl of the unit, place the herbs in a storage bag with the tubing of the smoker unit, cinch the end of the bag around the tubing, and light the chips. I like to leave the smoke in the bag for maximum smoke vapor infusion.
I used both my gas grill and charcoal grill for the smoke process by placing my herbs in a vegetable basket and grilling with the herbs on the unlit side of the grill. Within the first 5 minutes, you’ll see how the herbs lose moisture and begin the drying stage.
Tasting Notes: I find the handheld food smoker will produce the boldest smoke flavor to the herbs. The intensity of flavor rated from lightest to boldest based on equipment would be a gas grill, electric smoker, pellet smoker, charcoal grill, handheld food smoker.
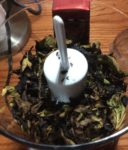
Grinding Process
Once the herbs have charred and dried, it’s time to remove them from the grill and bring them to the food processor. I have a mini processor that only has two settings: chop and grind. I prefer to use this appliance to bring the smoked herbs to dust level but a spice grinder works just as well.
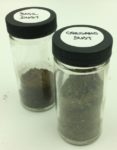
First, remove all the herb leaves from the stems and place a small quantity in the food processor bowl. You can remove the leaves by placing the entire herb sprig in a colander and pressing the leaves through to parchment paper. Secure the lid and grind until you get as fine a dust as the appliance will allow. Both the appliance and the herb will determine how fine the herb dust will get. As you will see, basil dust becomes finer than oregano. This technique will work for just about any herb you can grow or locate at the market. Store the herb dust in glass or metal jars for up to a year.
Tasting Notes:Smoked herbs are much stronger in flavor than the standard dried herb. Adjust the amount used in recipes as needed. It is often best to start with less, taste, and then add more as needed.
So Many Uses
Experimentation is key when it comes to #herbdust. Most often, herbs will be applied to meats and poultry, perhaps rice and pasta dishes, but there are so many more foods that are good pairings for herb dust. Let’s take parsley as an example. Commonly used with fish and beef, parsley is a great pairing for sweet items as well. This includes banana and cream. It’s important that you look beyond the traditional side dishes and entrees and explore the sweet side of what herbs can offer. By doing so, you’re sure to find endless combinations that will tickle your palate and give you more pleasing menu experiences.
The Culinary Crew wants you to know …
… that the two-zone method is certainly a practice that you will want to master and prioritize in your wood cooking toolkit, especially when grilling and smoking delicate fresh consumables like herbs. Not only will two-zone cooking avoid those acrid tastes associated with flare ups, it will infuse your food items with a nice balance of wood smoke flavoring.
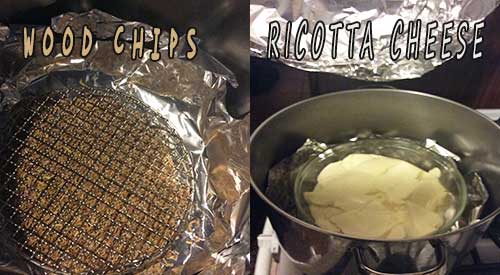
Smoked Ricotta Cheese – I know not everyone has a dedicated stove top smoker but I do know that we all have a large stock pot handy. I’m going to show you an easy way to convert that pot to a stove top smoker by using micro wood chips, aluminum foil, and a roasting rack. I’ll explain to you a combination hot/cold smoking method to bring a smoke flavor to whole milk ricotta, that will allow you to use this product in any recipe calling for traditional ricotta. Find your stock pot and roasting rack, and let’s get smoking!
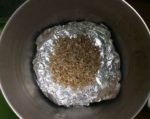
Once you’ve selected a stock pot to use for the smoking, the preparation of the pot is quite simple. Start by placing 2 sheets of heavy-duty aluminum foil in the bottom of the pot, allowing it to go up the sides slightly. Then select the micro wood chips of your choice – I’m using a Sugar Maple Minuto® wood chip in size #6 – and spread into a thin layer on the foiled bottom. Add a roasting rack. Mine is round to fit easily in my pot. I also like to line the lid of the pot in foil as all hardwood contains creosote which can cause some discoloration to the pot. The foil will protect this from happening and makes clean up a breeze.
Then place the prepared pot with the lid in place over a medium-high heat and allow the chips to heat until they are consistently producing smoke. This will take less than 15 minutes.
Once the chips have started to combust and produce smoke vapor, it will be time to add the ricotta. I am doing 3 pounds of whole milk ricotta as I plan to make a dessert pastry horn and then keep some spare smoked ricotta cheese for pasta recipes.
After 12-15 minutes of heating, lift the lid and place a heat safe container of the ricotta on the rack inside your smoking pot. Secure the lid in place and allow this to stay on the heat for about 5 minutes. Then shut the heat off and leave the pot with the ricotta inside untouched for about an hour. Let the smoke infusion occur with this cold smoke technique.
Tasting Notes: Any hardwood can be used for the smoke infusion but note that by retaining the pot lid in place, you are limiting the oxygen that can enter the pot. This produces a much bolder smoke infusion than is common with the same wood used on a traditional smoker or grill.
Smoked Ricotta Cheese- Smoky, Creamy Goodness
Here’s something to keep in mind with this stove top DIY smoking technique. I have a very tight seal on my pot which means it doesn’t take a lot of wood chip product to infuse a smoky flavor in the ricotta. Plus, the fat level of this dairy product attracts smoke vapor well as this is high in water content which smoke vapor is naturally attracted to.
If after about an hour, and after you’ve sampled the smoked ricotta, you still desire more smoke, simply turn the heat back on for about 10 minutes to stimulate the chips for additional combustion. Then repeat turning off the heat and allowing the ricotta to sit absorbing the smoke for the set amount of additional time you want. Once done, refrigerate the smoked ricotta until you are ready to use it, keeping this covered well. If any liquid accumulates while refrigerated, simply pour off before using the smoked ricotta in a recipe.
To get your recipe ideas stimulated, I’ll offer up my Smoked Ricotta Pastry Horn recipe which is super easy, fabulous looking, and can be made with an assortment of filling options. Keep watching our website for the announcement on this recipe release.
What’s your favorite food to stove top smoke? Leave us a comment to opine and subscribe to get all our postings on tips, techniques and recipes. Bringing innovation to wood fired cooking with recipes, techniques and the science behind the fire, smoke, and flavor. That’s SmokinLicious®.
The Culinary Crew wants you to know…
… that experimenting with “Do It Yourself” techniques can certainly apply to using your outside charcoal or LP gas grill as a quasi-smoker too! We’ve heard from many of our followers about deep dished aluminum food serving trays and even pie tins being used to offer a quick and easy try to food smoking.
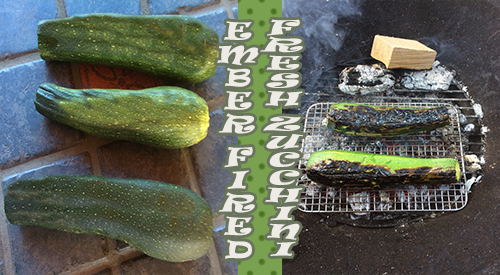
Zucchini is a great vegetable to not only grill but ember cook. It has the density to hold up over the high heat. Add a distinct char taste to this abundant vegetable either as a side dish or an ingredient by making ember fired fresh zucchini.
EMBER FIRED ZUCCHINI
How to cook your zucchini on hot coals.
I love thick-skinned vegetables that come in season during Summer. They are the perfect items to light a fire and make some hot coals to ember fire flavor into them.
We’re getting ready to coal roast one of my favorite vegetables – zucchini! This is so simple to do and produces an extraordinary flavor for zucchini to be eaten on its own or to be used in your favorite recipe. Clean out the fire pit, charcoal grill or outdoor fireplace and prepare to roast “ember fired fresh zucchini” directly on the hot coals.
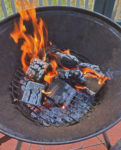
Building A Small Fire
Know this from the start – You do not need a large fire! A small fire is best to accomplish your cooking in about an hour’s time. For my fire, I am using ten SmokinLiciousSingle Filet Wood Chunks in Ash with a couple of pieces of charwood that were left over from a previous cook. Why Ash hardwood? Because it is hands down, the best hardwood to produce an even bed of coals which is what you want when you coal roast.
I stack the wood so there is quite a bit of air space between the pieces. This ensures I have good oxygen flow to produce combustion quickly. My technique is to stand the wood pieces on their end and make a circle. I try to have a couple of pieces in the center kind of tipped on to each other. Remember, you want to produce hot embers quickly so it only requires a little wood and a lot of oxygen to burn things down. I light my wood using a small butane torch. Leave the torch in place until I’m sure the wood has ignited. I keep the lid off my charcoal grill so I can push the combustion process through completion and get those ash covered, hot embers.
Red Means Hot
You will know when the coals or embers are ready for cooking when you have uniform coals and they are glowing red from the bottom and gray on top. I keep a couple of larger coals banked to the side to maintain heat and for reserved hot coals. Just in case I need to rake more to the cooking side. I like to nestle a high heat metal cooking rack on the hot coals and then place my whole zucchini on the rack. This allows for little ash to accumulate on the skin. Remember, those coals are very hot so the zucchini will take less than 20 minutes to tenderize and char.
Turn For Full Char
With the zucchini and coal rack in place, I give the embers about 8 minutes to char and cook the first side of the zucchini. After that time, I gently turn the zucchini so that each side gets an even char. Once the first 8 minutes are done, there will be less time needed for each of the other sides as the zucchini will hold heat. I’ve added one additional wood piece to my banked fire just to be sure I have enough heat in the coal area. I will not put the lid on the unit during the entire cooking process as this is open fire cooking. My total coal cooking time is approximately 16 minutes.
Perfection In Smoke & Char on Ember Fired Fresh Zucchini
After placing my ember fired fresh zucchini on hot coals for about 16 minutes total, turning several times to get an even char, this spectacular vegetable is ready for eating. You will see, there is very little coal bed left following this technique so remember, if you are cooking more than a couple of zucchini, you will need a larger coal bed.
For those of you thinking that the black, charred skin will be bitter and not appealing to eat, think again. Most of the char will rub right off but the flavor will be infused throughout the ember fired fresh zucchini. I’ve sliced mine about ¼-inch thick as I plan to make a galette of ricotta, garlic oil, and basil.
The Culinary Crew wants you to know…
… that ember roasting is ideal to boost up the bland, delicately flavored zucchini and will add a rich, wood-fired taste dimension to any dish featuring this exquisite summer squash. So, be prepared to enjoy a rich, char-smoked variation of your ratatouille, quesadillas, stuffed zucchini or soups from ember cooked zucchini!
Check in soon for our post on that recipe. Did you love this wood-fired technique? Leave a comment and subscribe as we continue to bring you new ideas, tips, techniques and recipes for all things wood-fired, smoked, and charred!
As we highlight another hardwood from our offerings, we need to start by pointing out that we are referring to Eastern Alder not the better known Western Alder or Red Alder of the west coast. Eastern Alder is part of the Birch family, with the scientific name of Alnus but the common names for the varieties found in the Western New York and Northwestern Pennsylvania regions of Eastern Alder (Smooth Alder), White Alder, Red Alder.
Alder is a relatively soft hardwood of medium density. It is most commonly used with fish but I think I need to stress here that really any cooking hardwood can be used with any food item at the discretion of the cook. Many factors play in to how a hardwood reveals itself during the cooking event: rub ingredients, brine ingredients, quality of the meat/poultry/fish, freshness of the food item, style of cooking (over the coals, in the coals, indirect heat, etc.) and most importantly, oxygen flow which feeds the combustion of the wood. Alder provides a neutral coloring to the outer skin of foods which is why it is a favorite for fish. Would this be a first choice for say a steak or other beef item? No, but I certainly like to use it for lots of other things like fruit, vegetables, cheese dishes, and of course, fish.
For cooking, you can expect Alder to perform as follows:
When you’re looking for something on the lighter menu of woods, keep Alder in mind, and explore its lighter heat level and versatility for the more delicate items of cooking.
listen to our blog regarding wood chips for smoking
SMOKY-GRILLED POTATO: OUR #1 CROP GETS A NEW FLAVOR TAKE-As the #1 crop in the world, available all year, potatoes are a favorite for a variety of reasons. Get the nutritional benefit of this abundant vegetable by adding flavor in a different way – cooking it over charcoal and hardwood!
Ingredients for Your Smoky-Grilled Potato Dish:
New red and white potatoes
3 tablespoons of oil (grape-seed, walnut, almond, vegetable, or canola)
I’m using small red and white potatoes. You’ll need a knife and cutting board, as I like to cut these small potatoes in half to allow for maximum wood fire flavoring. I’m going to use a vegetable grill pan but you can use any heat safe pan whether foil, glass, heat-safe ceramic, or cast iron. Cut each potato in half, and place in the grill pan.
Seasoning and Oil Bring Out the Best
Just 3 simple ingredients are needed before the pan is placed on the grill. Drizzle three tablespoons of oil over the halved potatoes, then add coarse salt and fresh pepper. The oil can be grapeseed, walnut, almond, vegetable, or canola, anything you have and prefer. Mix well to ensure each potato is coated, then let rest to allow the seasonings to penetrate before adding to the hot grill.
Charcoal Grill Set Up
Time to get the grill ready. I’ll be using a combination of charcoal and wood – charcoal as the fuel for heat and wood chunks and chips for flavor. Keeping my intake vents open on the kettle grill, I start a chimney full of charcoal. Just one chimney will be needed for the actual cooking. I lay a small line of unlit coals down both the right and left side of the charcoal grate to keep my temperature stable through the cook. I pour the hot coals in the middle then add two Sugar Maple wood chunks and a handful of Wild Cherry Grande Sapore® wood chips on top of the hot coals. On goes the food grate and then my vegetable pan of halved seasoned potatoes.
Once the wood is set up and the food grate is on, the pan of potatoes is added. Put the grill cover on and adjust the lid outtake vent to 1/3 open position. Now, adjust the lower intake vent to the ½ open position. Let the potatoes cook for about 25 minutes prior to stirring. You’ll see the golden hue from the maple and cherry smoke vapor. Be sure to rotate the potatoes on the bottom to the top so that there is even color and flavor to each piece. The total cook time will be close to an hour but each grill and charcoal will perform differently so be sure to watch closely after the first 35 minutes. Remove when the potatoes can be pierced easily with a toothpick or knife tip.
Smoky-Grilled Potato- Full Flavor With All the Nutrition Intact
With all the nutritional value still intake, these golden, smoky potatoes are ready to eat as is or you can include them in your favorite potato recipes. I’ll be giving a smoky edge to my interpretation of a potato curry in our next recipe feature. Take advantage of this popular comfort vegetable and the ease of using a charcoal/wood grill for cooking and give your meals a memorable flavor enhancement.
The Culinary Crew wants you to know…
… that potatoes are one of the easiest veggies to grill or smoke! A minimum amount of effort will yield maximum deliciousness. Go ahead and experiment with a variety of your favorite spices or ingredients when grilling or smoking your spuds. Cilantro, curry, garlic or onion powder and even a touch of cayenne pepper can add a taste zip to these great and hardy tubers. There are many varieties of potatoes and they all do well on a grill or in a smoker but, just remember- the fresher the better!
As always, we’d love to hear your thoughts on our feature so start the conversation with a comment!
When you ask why people grill we found the answer very interesting!
You may not be aware that every year a trade show is held usually in the month of March that is dedicated to all things related to fireplace, stove, heater, barbecue, and outdoor living appliances and accessories. In addition to the trade show, this organization, known as HPBA or Hearth, Patio & Barbecue Association, conducts various surveys every couple of years. A recent survey was posted asking the question “Why do people grill?”
The top answer to this survey surprised and THRILLED me!
Why People Grill? – Most Recent Statistics
For North America, owning a grill is common. Currently, in the United States, 7 of 10 adults own a grill while in Canada that number increases to 8 of 10. Gas grills remain the most popular (64%) with charcoal units coming in second (44%). When looking at the most popular times of the year to use the grill, holidays, of course, dominate. Memorial Day and 4th of July are the clear winners for firing up the grill but Father’s Day remains a high demand grilling day as well likely due to this holiday falling right before true summer begins on the North American calendar. Of course, Labor Day is not far behind on the list.
This survey will be conducted again in 2019 with updated numbers likely available by the close of the year. I can’t wait to view them to see current trends.
Now to the question of “Why do people grill?”
Why People Grill? – It’s All About Flavor
The number one reason people stated for grilling is for flavor! This got me thinking about this answer.
What exactly made the flavor difference? Is it that the heat of the grill produced changes in the ingredients used? Was it the charring affect from direct fire of the grill which leads to a distinct taste? Or was it the flavor choices used when grilling with wood like wood chips, wood chunks, and charcoal?
I think without adding these follow up questions, it’s very hard to know just what the flavor enhancer is when grilling for these respondents.
For me, there is no question that it is the introduction of smoke to my outdoor cooking experience. Whether I’m cooking on a gas grill that I’ve included a smoker box of wood chunks, a charcoal grill equipped with hardwood charcoal or charwood plus wood chunks, an electric grill I’ve incorporate a micro wood chip product, or my outdoor fireplace that I’ve converted to an open pit fire using hardwood, I let the tantalizing smoke vapor work with the other ingredients of my foods to bring out the best of all the blended flavors.
#charwood
Direct fire or indirect cooking, either way the eating experience of foods cooked grilled, smoked, or by embers is unique and is likely the reason why people from around the world continue to seek out these methods of cooking.
Smokinlicious Double filet smoking wood chunks
So I agree with the 72% of North Americans who say they grill for flavor but I’d certainly add that I grill for flavor that is heightened by the addition of the natural plant material known as hardwood which takes my grilling to an umami level that’s hard to beat by any other cooking method.
What is your reason for grilling? Let us know in the comments and don’t forget to follow us on all platforms. Providing tips, techniques, recipes, and the science behind the flame and fire to improve your skills with wood-fired cooking! That’s SmokinLicious®!
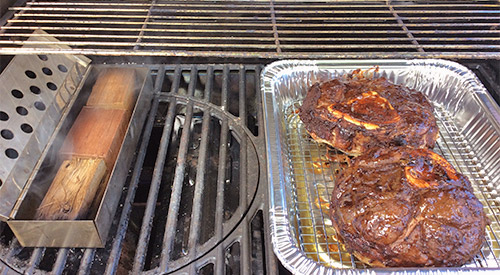
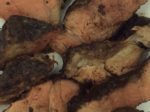
Grilling our Smoked Beef Shanks on the Gas grill with Double filet wood chunks in our smoker box!
OVER THE TOP GRILLED & SMOKED BEEF SHANKS
I’m going to make a confession. I rarely select steak to grill anymore. The reason – there are just too many other options that I simply prefer. Like beef riblets, short ribs, and shank. Oh, the bone-in shank! That is my favorite.
I’m going to give you a wet rub recipe and a grilling technique you can do on the grill of your choice, though I’ll be picking the easy gas grill. Get to the butcher and select some premium bone-in beef shanks then visit SmokinLicious® online for some wood chunks. Then get ready for the best grilled & smoked beef shanks you’ve ever had!
Smoked Beef Shanks- A Great Wet Rub
I tend to lean toward some Asian-inspired ingredients for my rubs, especially those that are a wet rub. While working on the rub, be sure you’ve started your grill so it will be ready to go when the meat is rubbed. Remember, we are using a two-zone set up for the grill so burners lit only on one side of the gas grill with the wood chunks placed on the heat shield or in a smoker box placed over the lit burners like I’ve done. Or, for the charcoal/wood grill, hot coals banked to one side of the grill.
For this wet rub, you’ll need equal parts of the following ingredients:
Ground ginger
Whole allspice – about 30
Garlic powder
Cinnamon
Cocoa powder
Sesame oil
Worcestershire sauce
Hoisin sauce
Honey
Start by combining the dry ingredients, followed by the wet and combine with mortar and pestle until a paste is made. Then coat the beef shanks on both sides and the edges with the wet rub. I line a disposable foil pan with a roasting rack, then place the shanks on the rack.
Tasting Notes: don’t be afraid to use a store-bought rub and simply add oil and/or garlic/spice pastes. There is nothing off limits when it comes to producing a rub.
Smoking
Time to open the pre-heated grill and start the cooking of the shanks. The wood chunks should be smoking well at this point so add the shank pan to the unlit side of the grill. Leave untouched for at least 40 minutes. Return to check the internal temperature. Flip the shanks and rotate the foil pan. Leave until the meat registers 140-145° F.
Tasting Notes: select the hardwood you like or use a combination of hardwoods like I did with my shanks – maple, hickory and white oak.
Smoked Beef Shanks- Serve ’em Up
When done, I simply slice against the grain for beautiful, flavorful beef that has a controlled infusion of smoke. Here’s a tip: be sure you enjoy the marrow in the bones! It is very rich so if you elect not to eat it when the meat is done, use it with onions and shallots to make a confit, or use it with a rich pasta dish to make the flavor of the richness even more stunning. Or, combine the marrow with an acidic dish like an arugula salad with lemon and capers. And don’t forget to save the bones to make our smoked beef broth. Two zone cooking makes it so easy to control the smoke infusion and produce perfection in any item grilled.
What’s your favorite beef cut to grill and smoke? Bringing innovation to wood-fired cooking with recipes, techniques and the science behind the fire, smoke, and flavor. That’s SmokinLicious®.
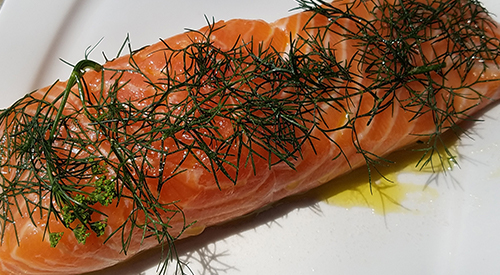
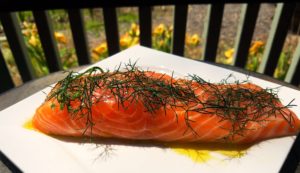
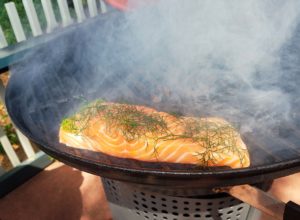
Our gorgeous filet of salmon is awaiting Chef Calle to turn it into Charwood Grilled Salmon on a kettle grill using a two-zone method along with Smokinlicious® wood chips!
Charwood Grilled Salmon Fillets for a Hint of Smoky Flavor
By: Chef Calle, Resident Executive Chef
Chef Calle here and thanks to SmokinLicious®, I’m going to offer an easy and palate-pleasing method to cook and lightly smoke fresh salmon fillets over a Charwood fire that features a small number of smoking chips. With this approach, the smoking chips infuse a delicate smoky flavor to the salmon without overpowering its delicious fresh taste.
Today, I’m using a Stok® Tourist™ grill, clearly one of the best Charwood grilling and smoking units on the market. If you don’t have a Stok®, just about any Charwood grill will work, if its heat chamber has room enough for both the Charwood and wood chips.
Charwood Grilled Salmon- Preparation
Preparation is key with salmon and setting up the cooking equipment. So, first prepare the fresh salmon fillets by lightly seasoning with EVOO, salt, pepper and if you have it- fresh dill or fennel. Let them sit and soak up all those great flavorful ingredients for about half an hour or until the salmon reaches room temperature. Chef’s Tip: Do not use salmon that is past its prime, thinking that the smoke will disguise the slightly off flavor of the fish. Only use the best salmon available.
While the fish is marinating, begin preparations for the actual grilling by first firing up SmokinLicious® all natural Charwood using a hollowed chimney starter. Never use charcoal lighter fluid! Or Charwood, charcoal briquettes, pretreated with petroleum-based starting fluid. In addition to ruining your salmon with a foul aftertaste, it’s safer not to consume the residue or remnants from petrochemical fire starter liquids.
After your embers have taken on a medium to high heat condition (grayish color), place them directly in the center of the grill’s heating chamber. Put the grill grate on over the fired embers and clean it by using either a halved onion or lemon like you would use a sponge but, do it quickly and in short strokes to avoid getting fingers or hands burned.
Smoking the Charwood Grilled Salmon
Next, position small amounts of the smoking chips (a few large handfuls, I’m using SmokinLicious® Grande Sapore) around the outer fringes of the main concentration of burning Charwood. This allows the wood chips to take on two roles- 1) indirectly contributing to the cooking process, and; 2) producing a burst of smoky vapor that flavors the fillets.
A minute or two after you’ve positioned the smoking wood chips and reattached the grate, place the salmon fillets, skin side down on the grate, directly over the medium embers and cover. Grill and smoke the salmon for about 4 to 6 minutes, uncover and gently turn the fillets over, cover and grill and smoke the skinless side for no longer than 2 to 4 minutes depending on the thickness of the fillets.
Chef’s Tip: Be careful not to overcook. You can gauge the finish of the fillets be being able to flake them with a fork.
When done, remove the skin by gently peeling away with a fork or just serve skin side down. For a nice finishing touch, brush with a bit more, high-quality EVOO, season with freshly ground salt and pepper to taste. Feel free to garnish with fresh dill, fennel edible flowers or lemon. Hope you enjoyed Chef Calle’s recipe Charwood Grilled Salmon Fillets for a Hint of Smoky Flavor!
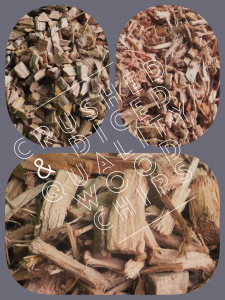
You see the options all the time. Crushed or diced tomatoes? Every chef knows when and why you choose one over the other. Did you know the same concept is true for wood chips?
At SmokinLicious®, the only true cooking wood Company, we produce our wood chips in the same manner as tomato processors! We crush the wood for our Grande Sapore® chips – these pieces produce a unique flavor because of their shape just like crushed tomatoes give a deeper flavor to recipes! These chips are meant to last and work with other ingredients for full flavor balance. We also offer our “diced” option of predetermined wood slices to produce our Minuto® and Piccolo® chips for smoldering on heat plates, cast iron, and flavor bars. Just as diced tomatoes give a fresh-from-the-garden taste, diced wood chips likewise produce a different, often more intense fresh wood flavoring.
SmokinLicious®only manufacturers cooking woods. Thatisour primary andonly business. We know hardwoods for cooking, all types of wood-fired methods. And we know wood flavoring – how to get the best clean flavors from the select hardwoods ideal for cooking!
See for yourself why we are a superior product with a superior outcome. Enjoy the benefits of the knowledge of our flavorists and get the options you are looking for. Made the SmokinLicious® way!
Dr. Smoke- there is a smoking difference between crushed or diced wood chips
Our Culinary Team wants you know…
… that the crushing and dicing method of our making of culinary wood chips is strikingly similar in concept to how grapes are processed in the phases of wine making? For example, the Ripasso method of Italian wine production starts out with crushed, partially dried grapes and proceeds on to fermentation with the leftover skins. Both Ripasso produced wine and our crushed or diced wood chips offer distinctive flavor, body and personality in a class of their own!
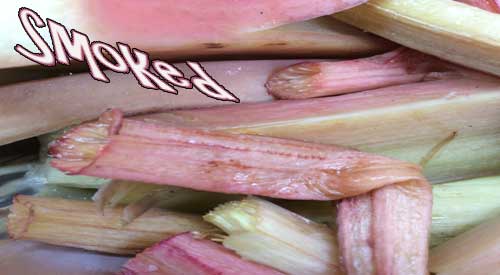
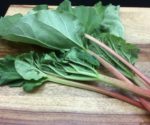
Rhubarb Smoked – I will make a confession: I don’t like rhubarb, a spring to early summer perennial vegetable, on its own, likely due to the very tart flavor. I do, however, enjoy this vegetable smoked and then blended with a sweet fruit.
This is likely why you may not have realized that rhubarb is a perennial vegetable since this is so widely used for dessert items. The rhubarb stalks are suitable to eat but the leaves are poisonous meaning they should never be eaten or added to a smoothie. Since this is a tart vegetable, I am going to first smoke it to change the balance of that tartness. Later, I plan to use these smoked stalks in combination with some smoked strawberry to make a strawberry-rhubarb fool, a delicious treat or dessert.
For now, let’s get about a pound of fresh rhubarb, hopefully from a garden or a fresh market, and meet at the smoker for an easy method of infusing wood flavoring to this tart stalk vegetable.
Smoked Rhubarb- Selecting and Preparing
#rhubarb
Rhubarb is a perennial vegetable that prefers cold conditions to thrive. When first planted, you won’t be able to harvest any of the stalks until the second year, similar to growing asparagus. When ready to harvest, you’re looking for stalks 12 to 18-inches in length with good girth to them. If the stalks are too thin, that means the plant does not have enough nutrients.
Here is a great guide on growing your own rhubarb for those that want to add to your garden production or simply like this vegetable: https://happydiyhome.com/growing-rhubarb/
Once harvested, clean well under water and pat dry. Trim all the leave ends from the stalks as these are poisonous, and discard. Note you can compost the leaves as the poisonous oxalic acid breaks down quickly when decomposition begins.
I prefer to cut my stalks into 3-4-inch lengths. That’s it! Likely one of the easiest vegetables to prepare for the smoker. Speaking of the smoker, time to prepare ours. I’ll be using an electric smoker today since smoking rhubarb takes very little time.
Tasting Notes: Whether to cut the stalks is dependent on what you plan to do with the rhubarb so adjust this step according to your planned recipe.
Smoked Rhubarb- Fire Up the Smoker!
The Electric Smoker for our Rhubarb (smoked) technique
I’ll be using a standard vertical electric smoker that uses lava rocks as the radiator of the heat as well as an electric element as the fuel/heat source. My electric smoker allows me to use wood chunks so I have an assortment of small sizes that total about 6 ounces of hardwood. The double filet wood chunk size is ideal and as a tip, if you note to SmokinLicious® the need for thin chunks, these can be provided.
My set up is simple: I wrap one of my grill grates in aluminum foil, place my element on the lava rocks and insert wood chunks between the element’s spaces. I’m using a combination of maple and cherry hardwood. I add my water pan with about 2-inches of hot water so energy from the unit isn’t wasted heating up the water. On goes my tray of pre-cut rhubarb that are spaced to allow the smoke to penetrate all around. Leave these untouched on the smoker for about 20-25 minutes or until the thickest stalks are fork tender.
The best part about rhubarb on the smoker is it takes very little effort. Trim, clean, and cut to size then place on the grate and smoke. In about 15 minutes time, you’ll see a golden hue come out of the rhubarb pieces. That means the smoke has penetrated its great flavor. Using a fork or the tip of a paring knife, I check the thickest stalk to be sure I can easily pass the metal tip thru. If so, then the rhubarb is tender and ready to come off the smoker.
Cut up Rhubarb pieces in the smoker
If your plans are to prepare this for rhubarb pie, then just continue with your favorite recipe. This step is simply to provide another flavor level and begin the cooking process. Check in with us soon as we release our version of the strawberry-rhubarb fool featuring this smoked rhubarb and smoked strawberry.
What’s your favorite method of cooking rhubarb? Leave us a comment to opine and subscribe to get all our postings on tips, techniques and recipes. Bringing innovation to wood fired cooking with recipes, techniques and the science behind the fire, smoke, and flavor. That’s SmokinLicious®.
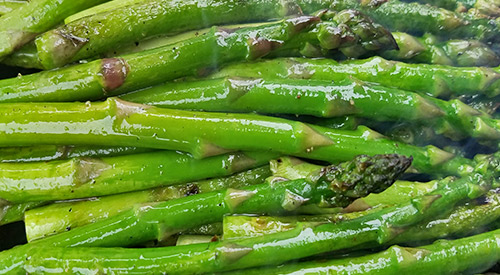
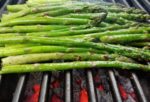
Our asparagus after seasoning and ready to become Charcoal grilled Asparagus!
Guest Blogger
By Chef C. V. Calle Guest Chef in Residence, SmokinLicious Kitchens
Nothing in the vegetable word represents late spring-early summer than fresh local asparagus but the window for fresh local asparagus is a short one. The growing season in our area (Western New York State) typically begins mid to late May and lasts until mid to late June all depending on the weather. Buying your asparagus at a Farmers Market or a Farm Stand provides the highest quality asparagus.
Luckily asparagus season corresponds to the beginning of outdoor grilling season and that is a good thing. If you have never prepared asparagus on the grill read this and you may never want to boil or steam asparagus again.
Fortunately for me, my good friends Terry and Donna Grant, owners of SmokinLicious® in Olean, New York provided me with their locally manufactured charwood product for grilling. Try it and you will never go back to charcoal briquettes again. SmokinLicious® all-natural charwood, adds flavor as well as the high heat needed for proper grilling. Remember, cooking with wood is not just a heat source because when you grill with high-quality wood products like SmokinLicious® you add substantial and delicious flavor to whatever is on the grill.
This is a simple recipe and takes just minutes to prepare.
Charcoal Grilled Asparagus- Ingredients:(serves 2 to 4 persons as a side dish)
1 pound local farmer’s market asparagus
high-quality extra virgin olive oil (EVOO)
salt & pepper
Procedure for Charcoal Grilled Asparagus:
Wash and break off the tough bottom two inches of each asparagus spear
Toss with EVOO and lightly sprinkle with salt and pepper to taste
Place asparagus on a hot grill top
Cook 3-10 minutes; depending on the size of the stems and until lightly charred on the outside but the stems remain firm and crisp (al dente). Tasting a spear or two while cooking will let you know when they are ready to eat
Remove from grill, add salt and pepper to taste and you are ready to go
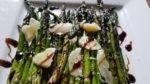
Optional plating technique: top with fresh Parmesan Reggiano cheese and drizzle with a high-quality balsamic glaze
The above recipe is suitable for anyone including vegans. If you are a meat eater, always grill your asparagus after you finish grilling your meat. While the beef, pork, lamb or chicken rests you can complete this process. Place asparagus spears on the grill where the meat was located, and the small amount of fat left on the grill top adds to the flavor of the natural wood. (This recipe can also be used on a gas grill with wood chunks placed on the heat shields).
JUST BECAUSE YOUR SMOKING FOOD (THAT IS!) DOESN’T MAKE IT ALL BAD!
listen to JUST BECAUSE YOUR SMOKING FOOD
Recently, I received a very interesting question regarding the safety of ingesting foods and beverages that have been exposed to smoke vapor using hand-held food smokers. Specifically, the question consisted of whether you need to be 18 years of age for items that have been infused with smoke using these gadgets.
#handheldsmoker
This got me thinking:
does the word “smoke” automatically give off the bad vibe response?
why do people only inquire about the smoke without needing to know more about the plant source that produces that smoke?
There is a lot of data out there on carcinogenic effect to high heat grilled foods like burgers, chicken, and steaks, even data on hot smoking foods at lower temperatures. Really, what it all boils down to is, if you grill meats to the point where you blacken them, that increases the risk for the carcinogens. Even if you cook to the blacken state, eating these foods in moderation will halt any real risk over an average person’s lifetime.
So why the question on legality to consume smoked foods and beverages?
You are not cooking the food by this method, merely infusing it with the smoke flavonoids, so there is no temperature (cold smoking technique). You are not exposing the food to smoke vapor for hours – it really comes down to minutes. Most importantly, you are not directly attempting to inhale the smoke vapor into your lungs. Yes, if your standing near the container that is holding the cold smoke when you open it, you will have some exposure but not like the person that takes a drag directly from a tobacco product or is chewing on a tobacco product!
Like anything else in our world, there are risks to everything we do, experience, sense, taste, explore, desire. Hot smoking is another name for roasting just at a lower temperature and usually with cheaper cuts of meat.
SmokinLicious® Double Filet wood chunks
What should never be compromised is the plant material – thewood – that is used to extract these flavors.
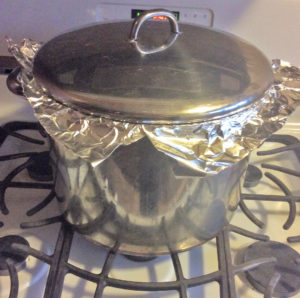
Stove top smoking techniques do not require fancy equipment, there are plenty of pots in your kitchen.
STOVE TOP SMOKING….
If you’re like me, over the years you’ve become a collector of various cooking gadgets and equipment to the point where you simply don’t have room for one more thing! Yet, you are enamored with the thought of doing stove top smoking & cooking when the weather isn’t cooperating or you simply prefer to be in the house rather than take food and gadgets outside.
Well, I have got just the solution for you!
Stove top smoking can be as easy as locating a deep pot with lid, metal steamer insert,aluminum foil and tools you likely already own.
Now when I say deep pot I’m talking about a lobster pot, large sauce pot, or even a Dutch oven. Anything that has capacity to hold a suitable number of food items on a steamer insert will do.
Once you have your pot and food item that you want to smoke follow these steps.
Place a second piece of foil or disposable foil pie plate on the chips followed by your steamer insert. (This will keep drippings from falling on the chips.)
Place the food items (chicken, fish, pork, beef, vegetables, fruit, etc.) on the steamer. Be careful not to crowd so the smoke can circulate around the food.
Depending on the extra room in your pot, if there is a lot of surface above the foods, go ahead and tent the steamer insert with foil so the smoke vapor has less area it needs to travel
Put the lid on the pot and seal the rim with foil to ensure none of the smoke vapor can escape
Turn the heat under the pot to high and allow to begin the smoking for 5-8 minutes
Reduce the heat to medium and cook small food items like chicken, fish, vegetables, or fruit for 10-15 minutes. Large food items like pork tenderloin, beef short ribs, etc. for 30-40 minutes.
Shut off the heat and allow the food to rest in the residual smoke vapor for 10 minutes
Remove the lid and foil tent if one was used
If you have done smaller cuts of poultry, fish, or meat, these may well be cooked through (175° F for dark meat 165° F for white meat). Otherwise, if cooking is still required, transfer the food to an oven safe dish or sheet pan and finish cooking in the oven.
There you have it!
A simple in-house, smoking technique using tools you likely already have in the kitchen! Just think, you stayed warm, dry, and comfortable in your own house while the Grande Sapore®, Minuto®, or Piccolo® Wood Chips did their wood-fired magic.
As always, we would love to see your take on the homemade stove top smoker so send along pictures.


 Know this from the start – You do not need a large fire! A small fire is best to accomplish your cooking in about an hour’s time. For my fire, I am using ten SmokinLicious
 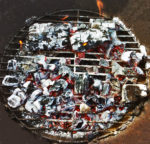 You will know when the coals or embers are ready for cooking when you have uniform coals and they are glowing red from the bottom and gray on top. I keep a couple of larger coals banked to the side to maintain heat and for reserved hot coals. Just in case I need to rake more to the cooking side. I like to nestle a high heat metal cooking rack on the hot coals and then place my
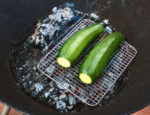 With the zucchini and coal rack in place, I give the embers about 8 minutes to char and cook the first side of the zucchini. After that time, I gently turn the zucchini so that each side gets an even char. Once the first 8 minutes are done, there will be less time needed for each of the other sides as the zucchini will hold heat. I’ve added one additional wood piece to my banked fire just to be sure I have enough heat in the coal area. I will not put the lid on the unit during the entire cooking process as this is open fire cooking. My total coal cooking time is approximately 16 minutes.
 After placing my ember fired fresh zucchini on hot coals for about 16 minutes total, turning several times to get an even char, this spectacular vegetable is ready for eating. You will see, there is very little coal bed left following this technique so remember, if you are cooking more than a


 I line a disposable foil pan with a roasting rack, then place the shanks on the rack.


 A simple in-house, smoking technique using tools you likely already have in the kitchen! Just think, you stayed warm, dry, and comfortable in your own house while the