As a billion-dollar business, selling grills is likely not going away any time soon. In fact, sales are gaining strength thanks to COVID-19 which forced many to find ways to keep cooking and eating interesting while forced to stay out of restaurants.
When asked, most people say they grill or barbeque for flavor. If that is the case, then why are some of the most common practices the ones causing the most variation in the taste of your grilled foods?
Here are the top 12 grilling mistakes you should avoid.
#1 Skipping Preheat of the Grill
It does not matter if you prefer to use a gas grill or a charcoal unit, you need to preheat the grill before adding food. Why? It is the only way to avoid having your foods stick to the grill grate. When you allow the metal to heat to a very hot level, the protein in meats cannot form a bond with the metal grate. Plan about 5 minutes preheat time for charcoal grills and 15 minutes for gas units.
#2 Cooking on an Unclean Grill
Yeah, I know. The grill is located outside so you think it does not need the same care and cleaning as your kitchen equipment indoors. Wrong! Leftover food particles, grease, smoke tar and creosote can build up on various parts of the grill and cause changes in food flavors as well as make the food stick. Plus, a grease trap that has never been emptied can ignite which will ruin your planned grill day! Get in the habit of scraping the grill grate after preheating and lightly scrub the cooled down grill including the lid area, with steel wool and water. The lid likes to hold on to carbonized grease which becomes flaky and falls off onto your foods if left in place.
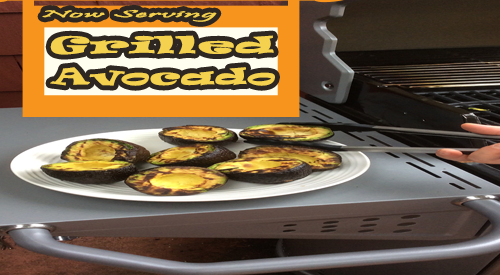
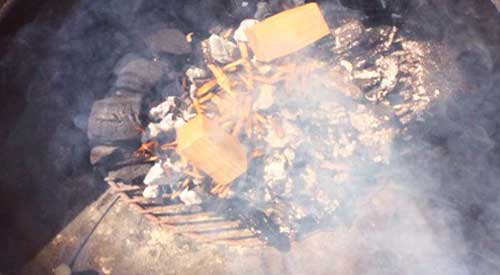
Wood grilled avocado is a fun way to add different flavor to this wonderful fruit.
WOOD FIRED GRILLED AVOCADO
Oh, the wonderful, healthy, creamy, flavorful avocado. With more potassium than a banana and 18 amino acids for daily intake, you can’t go wrong with this single seed fruit.
Did you ever think to grill this fabulous fruit with a little wood to give it even more flavor? We’ll show you just how easy grilled avocado can be on the gas grill using wood chunks for your smoke infusion.
Grilled Avocado with a Wood Fired Touch
Regardless of the brand of gas grill you have, you can add wood chunks to the grill for wood fired flavor. My grill has heat shields over the burners so I use that area to add one small wood chunk under the grill grate, directly on the heat shield. No, you won’t damage your grill, as the wood combusts to ash and basically blows away.
One chunk is all it will take to get great flavor into the avocados. I keep the burner that the wood chunk is located on set to medium as well as the burner next to that one on medium. Since I have 4 burners, 2 are on and 2 are off.
Once the grill is to 300° F, this technique will take less than 20 minutes.
Simple Preparation for Wood Fired Grilled Avocado
The only preparation needed for the avocados is to cut them in half and remove the seed. The avocados are placed flesh side down on the grate only on the side with the burners off. The heat captured within the grill will spread throughout the grilling area and cook the avocado while adding wood smoke vapor. Note, it’s important that you don’t attempt to move the avocados for at least 10 minutes otherwise you will find the avocado flesh will stick to the grate and you’ll lose much of the fruit’s flesh. Wait until some of the fat renders and chars making removal so simple.
Grilled Avocado- Prep To Finish In Less Than 20 Minutes
In less than 20 minutes you will have wonderfully wood flavored, charred flesh avocados ready for your favorite recipes. Think of using this fruit in smoothies, dips, on salads, as a creamy ingredient for sauces – remember, avocado can be used to substitute the amount of butter used in most recipes. We will take some of our avocado and make a wood fired guacamole first. Our recipe will post soon so stay tuned and don’t’ forget to send us your pics of wood fired avocado.
Did you get motivated to fire up the grill with wood? Send us a comment or your avocado fired pics and don’t forget to subscribe. Bringing you fun, innovative tips, techniques and recipes on all wood fired methods for foods, beverages, spices, herbs and so much more.
More Related reading on “What Wood for Smoking” and other great smoking and grilling tips and techniques
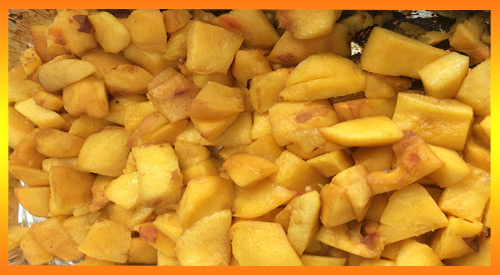
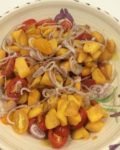
Our Grilled Peaches for the perfect salad addition with sweet onion, Tomatoes, and fresh herbs!
GRILLED PEACH SALAD- THE PERFECT SALAD!
Listen to our blog
If you’ve been a follower of our recipes and techniques for a while, then you’re aware of our preference to grill, smoke, coal cook, and ember fire in-season produce. Peaches are no exception and with our Grilled Peach Salad, get your taste buds ready for a real treat!
I’ve got my two quarts of fresh peaches and a plan to grill these on the charcoal grill using charwood coals. Then I’ll use my luscious smoked peaches in a salad that features two additional seasonal ingredients – tomato and shallots.
Get your chimney starter of charwood or charcoal and meet me at the grill for this quick technique and grilled peach salad recipe.
Whenever you use the charcoal grill, it’s always best to get it lit about 30 minutes ahead of cooking. I’m using a kettle-style grill made by Stôk that has a removable center grate for an assortment of inserts. I won’t be using any inserts for this cook as my peaches for the grilled peach salad recipe will stay in a disposable foil pan for easy cooking and removal.
Start by placing charcoal or charwood in a chimney starter. Place a Firestarter in the charcoal area of the grill and place the filled chimney starter over the starter. Lite the Firestarter and allow to remain in place until all the charwood has ignited and started to reduce to hot coals. While that’s burning, let’s prepare the peaches. Be sure you have a couple of wood chunks available to add to the coals when we are ready to grill. I like to use the single filet wood chunk size from SmokinLicious®.
Tasting Notes: there are differences in charcoal so be sure to use a natural charcoal or charwood product rather than briquets as briquets will produce more heat than you need.
Perfect Peach Bites
With our charcoal grill going, it’s time to start on the peaches. There are a few ways to remove the skin from peaches including placing them in hot water for a few minutes then removing and placing in a bowl of ice water. The skins will just peel off. I’m an old school so I use a sharp paring knife and just remove the skin.
Once the skin is removed, it’s time to cut the peach into bite-size pieces. You can easily cut around the pit and cut those slices into pieces. Place all the pieces in a foil pan in an even layer.
Tasting Notes: Try to purchase peaches that have some firmness to them if you don’t plan to grill them right away. The peaches should have no bruising and have a slight give when touched. Too soft and those peaches won’t hold their shape when exposed to the grill’s heat.
Smoking Process for the Perfect Grilled Peach Salad
With the peaches prepared, time to take them to the grill. Pour the chimney of hot coals into the grill’s charcoal area and add the wood chunks. Add the pan of prepared peaches and placed the lid on the grill. Be sure the outtake vent on the lid is ½ way open. The intake vent at the charcoal area should be ¼ way open. Now allow smoking for 15 minutes prior to checking. Remember, we want to add smoke without reducing the peaches to a puree.
Tasting Notes: Since peaches contain 89% water, they take in the smoke vapor extremely well. Keep that in mind when you select both the charcoal and wood. Remember, oak based charcoal tends to burn hot and has a stronger undertone to fruit.
Final Salad Prep- Grilled Peaches for the perfect salad addition!
While the peaches are absorbing all that great smoke flavor, return to the kitchen and prepare the remaining ingredients for our salad. You’ll need:
1 lb. tomatoes cut into 1/2’” pieces; or if using cherry or grape tomato, halved
3 tablespoons extra virgin olive oil, plus additional for final drizzle
2 tablespoons rice vinegar
½ teaspoon lemon zest
1 tablespoon lemon juice
1 shallot, sliced thin
fresh mint leaves torn
salt and pepper
I start by slicing my tomatoes in half, then add a teaspoon of salt to them while sitting in a colander so I can render some of the water. While the tomatoes sit, I start slicing the shallot into thin strips. At this point, you’ll want to check the peaches. They should be close to or ready to remove from the grill. I like to place them in the refrigerator for about 10 minutes to cool them down for the salad. While that’s happening, let’s prepare the vinaigrette.
I prefer to mix all the vinaigrette ingredients in a measuring cup so I can easily pour it to the salad right before serving, to keep the tomato and peach from getting too soggy. Start with the extra virgin olive oil and add the rice vinegar. Next, the lemon zest, lemon juice, salt, and fresh pepper. Whisk it all together and set aside while you combine the salad ingredients.
Tasting Notes: you can substitute cider vinegar for the rice vinegar and any color of tomato will do though I lean toward the reds and purples to give a color contrast from the orange peach.
Smoked peaches go into the serving bowl first, following by the tomatoes, and shallots. Pour the vinaigrette over the salad within an hour of serving and top with the torn mint leaves. A perfect balance of sweet, tart, smoky, and refreshing. An easy method and recipe you can have in 60 minutes. I love peaches so try our grilled peaches for the perfect salad addition for your next dish to pass! You will tantalize the guest taste buds!
Smokinlicious® Grande Sapore-larger smoker wood chips or woood nuggets are crushed to preserve the great moisture level to be released during the cooking process.
A MESSAGE FROM DR. SMOKE on WOOD NUGGETS:
I want to thank everyone for their feedback and comments regarding “One Size Does Not Fit Everything!” There are so many smokers/grills on the market today, and we’ve always felt that one wood chip size does not fit every piece of equipment! Is the description “wafer”, nuggets, or chip size?? Users of the various equipment always seem to be trying to fit either an oversized piece or an undersized into unit to make it work! Just like when a recipe calls for a Tablespoon, you don’t add a cup. It’s the same concept with wood smoke flavoring of food!
So, after much research and work in the test kitchen, we, at SmokinLicious® will be welcoming new equipment at our facility to manufacture a variety of wood chip sizes. Our packages will begin to distinguish the following new concepts:
Wood Species
Sizing of the product
Fines Fraction
Bark Particles
Wetness (moisture) level
Ash level
Although we have been providing this customization to our wholesale customers for some time, we feel the time is right to make this information available to our internet/home user customers!
The first scheduled product will be the “SmokinLicious® “Wood Nuggets.” This product will consist of wood pieces approximately 30-35 mm by 15 mm, a perfect size when you want to add something other than a “double filet” chunk to the process but need something more than a small chip in order to avoid flare ups over hot coals. The Wood Nugget will have plenty of substance to produce excellent smoke vapor, the most vital element for infusing wood smoke flavor in foods.
This will allow the backyard barbecuer the means to set up the fire with a base hardwood for smoking and add something at the end to match- just like what commercial smokehouses do! Use your base hickory and add cherry nuggets to provide some great red hue to the end product!
At SmokinLicious®, we are constantly refining products and techniques for food smoking, grilling, ember fire and oven cooking. We will have a classification of products anticipated to be completed by the end of this year. We will introduce this array of wood cooking and smoking products over the internet by Spring 2015! As always, we welcome your comments and feedback!
Bon Bar B Que,
Dr. Smoke- Our wood Nuggets offer the same superb Smokinlicious® flavor quality when your smoker or grill needs something bigger than chips but less that chunks.
For more reading on cooking and smoking wood, check out these article:
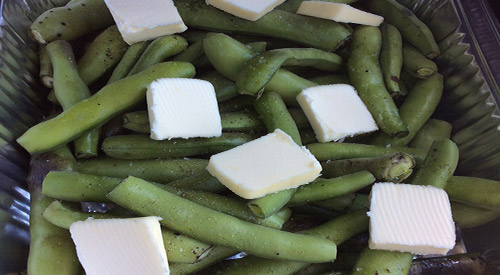
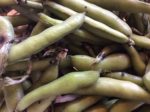
Fresh Fava Beans with Butter ready to become Grilled Fava Bean with a smoky flare!
ODE TO GRILLED FAVA BEANS
I love when the ideal weather comes around when at the same time there are so many options for fresh produce either at the Farmer’s Market or local grocery store. I tend to lean toward my grill and smoker for most of my cooking when the weather turns hot and steamy.
Beans are one of those vegetables that are spectacular on the grill but they get even better when you add a few wood chunks. I’ll show you how to prepare Fava Beans for the grill and give you my easy, fool-proof technique for incorporating wood chunks for flavor.
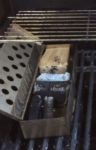
Before preparing the Fava beans, get the gas grill heated by turning on only half the grills’ burners which will be the side that radiates out the heat and holds the smoker box. For the smoker box, I’m using a stainless-steel model that has a hinged lid. I place 3 double filet wood chunks from SmokinLicious® in the box in a combination of woods. I’m using hickory, white oak and sugar maple to give me a great smoke balance to the beans. This will ensure I don’t overpower with the smoke vapor. By placing the smoker box with chunks on the grill grate as it preheats, it will be smoking by the time you have the beans ready.
Simple Bean Prep for Grilled Fava Beans
There is little to do with the Fava beans before they go on the grill. Wash them to start to make sure all the dirt and debris is removed. Pat dry with a paper towel and then move them to the cutting board. Remove any leaves and cut just the stem end to remove the stem. Place in a disposable foil pan, spread out evenly, and add roughly 6 tablespoons of butter to the beans, as well as salt and fresh ground pepper. That’s it. Leave the bean pods intact as they are going to act like a miniature steamer to cook the beans and ensure they don’t become over smoked.
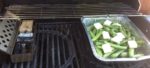
With the grill heated and the wood chunks smoking in the smoker box, place the pan of beans on the unlit side of the grill and close the cover. Check that your grill temperature steadies out at about 375°F. If lower, simply increase the heat setting on the active burners. Too high, decrease the heat setting. Leave the beans untouched for about 30 minutes. Return to the grill, stir the beans and check the wood chunks. If the chunks are still emitting smoke, close the grill lid and leave for an additional 10 minutes or so, or until fork tender. Remove the pan from the grill and allow to cool for about 10 minutes.
Grilled Fava Beans- Buttery, Smoky Finish
After the beans have cooled enough to be handled, take each pod and push the beans out one end into a bowl. You may keep the empty pods to use for making broth or for puree in a sauce or smoothie. These Fava beans are now ready for you to enjoy as is or use in your favorite recipe. Now, I’m taking my Fava beans and making a dip with goat cheese, lemon and tarragon.
This is one of the top questions heard when it comes to cooking with wood. Do you soak the wood chunks or chips before using on the grill or smoker?
I have a definite answer which is do not soak the wood before using in your equipment.
Let us examine why.
Wet or Dry Wood for Smoking?
Water Becomes Steam
Any time water is introduced to a preheated piece of equipment, whether it is an LP/gas grill, electric unit, or charcoal grill, it will affect the temperature of that equipment. For the LP/gas and electric units, this can be seen in the call for more gas or electric energy to keep the temperature at the preset level. For the charcoal unit, the water will reduce the heat of the coals and the fire will need to work harder to regain the energy to sustain the target temperature.
Wet Produces Off Flavor
There is an ideal moisture range for hardwood used for cooking, which includes grilling, smoking, direct coal and ember methods. You will hear the terms “seasoned” and “green”. “Green” wood refers to fresh cut wood which has not had an opportunity to dry out. The risks of using this type of wood is it will burn at variant rates, emit more sap, and has the potential to impart bitter and musty flavors. “Seasoned” woods refer to hardwoods that have dried out naturally. These will provide for more consistent temperature, provide cleaner flavors, and combust with less creosote build-up. Just be aware, you do not want firewood! If you Google seasoned wood, you will read that this is wood left to dry for 9-12 months or more. Do not leave your wood that long as it will not release any essence that produces the flavor.
Mold Potential
The wetter the wood the more potential there is for mold to develop. Mold needs 3 conditions: moist or damp locations to grow, a food source to survive, ideal temperatures usually from 32° to 120°F but love 70-90°F.
It is important that though you will use wood dry on any equipment (unless the equipment manufacturer specifically requests you soak the wood in water) that the wood not be completely dehydrated of all moisture. We recommend that you cook with wood that is approximately 20-25% moisture level. This is the main reason why at SmokinLicious®, we take the moisture reading on every order and provide that information to you. Here is a tip: if you see wood that is packaged in a plastic bag with no air holes, that is completely dry wood and will not provide any flavor or essence of the wood. It merely becomes a heat source
You’ve committed to a stay at home or in today’s lingo- stay-cation. Lists of games to play, tasks to complete, books to read, and movies and shows to see have been compiled. Now its time to give some thought to the food that will sustain you during this time.
Don’t compromise taste because your afraid to make too much work out of cooking. Using the grill is a super easy way to keep your foods and meals highly flavorful. Let’s give you some ideas that will provide options for everyone to feel satisfied and pleasantly full.
The Breakdown
I think the easiest way to view meal preparation when you focus on the grill as your primary method of cooking is to breakdown foods by categories.
Fruits:
This group of food can make some of the best grilled items. Already sweet in flavor, grilling them produces more vibrant flavor as the heat caramelizes the natural sugars and produces a char to the outside of the fruit. When selecting fruits for the grill, be sure they are ripe but not over-ripened to where they present as soft, or they will have tendency to break apart on the grill. Keep the pieces of fruit large when placing on the grill to maintain as much cell structure as possible. Brush the fruit pieces lightly with a high heat oil like coconut, avocado, or grape seed. The key is to leave the pieces untouched for at least 3 minutes before flipping to get great char and flavor infusion. Perfect fruits for the grill: banana, avocado, apple, mango, peach, papaya, pineapple, peach, pear, plum, grapes, cranberry, eggplant, kiwi, raspberry, blackberry, blueberry, tomato.
Vegetables:
You likely are already aware of popular vegetables to grill like corn on the cob, peppers, and onions, but there are so many more that pair perfectly with the grill. In fact, I would go as far as saying ANY vegetable is appropriate for the grill, you just need to control those that should be exposed to direct heat versus indirect. The easy method of determining heat level is the thicker the skin on the veggie, the more tolerant to direct heat. All vegetables can cook on the grill in less than 10 minutes so time really isn’t a factor. Always remember to avoid moving the vegetables on the grill until they have cooked for at least 3-4 minutes. For preparation to the vegetables, most require just quartering or slicing in half, with some going on whole like tomatoes and smaller mushrooms. Basting with high heat tolerant oils is also recommended.
Nuts and Seeds:
These are foods that react with a super boost in flavor when exposed to the heat of a grill and flavor of wood on the grill. Any seed or nut can be grilled by using a disposable foil pan or griddle pan designed for grilling. These items take about 15-20 minutes and should be stirred every 5-8 minutes to prevent scorching.
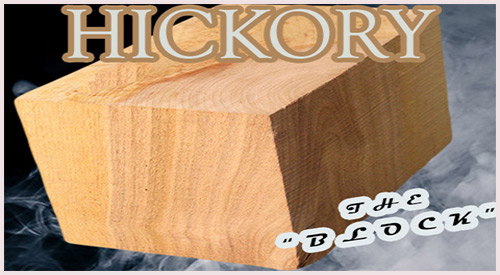
Our forest grown Hickory cooking wood blocks are center cut with NO BARK! Perfect sizing when you need a “chunky” piece of hardwood for smoking and wood-fired cooking!
HICKORY COOKING WOOD- WHAT A “NUTTY” CHOICE
Continuing our feature on specific hardwoods for the sole purpose of wood-fired cooking, let me introduce you to very popular choice, especially when it comes to hot smoking or pit roasting techniques and meats.
Hickory hardwood is part of the Juglandaceae family of wood better known as the Walnut family. The scientific names for the varieties we manufacture are Carya glabra (Mill.) sweet and Carya laciniosa (Michx.f.) but the common names for the varieties found in the Western New York and Northwestern Pennsylvania regions include Pignut Hickory, Sweet Pignut, Smoothbark Hickory, Kingnut.
Hickory cooking wood is most commonly used with animal proteins like beef (ribs, brisket), pork (shoulder, ribs), and game (elk, bison, moose, duck, deer). Its overall flavor profile is more significant with a moderate level of infusion. It often is described as having a bacon-like undertone. Because the overall infusion is on the stronger side, it works well when mixed with a lighter hardwood or fruit wood like ash, cherry, or maple to balance the use of Hickory with non-animal proteins.
The overall color that results from the smoke vapor of hickory cooking wood is on the brown or deep side.
Oh, and the answer is no, you don’t need to be concerned with the use of hickory cooking wood for those with a nut allergy. The trigger for an allergic reaction is contained within the nut themselves rather than the tree and occurs when the nut is cracked. So enjoy this giant of the forest and Bon-Bar-B-Q!
This is the year! You made a promise to yourself, family and friends that this outdoor cooking season, you were going to bring more flavor to meals cooked on the grill by incorporating smoking wood and grilling wood. All you need to know is, what are the options for setting up the grill for this type of cooking without purchasing a smoker?
We have the answer and lots of options to utilize your existing equipment!
LP/Gas Grills of All Types
There is a great deal of variation in LP/Gas Grilling equipment in terms of grilling surface space, the number of burners, BTU rating, etc. Know up front, that this will play into how frequently you need to replenish grilling or smoking wood or even to monitor the foods being smoked on the grill. Essentially, these tips will work on any brand/model that you may own.
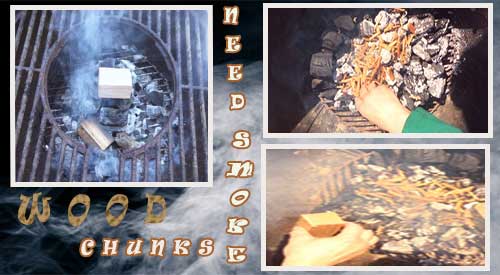
How To Add Wood Chunks on Gas Grill
Heat diffusers are commonly found on newer models of grills. They are made of high heat tolerant metal and cover the actual burners of the unit. Their purpose is to ensure even heat distribution throughout the grill so both radiant and conductive heat is maximized.
Wood Chunks On The Diffusers
If you have a grill model that has heat diffusers (remember, they may go by other names like flavorizer bars, flame tamers, heat plates, burner shields, and heat distributors) then you’re ready to use smoking wood chunks on your unit! Yes, I said smoking chunks. This is by far the easiest method of getting the true smoke flavor to the foods being cooked. Plus, you can set up an indirect method of cooking using smoking chunks.
You will need 3-4 wood chunks sized to fit over your heat diffusers and under the grill grate when setting in place. A 2x2x3-inch size fits most units and these should have some measurable moisture level; at least 20% moisture is ideal meaning you won’t need to presoak the wood. If you have an old grill model before heat diffusers were standard, you can still use smoking wood chunks by placing them in a smoker box. These boxes will generally fit 3-4 chunks of the size referenced above but be sure to use a good quality box. My preference is cast iron. Insert the chunks into the smoker box and leave the lid off!
You smell it before you see it! The aroma of foods being cooked outdoors. When those foods involve cooking over wood – hardwood to be specific – well, it’s a flavor experience that is in a league of its own.
Today, instead of concentrating on the cooking technique of wood-fires, let’s examine the smoke vapor.
Does BBQ smoke color mean anything for flavor outcome?
The quick answer: absolutely! Let’s take a closer look at the finer points of smoke vapor colors.
We’ve all been there! You purposely made a list of all the things you would need for the weekend BBQ. Carefully selected the meat, cleaned the grill or smoker the weekend before, and purchased the wood chips to impart that great flavoring you can only get from hardwood! You marinated the meat 24 hours ahead and woke up on grill day full of excitement.
Let’s be honest. When you bought that charcoal grill you were likely thinking that you could both grill and smoke without needing to add anything. Soon, you realized, that just wasn’t the case. Now, you’re contemplating whether you need to purchase a smoker. Well, hold on the shopping trip until you read this. We can help you turn your charcoal grill into a smoker!
You can turn your charcoal grill into a smoker with these simple steps!
Is it fresh, is always a question that comes from new smokehouse products wood chips customers only! Our old customers know that at Smokinlicious® we are cutting products daily and measuring moisture to produce the best smoking wood in the world!
I always find it interesting when we receive a new inquiry about providing specialty products for commercial-grade smokehouses. I’m speaking specifically to the large commercial-grade smokehouse. The type that utilize walk-in, wall smokehouse units that can turn out hundreds of pounds of product each cycle.
First, there’s always the question if we can duplicate the current wood chip product. That’s where the education begins.
The questions are quite frequent: “Since (the equipment) uses lump charcoal, do you need to add wood for smoke flavor?” “Do wood chips or chunks work best if they are needed or desired?” “Generally, how much lump charcoal does equipment use for 10 hours of smoke?”