Our team developing traditional family recipes for the “Passing it on” series
If you have been a follower of our blog, you’re likely aware that we often feature a Guest Blogger. It’s great to get other ideas on outdoor cooking, recipes, and tips on anything to do with cooking and the outdoors. Many of our blogs offer a sharing of cooking styles and cherished traditional family recipes.
Recently, I had the opportunity to become another platform’s guest blogger. Or rather, guest cook!
Hello South Africa!
In 2019, we had the good fortune to begin offering our wood chip products in South Africa. This would not have been possible if it wasn’t for the help of some great South Africans. Who could have known that a pandemic would strike in 2020 and force a change in our business plan.
But here’s something great that came out of this! SmokinLicious® had the honor of meeting Clinton Phillay. Clinton has a passion for ensuring that traditional family recipes get passed on to others in order to keep the spirit of family cooking alive.
What a great goal and a needed purpose. SmokinLicious® was happy and honored to participate. Plus, the timing was perfect. SmokinLicious® is about to release our new YouTube channels featuring our step-by-step recipes as well as a channel just for business customers.
While you wait to see the first episode featuring our Smoked Dry Rubbed Chicken Drumsticks, check out the Passing It On channel: https://www.youtube.com/c/PassingItOn
This is a recipe source you’ll want to subscribe to and hit the notify button so you can begin a great collection of traditional family recipes.
Coming soon their TikTok account will feature these same recipes. Watch for it soon and subscribe!
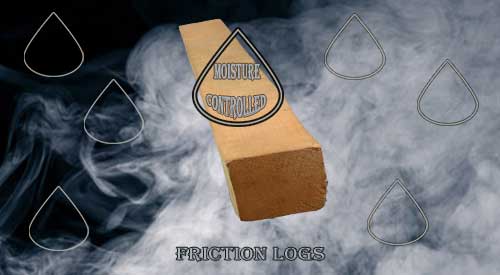
The Smokinlicious® friction log is not only cut to the correct sizing, we also customize the moisture level for optimal smoke generation.
You started your food process by ensuring you were unique in the market. You tested and retested ingredients and procedures for the perfect smoking program. Did you think of everything? What about the wood you use with your friction logs?
Friction Logs- How to Create Balance with Moisture and Wood
Do you know hardwood needs moisture to smolder and produce smoke aerosol? Why? First, friction logs are designed to produce a pre-stage to combustion. That means, no flames or fire. Secondly, this stage occurs at a lower temperature. That means less of the bad components of wood are introduced. Finally, reach the ideal moisture level and you are guaranteed a better product. Clean flavours, perfect colour and great aroma. Our logs bring that to you!
Why Things Go Wrong
Moisture in wood is critical. If you use a wood that is too wet, acrid flavours will form. Wood that is too dry gives no or limited flavour to foods. In short, that’s the reason why dialing in moisture for your friction logs is essential.
Isn’t it time you dial in the moisture level of your friction logs for flavour that makes your foods an experience for the customer?
We know what it takes to gain the perfect essence from the wood. Learn why SmokinLicious® is the perfect partner for your food process and explore the world of hardwood as an ingredient!
Smoking and wood-fired cooking are a passion for many. You invested in a quality piece of equipment. Shopped for the best ingredients. Dedicated time to watching videos and reading articles on smoking. Sourced hardwood that claims to be for smoking. But do you know for sure?
So Many Terms
Food labeling over the years has become complicated. That seems to have passed on to hardwoods for smoking and cooking as well. Package labeling for wood is not usually accurate. In fact, it implies certain information.
Case in point, many suppliers now use the term 100% natural. But what does that mean? Natural used for food labeling means there are no artificial ingredients or preservatives and there has been minimal processing. Certainly, a supplier that sources wood from orchards uses the “natural” term but you have no assurance the tree has not been genetically modified. Translation – chemicals have been added.
Move on to the various drying processes and even more confusion occurs.
Kiln-dried, air-dried, and naturally cured are all common labeling for wood. But that’s as far it may go. No one references how long that process is, or at what temperature the drying occurs, or even where this process happens (i.e. open yard, shed, etc.).
True Forest Hardwood for Smoking
When you see forest grown on the package you assume the wood comes from a natural growing area. Even if there is a reference to a drying process, be sure the wood does not appear cracked and light in weight. If too much moisture is taken from the wood, you’ll end up with seasoned firewood and not a hardwood for smoking. Remember, moisture is needed to produce a clean smoke. No moisture means no flavor from the wood.
Be sure the label states 100% of the hardwood named on the package. If not, you may be using a combination of hardwood AND softwood! You have to make the decision on whether you want to use bark-on or bark-free wood. Off-flavors can develop with bark.
In the end, by reading wood labels in detail like you do with food labels, can guarantee you a better choice. After all, some of the best flavors come from those items direct from the land around us.
It is obvious that a return to a “normal” work environment is not likely soon. You may be one of the blessed who has decided you do not want to return to an office but rather continue the joys and challenges of working, educating, entertainment and sleeping from home.
To manage all these needs, meal planning needs to be addressed to allow for more family time. Rather than discuss animal proteins as we have previously done, the focus will be on other food categories that provide for endless options at mealtime.
Time to bring in our top 10 foods to get on the grill or smoker for fabulous flavor to your meals!
Foods to Bulk Grill
#1 Peppers
Do not purchase fire roasted peppers in the store! They are so easy to make using any type of grill you own and any pepper you prefer. By grilling in bulk, these can be added to meals like grilled sausage topped with peppers and onions, whipped into a fire roasted pepper tapenade for snacks or appetizers, bring an elevation to a salad, or as an addition to Dutch oven meals (think chili, goulash, mac and cheese).
Introducing to you Peggy Hatfield, the Bella Cupcake Couture’s resident dessert couturier, and baker. Peggy became passionate about baking when she was 9 years old. She served freshly- baked treats in her small town in Alabama for 28 years before her home bakery and café was closed. But with the Bella Cupcake Couture website, she was able to share her expert reviews on the best baking tools, equipment, accessories, and the latest trends, including the know-how of baking. Bella Cupcake Couture is pleased to present to you the expert baker’s how-to guides, expert tips, and hacks for baking and dessert making.
While there are other techniques in cooking, baking is considered one of the most critical types. Baking requires precision and dedication to the entire process. If you forgot one or add too many ingredients, you can ruin the entire dish. Also, cooking a baked item for longer than the required time will also result in a big problem. That is why, in baking, you need to have lots of patience to succeed with your product.
Bundt Cake- Making A Cake
At some point, people tend to become excited when removing a just baked cake, forgetting to be more careful after the baking process is complete. The last part of the baking, which is removing your cake from the pan, requires the same level of care as was used in mixing the batter. This article provides the key tips in keeping a bundt cake from sticking to your pan.
Bundt Cake- Prevent from Sticking
The more careful you are in the cooking part, the more cautious you need to be removing your cake from the pan. It is frustrating when you spend your time, effort, and money , then all of a sudden, your cake decides to remain stuck in your pan, ruining your efforts.
Hey! Don’t worry because here are the effective ways to prevent your bundt cake from sticking.
Bundt Cake- Use a Simple and Nonstick Heavy Bundt Cake Pan
This step is one of the highly recommended ways on how you can prevent a cake from sticking. If you are wondering about its efficiency, you can look for reviews online to have an idea on the brand of bundt cake pan with the best value and rating for your purchase.
To maintain the pan’s efficiency, you should put extra care into cleaning it. Avoid using strong dish washing liquid and abrasive sponges because these can cause damage to the pan’s coating. The most efficient way to take care of your nonstick pan is to wash with mild soap, dry it with a soft towel, and avoid using any metal cooking tools or abrasive brushes.
Bundt Cake- Use Grease
Take note that using just any grease can also affect the quality of your nonstick pan. Nonstick cooking sprays contain chemicals that can degrade your pan’s nonstick coating. Butter may affect the quality of your cake due to the milk properties which can bind your cake to the pan. One of the highly recommended types of grease that proves best for baking is melted shortening.
Bundt Cake- Loosen the Edges
You cannot and should not forcefully remove your cake from a pan. You need to slowly and carefully loosen the edges and let the cake sit for 5 minutes before turning it upside down on a cooling rack. The use of a plastic spatula is a must to avoid scratching your nonstick pan and cutting into your cake.
Bundt Cake- Get Your Cake Upside Down
Once the pan is upside down on a cooling rack, let it sit for another five minutes before lifting from the cake completely.
Final Notes
Removing the cake from your baking pan is critical to the final result. Following our simple steps above will ensure a perfect bundt cake. Making the investment in high-quality baking equipment adds insurance for the best product results. If it happens that your cake still sticks in your pan, don’t give up! Try and try again until you flawlessly achieve the perfection of your cake.
More Related reading on baking in a smoker bundt cake and more!
Our tips can help with your spring season for grilling plans!
SPRING SEASON FOR GRILLING!
Spring is finally here and that means it’s time to prep the grill for your Spring Season for Grilling! Yup, the winter blahs are gone and it’s time to fire up the grill, BBQ, the Barbie, the Brac, or whatever suitable name you use to call your equipment on your specific continent.
No, there is no way around it! First, comes the dreaded cleaning of your unit. Whether it’s less than $30 or over $3,000, all equipment needs some cleaning attention once in a while. What better time than Spring to roll up your sleeves and get everything ready.
Remember, a grill or smoker is an oven that has been seasoned over time with all that cooking so a little soap and water is generally all that is needed to do a nice cleanup. You simply want to clean the unit of dirt and dust, so gently clean being careful not to rub out the “seasoning” of the unit!
Of course, there are those times when you failed to provide suitable attention to your equipment and a bunch of soot, grease, and all kinds of other nasty things developed on the equipment. When you’re faced with that situation, then consideration has to be made to a good degreaser or oven cleaner! Once the unit has been put back into good clean order, get ready to season it again. That’s right, all the harder cleaning agent to the seasoning right out of the unit. Actually, this the perfect time to use all the leftover charcoal, wood chunks/chips from last year! Start a fire and let burn/smoke in the unit to “season”. You’re not cooking now so there is no need to worry about moisture levels, water pans, etc. – just generate the smoke and heat, and re-season your unit. Don’t forget to add a little oil (vegetable, coconut, whatever handles higher heat levels) to the grilling grates to get them all ready.
Own an LP/gas grill? You can do the same process by taking a chunk and lighting it on the grill, or take a disposable foil pan or tin foil and put some wood chips in. Then lite with a match or lighter (not with the unit’s burners), close the lid and capture the smoke/heat!
Now you’re ready for new SmokinLicious® culinary quality wood products and what will promise to be a great Spring Season for Grilling!
Bon-Bar-B-Q!
Dr. Smoke has tips for your Spring Season for Grilling plans.
Poor Tom! He, like many other grill and smoker enthusiasts out there, never learned the value of a water pan. By providing moisture to the grilling area, you can avoid drying out your meats and poultry and never have someone mistake your food for a rock!
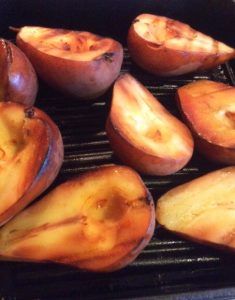
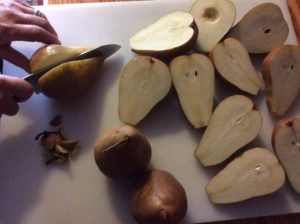
Pears, pears, everywhere! Why not try your hand with this easy method for smoked pears Depending on where you’re located, you’ll have at least a few varieties of pears to select from. Rather than just enjoy these as a raw fruit, try something truly unique that will give them a kiss of wood flavoring?
Stovetop smoking is so easy and a great way to still enjoy wood-fired flavorings during the winter months, when you may not want to venture out to the grill or smoker. I’ll be highlighting Bosc pears in today’s technique. To do this technique you will need:
Fresh pears – 4 will likely fill the smoker pan one time
A Chef’s knife, paring knife, and cutting board
A cooling rack
Pears cut in half
PREPARING THE SMOKED PEARS
When I purchased my Bosc pears, I made sure that they were firm to the touch so that I would have some longevity to their use in recipes for a while. Carefully, wash each pear and then pat dry with a paper towel. I then slice each pear in half, removing the stem tip. This will give me a flat surface to smoke and cook my pears since I am using a stovetop grill pan with my process. That will allow me to form some great grill marks on the pears while they cook. The benefit to using halves of pear is I can feature larger pear cuts in a salad or dessert, highlighting the golden smoked color.
Once the pears are halved and the stems removed, I will core out the seeds and hard seed membrane with a small paring knife. Once that step is complete, I start the heat under my stovetop smoking pan.
Let me tell you a story about my neighbor, Tom, we can all relate to.
A few years ago, Tom, a semi-trained Chef, wanted to smoke some food. So like all newbies, Tom went off to a box store, picked out a smoker ( offset), loaded a big bag of charcoal, a big plastic bag of wood chunks; next stop was at the butcher for three racks of ribs! Arriving at home he assembled the smoker, filled up the firebox with charcoal and wood, put on the rack of ribs and cooked them for hours. Finally, before dusk, he presented his charred masterpiece to the family!
Oh, he claimed to love the over-smoked taste! Politely and begrudgingly, the family told him how good the ribs tasted! Well, the smoker never was used again, went to the garage sale, the massive amount of wood went to the campfire, the charcoal lasted the summer for the kettle grill! The moral here is “wait to take on the rib”! Dr. Smoke doesn’t want this to happen to you! So, here are some suggested tips to follow!
First, go purchase the smoker/grill of your choice; next purchase a bag of quality hardwood charcoal; go home and assemble the unit. Then take some vegetable/olive oil and coat the grill! This is what is called seasoning.
Burn #1: start a charcoal fire in the unit or firebox and let it bring the unit up to temperature (250 degrees F)- do not put any food in the unit! Then let it cool down overnight!
Burn #2: start a charcoal fire in the unit or firebox, bring to around 200 to 225 degrees F. then put on some pork or beef hot dogs in the unit, then time the cook, sample the dogs for flavor, watch for hot spots and learn how to smoke- this is not charring. Learn the smoking process in your unit!
Burn #3: start a charcoal fire in the unit or firebox, bring to around 200-225 degrees F, then put on some chicken legs or thighs. No chicken breast-you need something with a bone. Time the cooking and taste the product!
Now order a SMALL number of wood chunks or chips from SmokinLicious®.
Burn #4: do the same as burn #3 only reduce the amount of charcoal and add SmokinLicious® chunks/chips to produce the smoke. Again time the cook, taste the results. Chicken is like a sponge it will absorb a lot of smoke so be careful when adding the quantity of wood.
We have all been in Tom’s position. We love grilling and smoking but prefer the warmer weather. For those of us in 4 season climates with below zero temperatures in winter and lots of snow, it seems too hard to continuing grilling! But just as Bert remarks, you do not have to give up cooking outdoors just because of the weather.
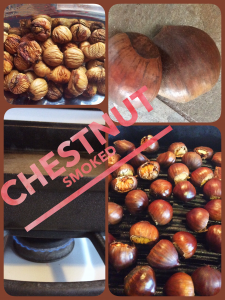
Collage of Smoked Chestnuts go on a Stovetop Smoker
SMOKED CHESTNUTS ON A STOVETOP SMOKER!
Depending on where your located, chestnuts may only be available for a short period each year, usually around the holidays. Mostly pan roasted in the oven, why not do something unique with this prized fruit and smoke them! In addition to the chestnuts, you’ll need a stovetop smoker, purchased or you can make your own with tools likely in your kitchen. You can see our writing on the “The Kitchen Find” which will guide you on what is needed.
about 2 hours of time. Be sure you also have a hood vent where you will be using the stovetop smoker in order to maintain a smoke-free kitchen.
You will find chestnuts available prepackaged or in bulk when in season. Although the packaged product will include a directive to cut an X in the flat surface of each nut, I grew up in a household where we always cut off the stem side. This is the small, dark cap side to the chestnut. The chestnut has a cap and a pointed end giving it a bloated teardrop look. I have found that when smoking, I get better control of the smoke infusion with a fresh cut to one end. Keep in mind, not all the chestnuts purchased will likely be viable as often mold will take hold of some of the chestnuts which you won’t see until you cut into them. As the chestnuts age, they can develop a fuzzy mold on the outside which will tell you not to waste your time cutting that one open! Simply discard!
Generally, chestnuts have a flat side and a rounded side.
To prepare them:
lay the chestnut on the cutting board with the flat side down. Place your knife blade over the small dark cap, and slice off in one motion. This will reveal the chestnut meat inside which will have a yellow-white hue. Once the cap is off, you’ll be able to tell if any mold has set in as it will have a marked gray/black appearance. If any mold is noted, discard the chestnut as it won’t cook tender. If the majority is free of mold, go ahead and keep it for the smoking/cooking process.
To do stovetop smoking, there are 4 parts needed:
a pan to hold the heat and wood chips
a drip pan to prevent rendered fat and juices from entering the wood. Generally, you only need the drip pan when you actually have a food item that will produce juices or fat drippings.
a grill pan
a lid.
Note: Smoked chestnuts will not produce any drippings though they do have a percentage of water that will be released as steam into the lid of the pan. Just be sure when you open the lid that you keep any collected water from dripping back into the cooking grate.
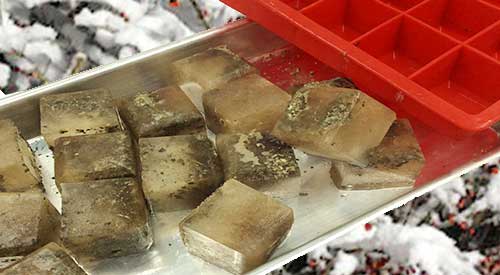
Our Fresh Herbs smoked and Iced ready to bring great flavors to our winter soups!
HERBS SMOKED AND ICED MAKE THE PERFECT WINTER FLAVOR CUBE
#smokinlicious
Here’s the perfect way to keep great flavors on hand for when you need them. I’m going to show you how to make smoked herb flavor cubes which consist of our previously smoked fresh herbs and, in my case, bone broth. Whether you smoke all the components of these flavorful cubes or not is up to you. I happen to like the combination of smoked bone broth and smoked herbs for some of my soups, sauces, and glazes. These are the perfect little flavor gems for all your recipes and the prefrozen cubes make adding so simple.
Herbs Smoked & Iced- Tools
#flavorcubes
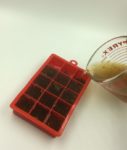
Here is all you need to make these flavorful cubes . Silicone ice cube trays, your choice of herbs and spices, as well as broth or stock. It will take about one quart of broth to make 40 flavor cubes.
To make portioning the cubes a snap, I use a measuring cup for the liquid. As I previously smoked my herbs and placed them in spice jars, I can portion out the herbs directly from the jars. Today, I’m using smoked parsley and oregano dust for infused broth cubes. These are two of my more popular blends for sauces, soups, and extra flavor to vegetables. Be sure your broth or stock is well strained before adding to the cube trays.
Tasting Notes: Don’t forget about fruits as well. These make perfect flavor cubes and can be cold smoked using a handheld food smoker .
Herbs Smoked & Iced- 1-2-3 And Done!
The best part of making flavor cubes is the freezer does most of the work. I simply place previously smoked herbs of my choice into the bottom of the silicone tray compartments and pour in the broth. I like to put my cube trays on mini sheet pans for easy placement and removal from the freezer. Just be sure to label the trays so when you go to un-mold, everything will be easy to identify. That’s it! How easy is that??
Tasting Notes:You do not have to use silicone cube trays but I prefer these to metal or plastic. I find they don’t taint the flavor of the cubes and they are extremely easy to release.
A New Umami
#smokedherbs
After adding smoked herbs to silicone ice trays and pouring in smoked bone broth, these flavor cubes just take hours of freezer time to set and then they are ready for use. I like to un-mold mine and place in storage bags that allow me to reach in, grab what I need, and reseal the rest. The depth of flavor these little cubes add to soup and sauces, whether for meats and poultry or vegetables, is fabulous.
Don’t forget to experiment with a variety of tastes and don’t feel you are restricted to just one herb or spice per cube. Make flavor blends like Indian flavor cubes with curry, ginger, allspice, and cumin. Or an Italian blend with oregano, basil, marjoram, thyme and rosemary. Or, combine fruit and spices for cocktail-like blends. There are no rules to the combinations you can use so find the flavors you love and flavor cube away!
We’ve all had those moments when the food comes off the smoker or grill and we wonder, What went wrong??
Sometimes the event is so bad you want to swear off outdoor cooking for good because of committing common smoking & grilling mistakes. I’m here to ask you to step away from the ledge and think about whether you do any of the following things. The more items on the list you engage in, the more likely you can benefit from my suggestions.
SMOKING & GRILLING MISTAKES:
#1 Resting Meat
This tends to be the common practice for roasts and steaks/chops. You’ve managed to get a nice crisp skin to the roast or steak and then you let it sit or rest, thinking it will make the outcome juicier. You end up with a soft skin, a wet outside, and waxy fat. These are meat cuts that don’t require resting. In fact, they will rest enough on your dinner plate so they are best served hot of the grill or smoker, without a rest period.
#2 Using Too Much Wood
You know that charcoal and gas are the fuels used to reach and maintain temperature while you’re cooking, and that hardwood is what flavors your food. You want to ensure there is adequate smoke flavor so you add 10 pieces of wood chunks to the hot coals when you start cooking. Then after the first hour, you add another 6 pieces of wood. STOP! That is way too much and simply put, a waste of a tree. On average it takes just 6 ounces of wood to start flavoring meat. My rule of thumb is to add 3-4 wood pieces for a full chimney of charcoal plus a couple of pounds of unlit. Only when those pieces are fully combusted (black and ashy) do I add a couple more pieces. Depending on what and how long I’m cooking, I may only use 6 pieces total.
#3 You Soaked Your Smoking/Grilling Wood
I know this is one of the biggest controversies out there when it comes to smoking with wood. To soak or not. I take the stand that you should never soak the wood as adding water will only fluctuate your cooking temperature and take more energy away from the fire to steam the water from the wood. Remember, the wood cannot start to combust until the excess water has been vaporized. Work with a wood that has at least 20% moisture for the best flavor.
#4 Room Temperature Meat
It is well documented that when you want to attract smoke vapor from burning wood, colder temperatures are like a magnet. Don’t take the meat out of the refrigerator until right before you’re ready to place it on the grill. In addition to attracting smoke vapor, colder temperature meats will warm up faster in your equipment than if you left them out on the kitchen counter.
#5 Searing to Lock in Juices
This is the one item even well-known restaurants can get wrong. Searing meats before finish cooking does not lock in the juices. What it does do is brown the outside of the meat and firm up the outer surface, giving a distinct pleasant flavor. The meat fibers do not get sealed by this method or produce any additional juiciness to the meat.
#6 Marinating Overnight or Longer
As marinades tend to contain oil and meat is made up mostly of water, the two tend to compete against each other. Here’s the thing with marinades. Marinating for long periods of time do not allow the marinade to penetrate any deeper than if you marinate for just one hour. In fact, you have an increased risk of breaking down the meat fibers too far with a marinade, producing a soggy outer layer. Stick to short marinade times and understand most of that flavor will penetrate only to the outside layer.
#7 Don’t Trim the Fat Cap
Just like meat being made up of mostly water, fat is made up of oil. Again, water and oil don’t mix. Leaving a fat cap on meat only allows it to melt and drip into the equipment you’re using. This can produce some additional flavors to the meat but allow too many drippings into the fire area, and you’ll cause flare ups that will deposit soot onto your meat. Don’t forget, most of us have a habit of trimming fat off meat before we consume it.
Thinking about using cedar wood for cooking? 6 reasons to don’t!
6 REASONS TO AVOID CEDAR WOOD FOR COOKING
You love different techniques for cooking and absorb new information like a sponge. In particularly, you love outdoor methods of cooking. One of your favorites is plank cooking on cedar wood. Every time you read a recipe, they all call for use of a cedar plank or other methods to use cedar wood for cooking.
But is cedar really the best choice? More so, is cedar wood for cooking a safe choice?
#1 Softwood Classification Presents a Concern for Using Cedar Wood for Cooking
Cedar wood is not a hardwood. It is a softwood that is from the gymnosperm trees meaning, it is a conifer or cone producing tree. As a rule, softwoods should not be used for cooking as they contain a lot of air and sap which equates to a fast burn and unpleasant flavors. In fact, there are many softwoods that can be toxic if cooked over.
#2 Poor Fire Resistance
During plank cooking, you are using the wood as a vessel to infuse flavor to whatever food is placed on top of the plank. Here’s the concern with cedar – because it is a lower density wood (23 lb./ft³), it has very poor fire resistance. That means, it reaches full combustion much faster than hardwood and will burn as a result. Certainly, that’s not what you’re looking for when you plank cook.
#3 Poreless
Unlike hardwood which contain pores in the cell walls, softwoods like cedar are poreless. They use cell components called tracheids to transport water and nutrients. In addition, the organic compound lignin found in the cell walls, is much lower than in traditional hardwoods used for cooking. Why is this an issue? Lignin is what gives wood fired cooking the distinct flavor and aroma to foods. In using cedar wood for cooking, the average lignin composition is 20%±4 compared to common hardwoods used for wood-fired cooking which average 28%±3.
#4 Plicatic Acid
Cedar contains chemical properties (specifically plicatic acid) that are shown to be a good absorber of odors and moisture. This is one of the key reasons why cedar is a preferred softwood for pest control to keep fleas, ants, mites, moths, and mosquitoes away. When exposed to plicatic acid for lengthy periods of time, a condition known as “cedar asthma” can develop.
Additionally, a regular exposure to the cedar oil found in the wood can result in contact dermatitis or skin irritation, rhinitis, and conjunctivitis.
#5 Animal Toxicity
There are many studies available on how the use of cedar wood chips and shavings have affected animals continually exposed to these products. Most studies show a correlation with liver dysfunction in animals such as rabbits, guinea pigs, and hamsters. In fact, smaller animals, like guinea pigs and hamsters, have a higher incidence of death which may be attributed to plicatic acid exposure. The phenols and aromatic hydrocarbons also have been shown to cause respiratory problems in animals like those listed above.
#6 Not All Cedar Is The Same
Cedar is part of the pine family of trees with native origin in North Africa and Asia. There are no native cedar trees to North America. The red cedar common in the Eastern USA is part of the Juniper family and can be highly toxic if taken internally. Under no circumstances should you ever cook with red cedar from the Eastern states of the USA.
USA cedar trees are referred to as false cedars since there are no native varieties. There are commonly 5 varieties of the false cedars available: Western Red Cedar (common to Southern Alaska, Northern California, and the Rockies), Northern White Cedar (Southeastern Canada, Northeastern quarter of the USA, south into Tennessee, and west into Iowa), Eastern Red (Aromatic) Cedar (Eastern USA), Yellow Cedar (Pacific Northwest from Alaska to British Columbia into Oregon), Spanish Cedar (although Native to South and Central America, it was planted in Florida). Every false cedar has some known health risks with the most common being respiratory due to toxicity of its pollen, oil, or other chemical compound.
Now you’re asking..
“So if there are all these documented health risks, how and why have cedar plank cooking and other methods of cedar wood cooking gain so much popularity?” I suppose the easiest answer is that cedar was used by the earliest settlers in the Pacific Northwest as a means of preserving, storing and cooking the seasonal fish. Think about the limitations of the day: they would be using resources that are available without thought to the items we ponder today like health, future risk, etc. This concept was examined from a different perspective many years later with the desire for flavor, appearance, and functionality.
We often make the mistake of jumping into something full throttle before asking some of the key questions to keep our bodies safe and healthy. Remember, there’s lots of documentation out there stating why you should not cook with softwood yet when it comes to cedar wood cooking, specifically, cedar plank cooking, we don’t seem to carry that issue forward. I don’t think I’ll ever understand why.
We love providing information to our readers and subscribers that is not in the open and letting you weigh the information for your own verdict. All types of questions are welcome and we encourage you to follow and subscribe to our social channels so you don’t miss anything. We look forward to providing you with tips, techniques, recipes, and the science for all things wood-fired cooked.
Kylee Harris on Coffee Smoked Foods– At one point, all foods had an element of smoke; everything was cooked over an open fire before gas and electric stoves came about. It’s thought that the smell and imparted taste of smoke is programmed into mankind as a result, which is why smoked foods are popular all over the globe. Meat, seafood, and even smoky desserts like fruit pies, are still flavored with a variety of wood smoke. Recently, professional and home cooks alike have begun to wonder about the hidden potential of another thing close to their hearts: coffee. Smoking food with a combination of wood and coffee beans could be the next big taste revolution.
Coffee Smoked Foods- Coffee Varieties for Smoking
Just as there is a variety of options when it comes to smoking food with wood, there are a few choices in coffee as well. For flavor profile, darker and richer bean varieties pair best with red meat, while more mild varieties are better sampled with poultry and seafood. There’s also the question of regular or decaffeinated types of coffee. No, smoking with coffee won’t caffeinate your food (though wouldn’t that be interesting), but there can be a difference in flavor here as well. Regular has a higher level of acidity and thus bitterness, while decaf is less so. Rule of thumb: if you like the bitter tang of a certain coffee, then you will probably like the flavors it lends to smoked food.
Coffee Smoked Foods- Beans, Grounds, and Pellets
Of course, flavor is one thing- this is open to individual tastes- but what about what works best for the actual smoking process? Ground coffee is great as a marinade or rub for meat, but it burns up too quickly to be very useful for smoking. Coffee beans are better for the process, as they can burn more slowly. A combination of wood chips with coffee beans (a 3:1 ratio) is a good balance, allowing the coffee beans to add their subtle flavors without becoming too smoky and overpowering. There’s also the option of coffee pellets, which are coffee grounds and saw dust pressed into compact pellets used as a fuel for both cooking and heating. These are said to have a much more subtle flavor when used for cooking and work particularly well, according to fans, for flavoring smoked corned beef.
Coffee Smoked Foods- Pre-Roasted vs. Green Coffee Beans
While both grounds and pellets have their place, most people prefer smoking food with whole coffee beans, which then poses the question: raw and green, or already roasted? The answer really depends on personal preference, once again. Green coffee beans will give off much more smoke, which can be a good thing if that’s the flavor you’d like to try. Pre roasted, on the other hand, will smoke less, but may need to be soaked in water first in order to be able to smolder for a longer time to produce a sustained smoking processes.
As you can see, there are quite a few choices you can make to customize your coffee-smoked food experience. Experimenting with flavors and methods is what really makes cooking the art form that it so clearly is. The options are plentiful, and the vision (or taste, as it is) is all up to you.
More related reading on our smoking & Grilling tips and technique see our directory on previous blogs!