Let's explore the primary heat sources for Grilling!

Let’s explore the primary heat sources for Grilling!

Exploring the primary heat sources for Grilling Click To Tweet

Listen to the audio of this blog

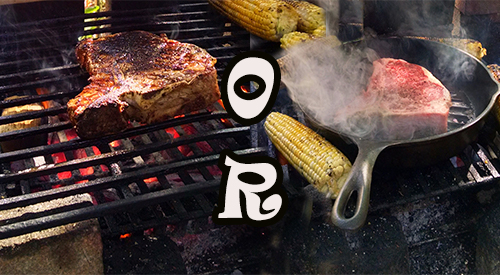
PRIMARY HEAT SOURCES FOR GRILLING-

We grill outdoors frequently yet I bet not many of you know the science behind grilling. What happens to food when we grill? How does food cook to a safe level on a grill?

Let’s cover the types of heat sources that cook grilled meats and help you decide the ideal method for cooking your favorite animal proteins.

What Is Meat?

Before I get into the types of heat sources to do the actual grilling, let’s talk about what meat really is. Meat is muscle from various animals. It is made up of 75% water, 20% protein, and 5% carbohydrates and fat. Each cell of a muscle is made of two proteins: actin and myosin.

Now breaking down the proteins of meat, these are made of amino acids which react nicely when salt ions are added. Thus, when salt ions are added, the water-retaining capability of meat increases which results in production of a juicy piece of grilled meat.

Now these proteins in meat are coiled when the meat is raw. Add heat, and these proteins uncoil as the protein molecule bonds are broken.

Note – heat shrinks the muscle fibers which will then squeeze out water allowing the molecules to recombine. Brining or marinating meat will reduce this shrinkage of the fibers.

Primary Heat Sources for Grilling

There are three heat sources for cooking foods: conduction, radiation, and convection. Let’s get an understanding of each one.

Conduction primary heat sources for grilling:

The best example of conductive heat is when meats are placed directly on the grill grates over direct heat. The transfer of the heat energy to the grill grate brands the food item with grill marks. Heat is transferred from the source (burner, lit charcoal or wood, electric element, ceramic plate) to the food which then engages the cooking process. The meat cooks from the outside to the inside due to heat transfer. The surface of the meat gets hotter and transfers to the center which is why people who rely on the meat’s outside coloring will under-cook the meat inside.

Convection primary heat sources for grilling:

Convection heat is transferred with a fluid which can include water (think boiling a food item like potato), oil (think French fries), and air (think your oven or two-zone cooking on a grill). Now, convection cooking only occurs on the exterior of the food while conduction heat cooks the interior.

Radiation primary heat sources for grilling:

My favorite example of radiation heat is cooking marshmallows on a stick held near a campfire. Essentially, this is how charcoal/wood grills cook. You elevate the food over the heat source.

What influences grilling is the length of time and the type of heat. Add in difference between temperature and heat as materials also play a part in the transfer of the heat energy. Water transfers slower than metal.

Radiation produces more heat than convection. You can easily increase the radiation heat on a charcoal grill by increasing the number of charcoal pieces. Gas and pellet grills produce convection heat. Convection heat dissipates easily by air currents. Infrared units known as intense infrared (IR) have marketed that they produce a better sear on meats. What is happening is heat energy is delivered faster than convection heat units but slower than conduction units. You also have the risks that the delivery of this energy via IR could be uneven resulting in black/burnt areas while other areas of the meat are light in color.

Primary Heat Sources for Grilling- Types of Heat on Different Equipment

Let’s look at the heat types for specific equipment so you know how the energy used cooks your meat.

Gas Grills:

Burner produces radiant heat that in turn heats the heat shields above the burners producing radiant and convection heat (note gas grills have permanent vents built in the unit). The grill grates then heat and produce conduction heat to the exterior of the meat which converts all this heat energy to conduction to cook the meat thru the interior.

Note gas grills can be set up with direct cooking (all burners on) and indirect cooking (only half the burners lit). If you cook with the lid up on a gas grill, you allow radiant heat to escape which will cool the top of the meat.

Charcoal/Wood Units:

Radiant heat is produced at the bottom of these units with the grilling grates absorbing the heat energy that produces conduction heat. Heat from below the meat is absorbed and converted to conduction heat to cook the interior. The lids on these units will produce convection heat due to the built-in vent that has a control setting.

Like gas units, charcoal/wood units can be set up direct or indirect cooking method with the foods absorbing indirect convection heat from all sides which then converts to conduction heat to cook the meat’s interior.

Flat Tops/Plancha/Griddles:

Whether gas or charcoal fed, the fuel source produces radiant heat while the solid cooking surface produces conduction heat to the meat. Due to direct contact of the meat to the solid cooking surface, the direct contact side of the meat will brown easily while this no lid unit allows radiant heat to escape causing the top of the meat to cool and not brown.

Infrared Units:

Burners on these units produce radiant heat which then heat energize the ceramic, glass or metal plate. Grilling grates absorb the heat and produce conduction heat where the surface of the meat contacts the grate.

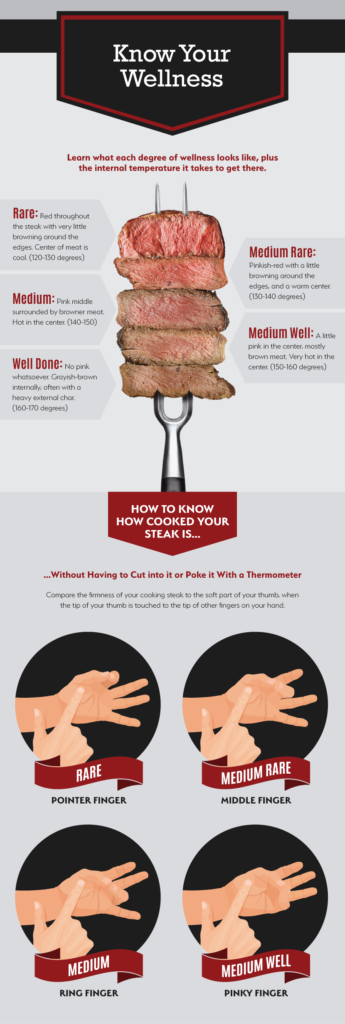
Always remember, on any unit regardless of heat source, thickness of the meat and not poundage will determine cooking time as you must remember that conduction cooking progresses to the interior. You must use a digital thermometer to ensure meat is cooked properly before consuming. Never rely on the outer coloring of the meat or recommended time per pound in a recipe. A digital thermometer is the only way to know.

Making you an informed consumer through valuable articles like this one. Leave us a comment and follow us or subscribe for more great recipes, techniques, tips, and the science behind the flavor and fire. That’s SmokinLicious®

SmokinLicious® Products:

Wood Chunks- Double & Single Filet

Wood Chips- Minuto®

Smoker Logs- Full & Quarter Cut

Charwood

More related reading on the primary heat sources for Grilling & Smoking tips and technique see our directory on previous blogs!

More related reading on the primary heat sources for Grilling & Smoking tips and techniques see our directory on previous blogs!

Other blogs you may like:

-3 METHODS OF SMOKING BOSTON BUTT FOR AUTHENTIC BARBECUE FLAVOR

-TEMPERATURE, MATERIAL AND TIME DETERMINE WHEN ITS CALLED BARBECUE

-PICKING YOUR IDEAL FIRE SETUP FOR COOKING

-WHY TWO-ZONE COOKING METHOD LET’S YOU WALK AWAY FROM THE GRILL

Dr. Smoke- Let's become better chef's and explore the primary heat sources for Grilling!

Dr. Smoke- Let’s become better chefs and explore the primary heat sources for grilling!

Cooking steak on the grill or in the grill pan is a universal question. Read more below to understand some of the techniques for cooking the perfect steak.

Cooking steak on the grill or in the grill pan is a universal question. Read more below to understand some of the techniques for cooking the perfect steak.

A GUIDE FOR COOKING THE PERFECT STEAK

Being able to successfully cook a steak is a skill that most people aspire to have. Pay attention to these details and you’ll see that it’s not that difficult to pull off.

To begin, you need to understand the basics of the different cuts of beef and how to choose the right one. From there, we’ll get into how to cook it to your desired level of doneness.

Choosing a Steak

Examining the butcher shop cases can be overwhelming. There are so many different cuts available—big steaks, skinny steaks, huge roasts, small roasts, and more. If your goal is to cook a good steak at home, I recommend sticking with the rib-eye, T-bone, New York strip, or Filet Mignon. These are the most expensive cuts, but in steaks, you get what you pay for and these are the most tender when grilled or pan-fried. The differences in tenderness come from the cow having stability muscles (think the lower back), which are less powerful and thus tender, and load-bearing muscles, which are tough. Price is directly correlated to these qualities. A tender steak will cost a lot more than a tough steak (though with the right treatment, you can successfully turn a tough cut like brisket into a tender, flavorful meal).

If the sheer volume of beef cuts still overwhelms you, check out our easy-to-read guide to steaks and their tenderness, price, and ideal preparation.

The seasoning requirements differ based on the cut. A tougher steak requires more seasoning because your eating experience is mostly about tasting the seasoning, rather than enjoying the tenderness of the cut. For example, you can get away with simple salt and pepper on a perfectly cooked filet mignon, while a flank steak used for fajitas should have some sort of spicy rub all over.

Tips for Cooking the Perfect Steak

So, you’ve purchased steaks that fall on the tender side and you’re ready to cook them. First, let them rest at room temperature for about 30 minutes to take the chill off. This results in more even cooking. Pro tip: If you are cooking for someone who likes a well-done steak and you like yours rare, leave yours in the fridge until the absolute last minute; your steak will cook less than your guest’s in a similar amount of time.

If you’ll be cooking on the stovetop, a cast iron or stainless-steel pan will work best. Nonstick coating can’t handle the high heat required for cooking a steak. Before you place the skillet over high heat, lightly season the steaks with a mild rub or just salt and pepper. While the skillet is warming, pour in a few tablespoons of peanut, canola, or other high-smoke-point oil. When the oil is shimmering and the pan is hot, place the steaks in the pan and loosely cover it with foil to prevent oil from splattering. Now is also the time to turn on any kitchen fans, as this will generate some smoke. If your steak is less than 1 inch thick, you can plan on cooking it in the pan the entire time. If your steak is thicker than an inch, do the searing on the stovetop and then move the entire pan to a preheated, 400-degree oven to finish cooking it without overly charring it.

When the steak hits the hot pan, start your timer. In general, 2 to 5 minutes per side is sufficient for medium doneness on a hot skillet. This range is flexible because, among other variables, everyone’s heat is slightly different, as is the steak’s starting temperature (depending, for example, on when you pull it from the fridge). For a thickness of an inch or less, I like to sear for about 3 minutes on each side, after which you should let it rest. If you have a thicker steak, you would put it in the preheated oven after the two 3-minute turns and let it cook for another 2 to 5 minutes until you achieve the desired doneness.

When you are finished cooking the steak, add a tablespoon of salted butter on top and a fresh herb – thyme works well – to get that expensive steakhouse-style flavor pop.

You have two methods for determining doneness. One is to use an accurate digital cooking thermometer. If you are aiming for a rare steak, you’ll need to pull it off the heat when the internal temperature is between 120 and 130 degrees F. On the opposite end of the spectrum, if you want a well-done steak, you should pull it off the heat when the internal temperature is between 160 and 170 degrees. The illustration below shows varying levels of doneness. The steaks will continue to cook slightly while resting, so take that into account as well.

Is this all a bit much to remember? Bookmark our illustrated guide to steak doneness and keep those temperatures in mind next time you’re trying to achieve the perfect level of doneness.

Don’t have a fancy digital cooking thermometer? No problem—you can use your hand! By positioning your thumb and fingers in various ways, you can mimic what a steak should feel like at various levels of doneness. The tenderness of a steak will roughly correlate to the feeling of the thick part of your palm, below the thumb, when your thumb sequentially touches the index, middle, ring, and pinky finger. Touch that part of your hand with the index finger of your other hand while moving your fingers from index to pinky, and you’ll feel that part of your palm getting firmer. If this seems daunting at first, simply use both methods. Get used to using a thermometer and at the same time touch the steak and see what it feels like. Don’t understand what we mean? Check out this guide to using your fingers to check a steak for doneness.

Is this all a bit much to remember? Bookmark our illustrated guide to steak doneness and keep those temperatures in mind next time you’re trying to achieve the perfect level of doneness. Also practice touching the meat, as we show below, and learn to feel your way to the perfect steak using your touch and chef’s intuition.

Grilling Tips for Cooking the Perfect Steak

Would you rather cook your steaks on the grill? You can easily apply most of the above methods to a hot grill, cooking the steaks directly on the grate. The same searing times apply, and if you have a steak that is thicker than 1 inch, simply finish cooking it over indirect heat (so in an area with no charcoal or with the gas burner turned off). You should get the same great results, but with the added bonus of grilled, smoky flavor.

To sum up, successfully preparing a steak is all about cut selection and cooking time. If you stick with a tender cut of beef and cook on high heat, then you can confidently start with the 2 to 5 minutes of sear time on each side and then finish it off in the oven.

Remember to hit it with a little bit of butter and a fresh herb, and you’ll find that you can easily prepare a fancy steakhouse-quality dinner at home.


Author: John Thomas

Source: eReplacementParts Blog


Dr. Smoke- hope you enjoyed our guest blog on cooking the perfect steak!

Dr. Smoke- hope you enjoyed our guest blog on cooking the perfect steak!