It has been months since the new normal occurred. You thought working from home would be brief but it is now clear this situation has no end. Reality has set in that you are working, educating, entertaining, eating and sleeping from home.
One benefit is you no longer are commuting. For those that use mass transit like a subway, bus line or rail line to get to work now find they have more time to devote to family and meals. For those that have had to drive to work now have freedom to cruise online recipes and those old cookbooks. This is your opportunity to make the most of those meals while not making cooking a chore.
We have all been in Tom’s position. We love grilling and smoking but prefer the warmer weather. For those of us in 4 season climates with below zero temperatures in winter and lots of snow, it seems too hard to continuing grilling! But just as Bert remarks, you do not have to give up cooking outdoors just because of the weather.
Often when faced with cooking a whole turkey, you find the challenge of ensuring every part of the bird is cooked to temperature. This can result in some extra work in ensuring that certain parts that cook faster don’t dry out or burn on the exterior. Think the wings and drumsticks. It’s a lot of work!
I’m going to introduce you to a method of cooking a turkey that will ensure every part cooks at the same rate and to the same doneness level without having to cover specific parts with foil. Spatchcocking a whole turkey meets that goal and by doing the cooking process on the gas grill with hardwood, you get the added benefit of a smoke flavor and oven room for preparing other dishes.
Order up a whole turkey, preferably under 24 lbs., and let’s meet in the kitchen to prepare the bird for smoking.
Does Fresh Make a Difference?
#freshturkey
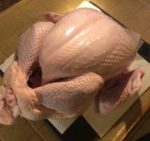
There is no question that I prefer a fresh turkey over frozen as the flavor is simply cleaner and the bird produces super moist meat compared to a frozen turkey. We are fortunate to have within 10 miles of our location, a fresh turkey farm that harvests turkeys once a year, just a couple of days ahead of Thanksgiving. My bird weighed in just under 22lbs. The organs and neck are removed from the cavity and the bird flipped breast side down to expose the backbone. This is where we start our spatchcock process. Get sharp cutting shears ready as we prepare to remove the backbone of our turkey.
Tasting Notes: If fresh whole turkey is not available, you may substitute frozen whole turkey. Just be sure it is completely defrosted and pat dried before starting this recipe.
Flatten and Rub for a Perfect Spatchcock Smoked Turkey
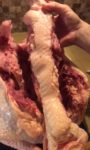
I won’t lie to you. Removing the backbone of a fresh turkey can be a bit of work, but it is so worth it. Start on one side of the backbone, insert sharp kitchen shears, and start to snip away. You’ll draw the shears along the edge of the backbone, releasing the bone from the meat. Done correctly, the spine will come out in one piece.
#spatchock
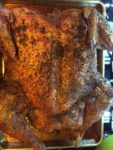
With the backbone removed it’s time for the final preparation to the turkey. Flip the turkey back so the breast is facing up. Time to break the breastbone so the turkey will lay flat on the cooking sheet pan. This will take both hands and a lot of force. Position your hands across the breast and push down with all your force until you hear the breast plate break. Now the turkey should be able to lay flat on a sheet pan equipped with a rack for rendering all the juice and allowing even heat distribution around the entire bird. The rack is key to use so heat distributes evenly. The turkey is now ready for a rub with your favorite seasonings, herbs, and spices.
#spatchocking
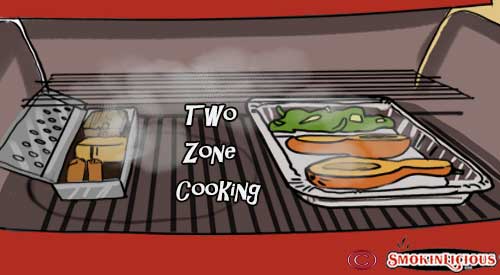
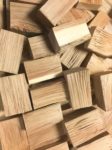
I’m using a simple herb rub that includes fresh sage, oregano, thyme, crushed red pepper, black pepper, marjoram, basil and cumin. I place my ground rub all over the skin of the bird and on the exposed meat side, reaching under the breast skin as well. Now cover with plastic wrap and refrigerate overnight. All this work can be done the night prior to grilling ensuring all that is left to do, is the simple two-zone cooking. Remember, two-zone cooking involves turning only half the burners on and placing a metal smoker box of wood chunks on the hot grate or directly on the heat shield of the hot burners. Be sure you have the box and hardwood at the ready for this step.
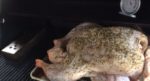
With our prepared spatchcock turkey readied, the sheet pan is added to the grill on the no heat side and the lid is closed. I leave this to cook on its own for about two hours before returning to rotate the pan, checking the smoker box of wood chunks I’m using on the lit side of the grill for the great smoke flavor. Remember, the heat from the burners that are lit will radiate throughout the entire grill, grill-roasting the turkey while the heat stimulates the release of the smoke vapor from the wood.
#twozonecooking #woodchunks#smokerbox
Tasting Notes: If you prefer, you can cook the turkey directly on the grill grate. Just be sure to place a water pan under the grate to collect all the juices.
Ready in No Time
My nearly 22 lb. fresh turkey takes about 3-3/4 hours to reach a 165°F internal temperature. In total, I use about 8 double filet wood chunks for the entire process. The best part, I can do other things while the turkey cooks, then rest it for about 20 minutes before carving. Don’t forget about all the beautiful juice it produces in the pan as well. Make gravy, use it as au jus, or save it for producing stock. Spatchcock fresh turkey – the easiest method of no-fuss grilling and smoking of a turkey!
What’s your favorite spatchcock turkey recipe? Leave us a comment to opine and subscribe to get all our postings on tips, techniques and recipes. Bringing innovation to wood fired cooking with recipes, techniques and the science behind the fire, smoke, and flavor. That’s SmokinLicious®.
More related reading on Spatchcock Smoked Turkey and other Sptachcocking itmes see our smoking & Grilling tips and technique see our directory on previous blogs!
Infusing cherry wood smoke into Brussels sprouts using the gas grill is simple and easy and adds a very flavorful touch to this hearty vegetable.
INFUSING WOOD SMOKE INTO BRUSSELS SPROUTS
A favorite of the cabbage family, Brussels sprouts came to the United States via French immigration in the 18th century. They are dominantly grown in California and available June thru January making them a Fall and holiday menu favorite. SmokinLicious® will take the flavors up a notch and add wood smoke into Brussels sprouts for two upcoming recipes. We’ll do this on the gas grill fit with wild cherry wood chunks to bring subtle smokiness to the finish sprouts. First purchase 3 lbs. of Brussels sprouts and get two cherry single filet chunks, and you’re ready to fire up the grill and get smoking.
The Easy Grill Method for Infusing Wood Smoke into Brussels Sprouts
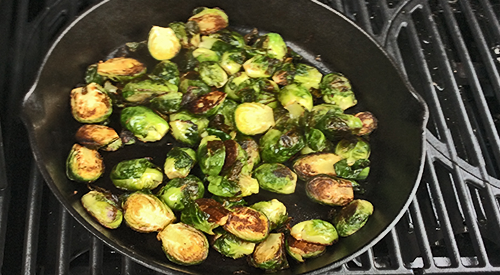
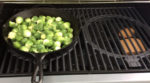
Bringing the flavor of wood smoke into Brussels sprouts is so easy. To start, gather about 3 lbs. of Brussels sprouts, some cooking oil, butter, and a heavy-duty skillet. I prefer a nut oil like walnut or almond. For a skillet I’ll be using cast iron. I’ve trimmed the ends on about half the sprouts and for the other half, I’ve trimmed the ends and cut them in half. That’s it! Fire up the grill and get ready for a quick method of adding great wood-fired flavor.
It only takes a couple of pieces of wood chunk to bring fabulous flavor to the grill. I set up a cast iron pan on one side and place two cherry wood chunks on the heat shields of the far burner. Let the pan heat up for about 5 minutes then pour in a couple of tablespoons of oil and heat. Right before I add the Brussels sprouts, I add a couple of tablespoons of butter. In go the whole Brussels sprouts and the lid comes down. Leave untouched for about 5 minutes before turning.
Flavor Finish
As I have two recipes in mind I’m cooking two batches of Brussels sprouts: one batch whole and one batch halved. After leaving for 5 minutes, I stir them to ensure that all surfaces are infused with wood flavor. I maintain a temperature of 350-375° F which will make this a quick cooking method. The first 5 minutes, the lid is down but once stirred, you can finish the cooking with lid up. Remember, cast iron will retain heat, so you can turn the heat off and let sit for about 5 minutes.
After stirring a couple of times, both the whole and halved Brussels sprouts are ready in about 20 minutes time. I simply remove them from the heat and bring them in to be added to my favorite recipes.
I have two recipes I’ll be working on: Smoky Brussels Sprout Gratin and Tortellini with Lemon and Smoked Brussels Sprouts. These truly are the most flavorful Brussels sprouts! For those of you thinking about a holiday meal with them, well, the grill will give you that extra oven room you need. Take advantage of the long harvest season and try these mini cabbages on your grill. Check in for our recipes soon so we can get you started on how to use your prized sprouts.
Bringing you new methods of infusing wood fired flavor into seasonal items. Be sure to subscribe and follow us to gain great tips, techniques, recipes and the science behind the fire.
The Culinary Crew wants you to know…
#chefbertandtom
… that the direct infusion of hardwood-fired smoke to foods, like Brussels Sprouts, is considered a flavor ingredient, much in the same way that spices, minerals and sauces enhance taste. When fired, the components of smoke vapor carry the hardwood’s distinctive flavor profile directly into meats, seafood, fruits or vegetables with pleasing results to the palate.
SmokinLicious Products used in this recipe- wood smoke into brussels sprouts:
Smokinlicious® recommends “must have” gas grill tools
GAS GRILL TOOLS
There is no question that LP/Gas grills have changed tremendously over the past 10 years and now include some features standard that for many years, were options. Then there is the development of dual or multi-fuel options on a grill so you can have one unit that performs as a gas grill, charcoal grill, wood grill, and even electric or pellet grill, all in one unit.
Today, I’m focusing on the standard LP/Gas grill, independent of any other fuel source. This guide will focus on the basic tools that will provide for a better grilling experience and make you more efficient at the grill.
GAS GRILL TOOLS THAT YOU MUST HAVE:
Tool #1
I’m starting with a grill brush since most of us have the habit of thinking about cleaning off the grill grates when we start the grill for cooking, not when we finish. This tool is to ensure clean up the residual food bits and grease left from your previous grilled foods.
Now I’m aware of the controversy over the use of metal bristles but most of these brushes are made well. Simple inspection of the brush bristles each time you use it will allow you to identify if the bristles have come loose and have the potential to be transported to your foods. I prefer a brush with metal bristles, with a long handle to keep my arm away from the heat, as often you want to clean the grill when it’s hot. Remember, most of these brushes are under $10 so think about purchasing one a couple times per season to ensure the bristles stay put.
Tool #2
There are times when the grill grates and lid will become super coated in grease and pieces of food. You’ll need to break out the cleaning agents to ensure these surfaces are ready to go for the next grilling event. Two of my favorites are CLR BBQ Grill Cleaner and Mr. Clean MagicEraser. As a non-toxic, non-flammable, biodegradable product, CLR BBQ Grill Cleaner is not something you have to leave on for hours at a time. It quickly breaks through the issues and allows you to wipe clean to an almost new state. Keep in mind, the CLR brand also makes a stainless steel cleaner for the outside as well.
Tool #3
Long-handled tongs. Your standard tong length for the traditional kitchen just won’t work at the grill, as you need to keep some arm distance from the hot grill surfaces. I like the 20-inch length with silicone grips as well as silicone tips, as silicone can tolerate extremely high heat. If you grill multiple food items at the same time, think about purchasing tongs with different colored tips and/or handles as that will ensure use of one color for a specific food so there’s no transfer of flavors.
Tool #4
Like the tongs, a must have is long-handled spatula for those food items that need to be flipped. I prefer one that is made of solid steel and has a bit of a beveling to the edge. Again, the longer the handle the better for keeping away from high heat.
Tool #5
An easy to read, digital thermometer. It is a must when you grill or smoke. Look for one that has a longer probe for when your grilling larger roasts and thicker cuts of meats and poultry. Be sure the readout is easy to see and if you grill a lot at night, get one that has a back-lite to see more clearly. If you cook a lot of different animal proteins at the same time, try to have a thermometer dedicated to each food so you don’t cross-contaminate while bacteria may still be an issue. There are assorted colors available making it easy to dedicate one to red meat, pork, poultry, and fish. Most of the digital thermometers on the market today are under $18 with even more under $10.
Tool #6
If you’ve always been a person that cooks directly on the grill grates and only does the standard fare – hamburgers, sausage, chicken, perhaps ribs – you need to get out of that rut and learn to do more with your grill. Start by investing in one piece of quality cast iron. Able to withstand intense heat, cast iron can take you from the average griller to someone with skill. Now, you can enjoy recipes normally done on the indoor stove outside in the fresh air, with your cast iron skillet. Remember, there’s a whole line of cast iron cookware so as you expand your skills, you can add to your outdoor cookware.
Tool #7
Although I am a fan of the standard steam table disposable foil pan, any size, shape foil pan will do. These are perfect for use as a drip pan to prevent render juices from spiking flames and as water pans for a two-zone cooking set up. I won’t deny, that I also use these to cook in especially fragile items like fruit and specific vegetables. You certainly can invest in a grill pan but clean up becomes a snap with the disposable pan.
Tool #8
Although the smoker box was originally intended for use with wood chips on the grill, I always use small wood chunks in mine. I prefer a box made from high-grade stainless steel and one that has a hinged lid. My smoker box holds three Double Filet Wood Chunks from SmokinLicious® perfectly and provides for extended smoke vapor as compared with wood chips. Used directly on the grill grate or set under the grill grate on the heat shield, it produces smoke for hours. Although you can place wood chunks directly on the heat shields, as I’m known to do myself sometimes, they will become permanently marked from the wood ash and eventually need replacing. The smoker box allows you to avoid this.
There you have it! My TOP TOOLSNEEDED FOR GAS GRILLING for better results and help in extending the life of your investment!


 After stirring a couple of times, both the whole and halved Brussels sprouts are ready in about 20 minutes time. I simply remove them from the heat and bring them in to be added to my favorite recipes.