We do a summer favorite WOOD FIRED GRILLED WATERMELON!

We do a summer favorite WOOD FIRED GRILLED WATERMELON!

WOOD FIRED GRILLED WATERMELON BECOMES A STAR

listen to our blog


You may have seen segments on grilling watermelon before which show slices of watermelon on a standard gas grill. Although I agree that the heat generated from the grill will produce a sweet outcome, there is no comparison to doing a grilling technique that incorporates wood for added flavor.

In this segment, I’ll show you how to grill watermelon on a grill of your choice with wood chunks for the unique combination of sweet and char flavors that only comes from grilling with wood.

Grilled Watermelon- Easy Prep

I think this is by far, the easiest preparation for the grill. All you need is a watermelon of your choosing and a grill; gas, electric or charcoal. Just 2-3 wood chunks from SmokinLicious® and about 20 minutes once you have a lit grill, and this method of bringing flavor to the standard watermelon will be complete.

As watermelon contains a lot of water, it is essential that you work with a medium heat setting on your gas grill and hot coals with a moderate flame for the charcoal grill. If using a gas grill, be sure to set up the wood chunks on just one side of the grill and allow the chunks to smolder first so there is plenty of smoke vapor. Since watermelon grills in no time at all, you want to have enough smoke vapor produced to give a great tasty outcome for both a gas grill or charcoal grill method. Electric smokers are self-contained allowing for simple dialing in about 15 minutes worth of smoking time.

our slices ready to be wood fired!

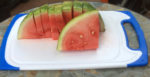
For the watermelon, cut lengthwise in half and cut each half into individual slices about 1-1/2 to 2” thick. Or, you can remove all the rind and grill just the watermelon meat. Keep fire safe tongs at the ready so you can turn the watermelon slices just once as they evaporate some water and sweeten up. DO NOT leave the grill! This fruit requires a careful watch so stay put and you’ll have every piece cooked to perfection.

So Many Uses for Grilled Watermelon

You’ll see how the watermelon darkens in color, get bits of char coloring to the skin, and is less water soluble. That’s the perfect outcome. Now it’s time to think about how to use your wood flavored melon.

Our finished wood fired grilled watermelon

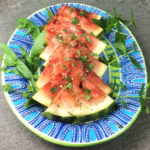
First, you can enjoy it as is. When I serve this naked, I just give one additional flavor such as fresh, chopped mint. But if you’re looking for a lunch or lite dinner entrée, think salad by including some baby arugula, goat cheese and a splash of balsamic vinegar. For a spicy version, sprinkle the wedges with red pepper flakes, a bit of granulated sugar, and lime zest. Wood fired watermelon also works great with other summer favorites like grape and cherry tomato, pepper slices, sugar snow peas, and cucumber. No matter how you choose to serve it, grilled watermelon with wood flavoring is going to top your list of grilled favorites.


Proving that there’s more to wood-fired cooking than just animal proteins, SmokinLicious® brings you great ideas for recipes featuring a wood-fired ingredient. Bringing you tips, techniques, recipes and the science behind the fire and smoke.

Purchase products:

Wood Chunks- Double & Single Filet

More Related reading on "What Wood for Smoking" and other great smoking and grilling tips and techniques

More Related reading on “What Wood for Smoking” and other great smoking and grilling tips and techniques

Additional reading:

-WOOD-FIRED APPLES MAKE THE BEST CAKE

-PEACHES WOOD FIRED FOR A SMOKY FLAVORFUL GAZPACHO

-Smoked Snow Peas With Cucumber Salad


 Dr. Smoke- Wood fired grilled watermelon is my favorite summertime dessert!


Dr. Smoke- Wood fired grilled watermelon is my favorite summertime dessert!


Smokinlicious® recommends "must have" gas grill tools

Smokinlicious® recommends “must have” gas grill tools


GAS GRILL TOOLS

Listen to the audio of this blog


There is no question that LP/Gas grills have changed tremendously over the past 10 years and now include some features standard that for many years, were options. Then there is the development of dual or multi-fuel options on a grill so you can have one unit that performs as a gas grill, charcoal grill, wood grill, and even electric or pellet grill, all in one unit.

Today, I’m focusing on the standard LP/Gas grill, independent of any other fuel source. This guide will focus on the basic tools that will provide for a better grilling experience and make you more efficient at the grill.

GAS GRILL TOOLS THAT YOU MUST HAVE:

Tool #1

I’m starting with a grill brush since most of us have the habit of thinking about cleaning off the grill grates when we start the grill for cooking, not when we finish. This tool is to ensure clean up the residual food bits and grease left from your previous grilled foods.

Now I’m aware of the controversy over the use of metal bristles but most of these brushes are made well. Simple inspection of the brush bristles each time you use it will allow you to identify if the bristles have come loose and have the potential to be transported to your foods. I prefer a brush with metal bristles, with a long handle to keep my arm away from the heat, as often you want to clean the grill when it’s hot. Remember, most of these brushes are under $10 so think about purchasing one a couple times per season to ensure the bristles stay put.

Tool #2

There are times when the grill grates and lid will become super coated in grease and pieces of food. You’ll need to break out the cleaning agents to ensure these surfaces are ready to go for the next grilling event. Two of my favorites are CLR BBQ Grill Cleaner and Mr. Clean MagicEraser. As a non-toxic, non-flammable, biodegradable product, CLR BBQ Grill Cleaner is not something you have to leave on for hours at a time. It quickly breaks through the issues and allows you to wipe clean to an almost new state. Keep in mind, the CLR brand also makes a stainless steel cleaner for the outside as well.

Tool #3

Long-handled tongs. Your standard tong length for the traditional kitchen just won’t work at the grill, as you need to keep some arm distance from the hot grill surfaces. I like the 20-inch length with silicone grips as well as silicone tips, as silicone can tolerate extremely high heat. If you grill multiple food items at the same time, think about purchasing tongs with different colored tips and/or handles as that will ensure use of one color for a specific food so there’s no transfer of flavors.

Tool #4

Like the tongs, a must have is long-handled spatula for those food items that need to be flipped. I prefer one that is made of solid steel and has a bit of a beveling to the edge. Again, the longer the handle the better for keeping away from high heat.

Tool #5

An easy to read, digital thermometer. It is a must when you grill or smoke. Look for one that has a longer probe for when your grilling larger roasts and thicker cuts of meats and poultry. Be sure the readout is easy to see and if you grill a lot at night, get one that has a back-lite to see more clearly. If you cook a lot of different animal proteins at the same time, try to have a thermometer dedicated to each food so you don’t cross-contaminate while bacteria may still be an issue. There are assorted colors available making it easy to dedicate one to red meat, pork, poultry, and fish. Most of the digital thermometers on the market today are under $18 with even more under $10.

Tool #6

If you’ve always been a person that cooks directly on the grill grates and only does the standard fare – hamburgers, sausage, chicken, perhaps ribs – you need to get out of that rut and learn to do more with your grill. Start by investing in one piece of quality cast iron. Able to withstand intense heat, cast iron can take you from the average griller to someone with skill. Now, you can enjoy recipes normally done on the indoor stove outside in the fresh air, with your cast iron skillet. Remember, there’s a whole line of cast iron cookware so as you expand your skills, you can add to your outdoor cookware.

Tool #7

Although I am a fan of the standard steam table disposable foil pan, any size, shape foil pan will do. These are perfect for use as a drip pan to prevent render juices from spiking flames and as water pans for a two-zone cooking set up. I won’t deny, that I also use these to cook in especially fragile items like fruit and specific vegetables. You certainly can invest in a grill pan but clean up becomes a snap with the disposable pan.

Tool #8

Although the smoker box was originally intended for use with wood chips on the grill, I always use small wood chunks in mine. I prefer a box made from high-grade stainless steel and one that has a hinged lid. My smoker box holds three Double Filet Wood Chunks from SmokinLicious® perfectly and provides for extended smoke vapor as compared with wood chips. Used directly on the grill grate or set under the grill grate on the heat shield, it produces smoke for hours. Although you can place wood chunks directly on the heat shields, as I’m known to do myself sometimes, they will become permanently marked from the wood ash and eventually need replacing. The smoker box allows you to avoid this.

There you have it! My TOP TOOLS NEEDED FOR GAS GRILLING for better results and help in extending the life of your investment!

SmokinLicious® products used in this blog:

Wood Chips

Wood Chunks- Double Filet

Charwood

More Related reading on this subject

More Related reading on this subject

Additional reading:

-HOW TO TURN YOUR LP/GAS GRILL INTO A SMOKER

-TOP TOOLS TO OWN FOR CHARCOAL GRILLING

-TOP 10 TIPS FOR GRILLING SAFETY

-WHY IS MY BARBECUE MEAT DRY??

Dr. Smoke recommends gas grill tools that are a must!

Dr. Smoke- Here’s our recommendations for “must have” gas grill tools.