Our Grilled Peaches for the perfect salad addition with sweet onion, Tomatoes, and fresh herbs!

Our Grilled Peaches for the perfect salad addition with sweet onion, Tomatoes, and fresh herbs!

GRILLED PEACH SALAD- THE PERFECT SALAD!


listen to our blog

Listen to our blog

If you’ve been a follower of our recipes and techniques for a while, then you’re aware of our preference to grill, smoke, coal cook, and ember fire in-season produce. Peaches are no exception and with our Grilled Peach Salad, get your taste buds ready for a real treat!

I’ve got my two quarts of fresh peaches and a plan to grill these on the charcoal grill using charwood coals. Then I’ll use my luscious smoked peaches in a salad that features two additional seasonal ingredients – tomato and shallots.

Get your chimney starter of charwood or charcoal and meet me at the grill for this quick technique and grilled peach salad recipe.

Fire Up the Grill for Grilled Peach Salad

Fire up the charwood with a good quality chimney starter!

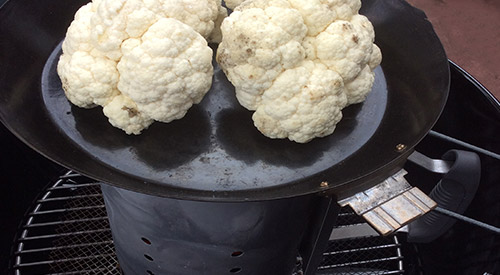
Firing up the STOK kettle grill!

Whenever you use the charcoal grill, it’s always best to get it lit about 30 minutes ahead of cooking. I’m using a kettle-style grill made by Stôk that has a removable center grate for an assortment of inserts. I won’t be using any inserts for this cook as my peaches for the grilled peach salad recipe will stay in a disposable foil pan for easy cooking and removal.

Start by placing charcoal or charwood in a chimney starter. Place a Firestarter in the charcoal area of the grill and place the filled chimney starter over the starter. Lite the Firestarter and allow to remain in place until all the charwood has ignited and started to reduce to hot coals. While that’s burning, let’s prepare the peaches. Be sure you have a couple of wood chunks available to add to the coals when we are ready to grill. I like to use the single filet wood chunk size from SmokinLicious®.

Tasting Notes: there are differences in charcoal so be sure to use a natural charcoal or charwood product rather than briquets as briquets will produce more heat than you need.

Perfect Peach Bites

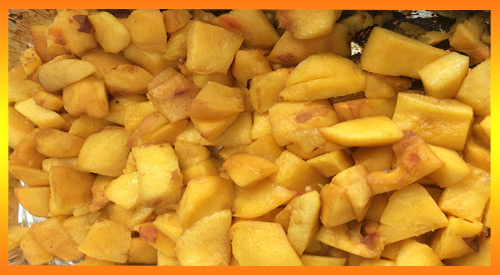
With our charcoal grill going, it’s time to start on the peaches. There are a few ways to remove the skin from peaches including placing them in hot water for a few minutes then removing and placing in a bowl of ice water. The skins will just peel off. I’m an old school so I use a sharp paring knife and just remove the skin.

Once the skin is removed, it’s time to cut the peach into bite-size pieces. You can easily cut around the pit and cut those slices into pieces. Place all the pieces in a foil pan in an even layer.

Tasting Notes: Try to purchase peaches that have some firmness to them if you don’t plan to grill them right away. The peaches should have no bruising and have a slight give when touched. Too soft and those peaches won’t hold their shape when exposed to the grill’s heat.


Single Filet wood chunks under the grilling grate

Smoking Process for the Perfect Grilled Peach Salad

With the peaches prepared, time to take them to the grill. Pour the chimney of hot coals into the grill’s charcoal area and add the wood chunks. Add the pan of prepared peaches and placed the lid on the grill. Be sure the outtake vent on the lid is ½ way open. The intake vent at the charcoal area should be ¼ way open. Now allow smoking for 15 minutes prior to checking. Remember, we want to add smoke without reducing the peaches to a puree.

Tasting Notes: Since peaches contain 89% water, they take in the smoke vapor extremely well. Keep that in mind when you select both the charcoal and wood. Remember, oak based charcoal tends to burn hot and has a stronger undertone to fruit.

Final Salad Prep- Grilled Peaches for the perfect salad addition!

While the peaches are absorbing all that great smoke flavor, return to the kitchen and prepare the remaining ingredients for our salad. You’ll need:

  • 1 lb. tomatoes cut into 1/2’” pieces; or if using cherry or grape tomato, halved
  • 3 tablespoons extra virgin olive oil, plus additional for final drizzle
  • 2 tablespoons rice vinegar
  • ½ teaspoon lemon zest
  • 1 tablespoon lemon juice
  • 1 shallot, sliced thin
  • fresh mint leaves torn
  • salt and pepper

the ingredients in the serving bowl and ready to add the dressing

I start by slicing my tomatoes in half, then add a teaspoon of salt to them while sitting in a colander so I can render some of the water. While the tomatoes sit, I start slicing the shallot into thin strips. At this point, you’ll want to check the peaches. They should be close to or ready to remove from the grill. I like to place them in the refrigerator for about 10 minutes to cool them down for the salad. While that’s happening, let’s prepare the vinaigrette.

I prefer to mix all the vinaigrette ingredients in a measuring cup so I can easily pour it to the salad right before serving, to keep the tomato and peach from getting too soggy. Start with the extra virgin olive oil and add the rice vinegar. Next, the lemon zest, lemon juice, salt, and fresh pepper. Whisk it all together and set aside while you combine the salad ingredients.

Tasting Notes: you can substitute cider vinegar for the rice vinegar and any color of tomato will do though I lean toward the reds and purples to give a color contrast from the orange peach.

Smoked peaches go into the serving bowl first, following by the tomatoes, and shallots. Pour the vinaigrette over the salad within an hour of serving and top with the torn mint leaves. A perfect balance of sweet, tart, smoky, and refreshing. An easy method and recipe you can have in 60 minutes. I love peaches so try our grilled peaches for the perfect salad addition for your next dish to pass! You will tantalize the guest taste buds!

SmokinLicious® products used in this blog:

Wood Chunks- Single Filet

Charwood

More Related reading on "What Wood for Smoking" and other great smoking and grilling tips and techniques

More Related reading on “What Wood for Smoking” and other great smoking and grilling tips and techniques


Additional reading:

-PEACHES WOOD FIRED FOR A SMOKY FLAVORFUL GAZPACHO

-WOOD FIRED GRILLED WATERMELON BECOMES A STAR

-WOOD-FIRED APPLES MAKE THE BEST CAKE

Dr. Smoke adds mint, onions, and tomatoes to make the Grilled Peach Salad a perfect treat!

Dr. Smoke adds mint, onions, and tomatoes to make the Grilled Peach Salad a perfect treat!

Top charcoal grilling tools

Top charcoal grilling tools

TOP Top charcoal grilling tools Click To Tweet

(more…)

We are cooking on a chimney starter with a grill pan to nicely char our head of Cauliflower for this recipe!

We are cooking on a chimney starter with a grill pan to nicely char our head of Cauliflower for this recipe!

COAL FIRE CAULIFLOWER BY COOKING ON A CHIMNEY STARTER

listen to our blog

listen to our blog


A cousin to broccoli, #cauliflower is one of those vegetables that can be eaten raw or cooked and converted to so many different textures. Best yet, cauliflower is one of those super cancer-fighting foods as it contains sulforaphane known to kill cancer stem cells.

I’ll be taking my head of cauliflower and introducing it to hot coals, first, direct heat using a #chimneystarter for the actual cooking and then directly on the hot coals to give it the perfect “meat” char. No matter what color you enjoy – white, yellow, purple – grab a head and get your chimney starter ready, as I show you how to use a chimney starter as an actual grill.

Cooking on a Chimney Starter: Why a Chimney Starter?

All our hot embers accumulated in the Chimney starter provides an excellent heat source for cooking

There are times when you really don’t need to fire up a full charcoal area of coals on the charcoal grill. I have the perfect solution when you’re doing just a small quantity of a food, like our head of cauliflower. Use your chimney starter

To start, I place a mesh screen on the charcoal grill grate to help retain the small, hot coals for cooking. I have a collection of micro charcoal pieces that work perfectly for this type of cooking.

After lighting a Firestarter, I place the charcoal filled chimney starter on top of the Firestarter and allow the coals to burn down to hot embers. Hot embers are what I will be using to cook my fresh cauliflower, first, directly on the chimney starter, then on the mesh screen once I dump the hot embers from the chimney starter.

(more…)

Our gorgeous filet of salmon is awaiting Chef Calle to turn it into Charwood Grilled Salmon on a kettle grill using a two-zone method along with Smokinlicious® wood chips!

Our gorgeous filet of salmon is awaiting Chef Calle to turn it into Charwood Grilled Salmon on a kettle grill using a two-zone method along with Smokinlicious® wood chips!

Charwood Grilled Salmon Fillets for a Hint of Smoky Flavor

By: Chef Calle, Resident Executive Chef


listen to our blog


Chef Calle here and thanks to SmokinLicious®, I’m going to offer an easy and palate-pleasing method to cook and lightly smoke fresh salmon fillets over a Charwood fire that features a small number of smoking chips. With this approach, the smoking chips infuse a delicate smoky flavor to the salmon without overpowering its delicious fresh taste.

Today, I’m using a Stok® Tourist™ grill, clearly one of the best Charwood grilling and smoking units on the market. If you don’t have a Stok®, just about any Charwood grill will work, if its heat chamber has room enough for both the Charwood and wood chips.

Salmon seasoned and awaiting the grill

Charwood Grilled Salmon- Preparation

Preparation is key with salmon and setting up the cooking equipment. So, first prepare the fresh salmon fillets by lightly seasoning with EVOO, salt, pepper and if you have it- fresh dill or fennel. Let them sit and soak up all those great flavorful ingredients for about half an hour or until the salmon reaches room temperature.
Chef’s Tip: Do not use salmon that is past its prime, thinking that the smoke will disguise the slightly off flavor of the fish. Only use the best salmon available.

While the fish is marinating, begin preparations for the actual grilling by first firing up SmokinLicious® all natural Charwood using a hollowed chimney starter. Never use charcoal lighter fluid! Or Charwood, charcoal briquettes, pretreated with petroleum-based starting fluid. In addition to ruining your salmon with a foul aftertaste, it’s safer not to consume the residue or remnants from petrochemical fire starter liquids.

After your embers have taken on a medium to high heat condition (grayish color), place them directly in the center of the grill’s heating chamber. Put the grill grate on over the fired embers and clean it by using either a halved onion or lemon like you would use a sponge but, do it quickly and in short strokes to avoid getting fingers or hands burned.

Smoking the Charwood Grilled Salmon

Next, position small amounts of the smoking chips (a few large handfuls, I’m using SmokinLicious® Grande Sapore) around the outer fringes of the main concentration of burning Charwood. This allows the wood chips to take on two roles- 1) indirectly contributing to the cooking process, and; 2) producing a burst of smoky vapor that flavors the fillets.

Salmon on a two zone grill absorbing all the great smoke flavor

A minute or two after you’ve positioned the smoking wood chips and reattached the grate, place the salmon fillets, skin side down on the grate, directly over the medium embers and cover. Grill and smoke the salmon for about 4 to 6 minutes, uncover and gently turn the fillets over, cover and grill and smoke the skinless side for no longer than 2 to 4 minutes depending on the thickness of the fillets.

Chef’s Tip: Be careful not to overcook. You can gauge the finish of the fillets be being able to flake them with a fork.

When done, remove the skin by gently peeling away with a fork or just serve skin side down. For a nice finishing touch, brush with a bit more, high-quality EVOO, season with freshly ground salt and pepper to taste. Feel free to garnish with fresh dill, fennel edible flowers or lemon. Hope you enjoyed Chef Calle’s recipe Charwood Grilled Salmon Fillets for a Hint of Smoky Flavor!

Bon Appetit

final plating with all the decorations!

Purchase products:

Charwood

Wood Chips- Grande Sapore®

More Related reading on "What Wood for Smoking" and other great smoking and grilling tips and techniques

More Related reading on “What Wood for Smoking” and other great smoking and grilling tips and techniques

Related reading:

-Charcoal Grilled Asparagus using Charwood

-WHY CHAR-WOOD IS THE BETTER OPTION OVER CHARCOAL

-THE ULTIMATE WOOD-FIRED CLAMS CASINO

-SNAPPER GETS WRAPPED IN CORN HUSK & COAL FIRED


Awesome technique by Chef Calle- so you can do-Charwood Grilled Salmon Fillets for a Hint of Smoky Flavoror your finesse technique for Grilling & Smoking Shallots on the charcoal grill

Awesome technique by Chef Calle- so you can do-Charwood Grilled Salmon Fillets for a Hint of Smoky Flavor

TOP 10 TIPS FOR GRILLING SAFETY

Listen to the audio of this blog

We all love the time of year when we can abandon the indoor kitchen and head out to the grill for open air breathing, relaxing, and some great food. For those of you who are new to outdoor grilling or who may need a refresher, we are giving you our top TIPS FOR GRILLING SAFETY so there’s no chance your summer grilling season is remembered for another reason.

Tip #1

You probably wondered why about 15 years ago, outdoor kitchens became all the rage. The real purpose in having an area designated for outdoor cooking took hold when people realized these structures were highly durable and allowed for measures to be in place to ensure rogue hot coals from charcoal fires or excessive heat from gas grills didn’t ignite the surrounding structures like the house and garage. If you can’t afford a full outdoor kitchen layout, at least follow some of the basic ideas: set the cooking area a distance away from any building and preferably on a fire-proof surface like concrete, that is safely away from trees and grass.

Tip #2

Keep your grill clean. Whether it’s propane, natural gas, electric or charcoal, all grills need periodic cleaning to keep them performing optimally as well as to prevent those surprise grease fires. Any grill can have a grease fire! Clean the drip pan, grease pan, lid, walls and grilling grates. In addition to the safety need, this will give you the longest life out of the grills parts. If you grill a lot in a single season, then clean the equipment more than just at the start and end of the season.

Tip #3

Don’t use lighter fluid. This is a chemical designed to give quick life to briquets, charcoal, and wood. Don’t use it! It adds a prominent chemical taste to your foods and can result in a fire that goes wild. Learn what a chimney starter is, buy one, and use it. It is the safest and easiest method of lighting a fire for a charcoal/wood grill.

Tip #4

Take note of the clothing you choose to wear when you know you’re going to be in control of the grill. No dangling sleeves, strings, or flammable materials should be near the grill. Aprons are a great way to keep clean as well as to keep flowing clothing under control. Just be sure the ties to said apron don’t become a fire starter.

Tip #5

Outdoor cooking is an adult activity. Don’t assign a youngster to watch the grill. Grease fires account for most of the damaging fires resulting from grilling. Plus, it is so easy for youngsters to receive burns from brushing or directly touching the hot grill surfaces. Animals, too, should be kept away.

Tip #6

Always prepare for catastrophic events! That means keep a fire extinguisher handy, sand, or baking soda at the ready. Never attempt to put out a grease fire with water. Remember, when using a fire extinguisher, spray ahead of the fire and then move toward it.

Tip #7

Understand how your grill works. With multi-fuel options in one piece of equipment, you need to know how to close vents, valves to gas, and output drafts. Firing up the grill and having something uncontrollable occur is not the time to learn what those knobs, slides, and dials are for.

Tip #8

If nuts, bolts, or screws loosen up, take the time to secure them back in place, especially if they are on lids, wheels, or fuel areas. Grills need to be sturdy to withstand the constant opening and closing of the lid. Protect the surface the grill is on by investing in a grill mat that is fire retardant. Not only can it prevent the start of a fire, but it will protect your deck or patio material from needing replacement.

Tip #9

When lighting a gas grill, be sure to keep the lid open. Lighting when the lid is down can result in the gas pooling and exploding. This will result in the lid becoming a weapon of its own when it is blown off the grill!

Tip #10

Never move a grill indoors including to a garage! I know. Space is always an issue when you entertain and a grill can take a lot of that valuable space. But there is no way around the fact that these pieces of equipment require outdoor air to prevent accumulation of volatile gases that can make you and everyone around ill or worse. Plus, these units radiate a lot of heat and that heat can spread quickly to other surfaces like the garage door, walls, siding, canopies, lawn chairs – you name it. Always maintain a 3- foot barrier around the grill including above it to ensure no issues.

Have you experienced a disaster while grilling? Tell us what safety tip you wish you had known about before disaster struck. Get tips, techniques, recipes, and the science behind the flame and fire to improve your skills with wood-fired cooking! Follow our TIPS FOR GRILLING SAFETY for a wonderful safe grilling season!

Purchase products:

Wood Chunks- Double & Single Filet

Wood Chips- Grande Sapore®, Minuto®, Piccolo®

More Related reading on this subject

More Related reading on this subject

Additional reading:

-6 TIPS FOR A HEALTHY OUTDOOR COOKING SEASON

-WHY WON’T MY WOOD CHIPS SMOKE??

-WHAT WOOD TO USE FOR SMOKING: A PRIMER

-HOW MUCH WOOD TO ADD WHEN SMOKING


The top Ten TIPS FOR GRILLING SAFETY we hope will make your grilling season safe and tasteful!

The top Ten TIPS FOR GRILLING SAFETY we hope will make your grilling season safe and tasteful!