Sun 8 Nov 2020
OPEN PIT COOKING- FIRE BUILDING
Posted by DrSmokeRead other related stories: Cooking , Cooking With Wood , General Smoking Information , Smoking Tips
No Comments
Build an open pit cooking fire for grilling and ember cooking! Is easier than you may think follow our steps below!
OPEN PIT COOKING- BUILDING THE PERFECT FIRE
SmokinLicious® receives a lot of questions about wood-fired cooking and one of the most repetitive concerns the building of the fire for cooking. We’ve developed this series to address how to build the fire by equipment and technique. For Part I, we cover the open pit cooking fire.
Get Organized- Open Pit Cooking
The first step is to know where you will build the fire. Are you planning on using an outdoor fireplace, a fire pit, or will you construct a temporary fire location?
When using an existing fireplace located outdoors, you must ensure that the firebox is clean of previous ash and wood. The same is true for a open pit cooking fire pit. If you will set up a temporary location for the fire, consider what you will use for materials to secure the area. It is never recommended to use your patio, paved driveway or lawn because a hot fire is sure to damage them or, at the very least, mar their appearance (thin charcoal black coating the surface). Using large stones, interlocking bricks, or a metal fire ring work great at securing the area to contain your fire.
Once you’ve decided on the location, you’ll need to collect some supplies to make the cooking safe and fun.
▪ material to contain the fire like stones, bricks or a cast iron/wrought iron ring. You can use an outdoor fireplace or open pit cooking fire pit whether permanent or portable
▪ water, shovel, dirt, and/or fire extinguisher to deal with potential fire spread or wayward embers
▪Smokinlicious® smoking wood chips for quick lighting
▪ 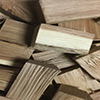 small twigs or small pieces of hardwood to create a tepee around the wood chips (we like our Smokinlicious® smoking double or single filet chunks)
▪ larger hardwood pieces to create a 2nd tepee around the first (Smokinlicious®1/4 cut logs work great for that)
▪ rolled newspaper or fire starters
▪ have additional hardwood for producing more coals for cooking as needed
▪ a coal rake, fireplace tongs for moving and relocating wood pieces, spray bottle of water to tame flames near food, instant read thermometer (you can also use a traditional wrought-iron log holder to make the fire – the hot coals will fall through and then you rake them to the cooking side)
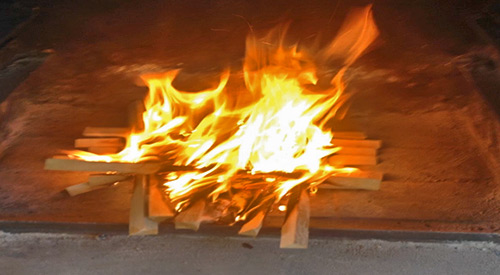
The Perfect Fire for Open Pit Cooking
Always take note of the day’s temperature, wind conditions/direction, and conditions of your wood (dry or wet, fresh cut or aged) before you start. You want to be sure you set up and start the fire where the wind direction won’t cause smoke to enter house windows or the dining area. Keep those locations upwind.
 In your fire safe area, pile up a few handfuls of hardwood chips (you can use newspaper but I like to try to stay with wood in its natural state). Make a small tepee around the wood chips using small wood pieces (our single filet wood chunks work great) or twigs. Make a second tepee of larger wood pieces around the first one. You’ll see that you’re graduating from small wood pieces to larger as you build but you’re also ensuring good oxygen pockets to help feed the fire to the next level. This is what ensures even combustion and even coals. Now, light the wood chips at the center and allow everything to ignite. Don’t add any additional wood until you see the outside wood ablaze.
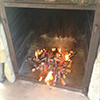
Fire for Fuel, Coals for Open Pit Cooking
The purpose of your shovel other than as protector of wayward fire, is to take those hot coals and move them to the cooking area. Remember, the fire area is not where you are going to cook. That location is nearby but not with the flames. You should never cook over direct flame as it will overcarbonize the foods and result in bitter tastes.
Ideally, you want to cook over coals that have a white colored ash over them. Now, here’s how to determine temperature of those coals: hold your hand over the coals the distance your foods will be. If you can only hold your hand for a count of 2 seconds before you need to pull it away, that is high heat. 3-4 seconds is medium-high, 5-6 seconds is medium and 7-8 seconds is low heat.
Bring on the Food!
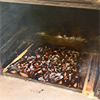 Once your coals are at the perfect temperature for the foods you want to cook, it’s all about cooking! Remember, you can set up different heat areas to cook different foods. That’s what makes the experience with wood cooking, specifically with coals, so exhilarating.
We hope this article was full information you didn’t know. Leave us a comment and subscribe so you don’t miss anything concerning wood fired cooking, flavors, and the science behind the fire.

More Related reading on “What Wood for Smoking” and other great smoking and grilling tips and techniques
Interested in reading more? Try:
-Top 10 Vegetables to Cook in Hot Embers
-THE TOP 8 MISTAKES TO AVOID WHEN COOKING & GRILLING WITH WOOD
Purchase products:
Wood Chunks- Double and Single Filet
Wood Chips- Grande Sapore®
Smoker Logs

Dr Smoke- “Spending time on fire preparation for open pit cooking will enhance your cooking results.”